Advertise on fullfatrr.com »

Home > Maintenance & Mods (L322) > 2002-2005 M62 PCV Valve - then it went a bit wrong!
Post Reply  Down to end
Page 1 of 4 1234>
Print this entire topic · 
Saint.v8


Member Since: 13 Jun 2012
Location: UK< Surrey - Near the Middle Close to Some Green Bits
Posts: 94

United Kingdom 2003 Range Rover Vogue 4.4 V8 Adriatic Blue
2002-2005 M62 PCV Valve - then it went a bit wrong!

As the title suggests, I was using Deasy's great guide to replacing the PCV Valve and Oil Seperator when things went a little Pete Tong....

So building on Deasy's thread, lets start at the beginning....

Lower the vehicle to Access Height to make working towards the back of the engine a lot easier and set the bonnet into 'service' mode...

Click image to enlarge


Remove the Acoustic Engine over....

Click image to enlarge


Remove the weather seal strip from along the front of the Pollen Filter housing and Battery and Brake areas....

Click image to enlarge


Disconnect the battery negative lead (waiting for the Sat Nav system to go off first obviously)

Then disconnect the Battery Jump Post Positive Lead....

Click image to enlarge


Undo the two 13mm nuts that holds the Pollen FIlter Housing in place then pull towards the front of the car.....

Click image to enlarge


You can now get much better access to the rear of the engine...

Click image to enlarge


Time to setup your working space, I use my old shooting mat (I have a new one Very Happy) to work on, so I draped it over the front slam panel, intake and E-Box. I then used a small set of steps to get up and into the engine bay.

It is quite surprising how comfortable it is up there and I mostly sat on the Slam Panel and E-Box, also kneeling on the front of the rocker covers is comfortable....I weigh in at over 20 stone and 6'3" tall and it took my size and weight with no issues...just be mindful of the components below, but I found it a comfortable place to work....

Click image to enlarge


Undo the 10mm nut holding the Electrical Splice in place...note I snapped the bracket, it doesn't just lift up and off, but wiggles off!!

Click image to enlarge


You can now get to and see the PCV Valve in place...

Click image to enlarge


Undo the breather tubes to the Cyclonic Oil Seperator...

Click image to enlarge


Undo the 10mm bolt holding the Oil Seperator in place, then I used a long flat screwdriver to hold the small pipe at the bottom of the seperator in place while I pulled the unit from the pipe...Note: this pipe at the bottom can be a real PITA to get back on at the other end, so be mindfull to carefully remove the seperator from it and not remove the pipe from the other end....

Click image to enlarge


Click image to enlarge


Now remove the various pipe clips from the pipes leading to the PCV valve unit...

Click image to enlarge


On removing one of the Breather hose from the top of the rocker cover, I noticed it had split....I wonder if this is where my very minor Oil leak has been coming from??

Click image to enlarge


Click image to enlarge


The two top bolts holding the PCV valve in place are 10mm and also hold the bracket that holds the Electrical Splice in place...

Click image to enlarge


Click image to enlarge


Using a T27 Torx bit, undo the PCV clamping bolts.....this is where the fun begins...!!

3 of the remaing 5 Torx bolts are simple to get to, 2 of them are a SOD...a real Censored ...one the 3 easy to get to had been done up so fecking tight and had been really badly chewed up that I snapped a T27 bit, wrecked my spring drive and almost had me totaly give up on it....90 minutes to get one bolt out....in the end using a set of mole grips I managed to get it undone....

Click image to enlarge


Click image to enlarge


With them undone, now it is time to remove the PCV valve....the fun continues....

Mounted on the bottom of the valve is a small pipe - it is mentioned by Storey Wilson in his video tutorial, and various other posts I have read about the process to replace the PCV....so I was VERY aware to be careful of it, the same goes for the Vent pipe between the PCV and the Front of the intake manifold....

So being very cautious I pulled the PCV valve from the rear of the manifold, no sooner had I moved it back 3mm so I could get a screwdriver in the gap to hold the Vent Pipe in place, the small pipe snapped...oh Censored ....

I would have assumed there was play in the small pipe to allow you to get it on and off, but there was none, not a single mm of play...how they put it on there in the first place I have no idea....

I reached around under the manifold feeling for the other end of the pipe and gave it a small tug. Nope not a single mm of play at all, so I then looked down the back and the other end of this small pipe goes down below the Oil Seperator, so I carefully pulled the pipe back out from under the manifold to see the damage. The plastic had become so brittle on the PCV valve that as soon as I tried to pull the remains of the spigot out of it, it crumbed, so I ended up cutting an inch off the pipe...it is now even shorter than it was.

I rerouted the pipe to allow for more play if I need to replace the PCV again the future and also because i had made it an inch shorter it was never going to fit back where it was originally.

Click image to enlarge


Click image to enlarge


Click image to enlarge


Click image to enlarge


Had to have a coffee after that...

OK, Time to fit the new PCV Valve....

In order to make life a bit easier, on remvoing the old Valve I left one of the breathers attached as it was difficult to get to the Jubilee Clip in place, so I fitted the new Breather Pipe tothe PCV before fitment...

Click image to enlarge


Got back on top of the engine to replace the valve, lined it up and pushed it into place....now thats when it all went Pete Tong...it seemed to not 'fit' well it kinda did but didn't, so I pushed it on a little futher and all I heard was the sound of something falling into a hollow metal dish....oh feck...

I removed the PCV and moved it to one side, and the vent pipe fell out the back of the manifold.

On retrieval, I had snapped the end off...OH FECK....

On closer look what I had done was when I remvoed the old PCV, the little rubber seal on the centre spigot of the diaphram was still attached to the Vent Pipe - I hadn't noticed, so when I pushed the new PCV into placeit was trying to fit the new rubber seal into the Vent Pipe which already had a rubber seal in it...and with me pushing I had snapped the pipe....

Click image to enlarge


Click image to enlarge


It was time for another coffee....

I had to find the other end that had snapped off inside the intake manifold...

This meant taking the Fly-by-wire throttle butterfly off the front...

Click image to enlarge


Remvoe the Intake Ducting...

Click image to enlarge


Disconnect the Throttle wiring, the Water Temp Sender, SAI Connection and another which I have no idea what it does Very HappyVery Happy

Click image to enlarge


Undo the 4 10mm bolts holding the butterfly valve body in place and remove....

Click image to enlarge


Click image to enlarge


Fishing around inside the manifold (luckily it was at the front as I have large hands - otherside, the girlfriend would have to reach in and see what she could find) I found the end I had snapped off....

Click image to enlarge


That was the end of day one (Saturday) as I would have to bond these two pieces back together as no one would be able to supply this off the shelf on a Sunday, and I couldn't wait for 3-4 days delivery from an internet supplier or wait for a LR/BMW dealer to order into stock for me.....

Saturday evening I used Unibond 2-part Epoxy resin deisnged for Plastic....reportedly a permenant repair, High Temperature resistant and super strong up to 30kg/cm2 after fully curing for 24hours....

Held together for the required 15 minutes, left it overnight to cure and now we crack on to Sunday morning....

Click image to enlarge


Feeding the pipe in through the rear of the manifold, patience is needed to locate the front of the pipe into the hole in the front of the manifold and also line it up at the rear....

Click image to enlarge


Click image to enlarge


On replacing the new PCV I decided to use new M6x25 (10mm hex) bolts as they are easier to get to with a socket/spanner than the T27's

Click image to enlarge


And ensured the pipe was located correctly before I replaced the Throttle Butterfly...

Click image to enlarge


Replaced the breathers and Oil Seperator into place and all the pipe connections to the PCV Valve....

Click image to enlarge


Replaced the Throttle Butterfly and reconected the wiring connections....

Click image to enlarge


Replaced Intake Ducting...

Click image to enlarge


Replace Pollen Filter Housing, Weather Seal and the Engine Acousitic Voer - remember to reattach the Battery Positive Jump Lead....

Click image to enlarge


Click image to enlarge


On starting the car....she spluttered into life, then died...restarted and she ran fine....need to take her out for a spin later, so we are off to see the inlaws this evening so should be a good test.

So what have I learned:

The PO or his/her mechanic was a numpty and rounded off one of the PCV Bolts....
The Little Pipe on the bottom of the PCV is a PITA
The Plastic the PCV is made from is brttle when it gets old
The Plastic Vent Pipe is easily broken
The slam panel and E-Box/Intake Filter is quite comfortable to sit on when using a mat Very HappyVery Happy

I usually don't like repairs/maintenance spreading over two days of the weekend (unless planned that way) as it leaves little wiggle room if things go a bit wrong, but hopefully the repair will hold.

Just to note the Vent Pipe is ony Ł25-26 so not expensive, but is not a usually stocked item so if you can't repair, you'll have to wait for delivery....

Now where's my coffee! 

Post #204653 18th Aug 2013 2:46pm
View user's profile Send private message View poster's gallery Reply with quote
Joe90


Member Since: 29 Apr 2010
Location: Hampshire
Posts: 6399

England 

Excellent stuff Saint Thumbs Up .
Experience is the only genuine knowledge, but as time passes, I have forgotten more than I can remember Wink
Volvo V70 P2 2006 2.4 Petrol 170bhp Estate SE
MG Midget Mk1 1962

Previous: L322 Range Rover TDV8 3.6 2008; L322 Range Rover TD6 3.0 2002; P38A Range Rover V8 1999

Post #204711 18th Aug 2013 10:21pm
View user's profile Send private message View poster's gallery Reply with quote
Danwilderspin


Member Since: 15 Jun 2016
Location: Cambridgeshire
Posts: 2180

United Kingdom 2007 Range Rover Vogue SE 4.2 SC V8 Zermatt Silver


Would this achieve the same for a lot less effort? Current stable:
2006 BMW M6
2007 4.2 V8 S/C FF
Gone:
2002 4.4 V8 FF

Post #459009 30th Nov 2017 10:27am
View user's profile Send private message View poster's gallery Reply with quote
ohuntsman


Member Since: 21 Mar 2016
Location: Surrey
Posts: 337

United Kingdom 2002 Range Rover Vogue 4.4 V8 Zambezi Silver

If you have PCV problems/worries it is definitely worth a try - although I profess to be no authority on if it will work or not!

Post #459053 30th Nov 2017 5:33pm
View user's profile Send private message View poster's gallery Reply with quote
holidaychicken


Member Since: 06 Nov 2013
Location: Kent
Posts: 1086

United Kingdom 2004 Range Rover Vogue 4.4 V8 Java Black

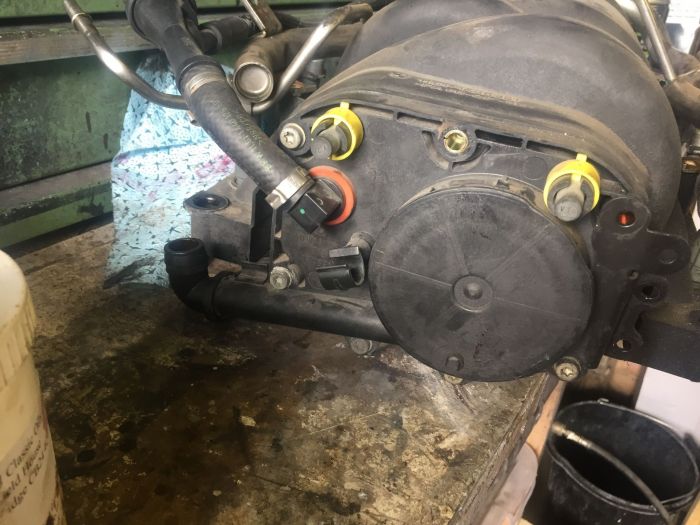
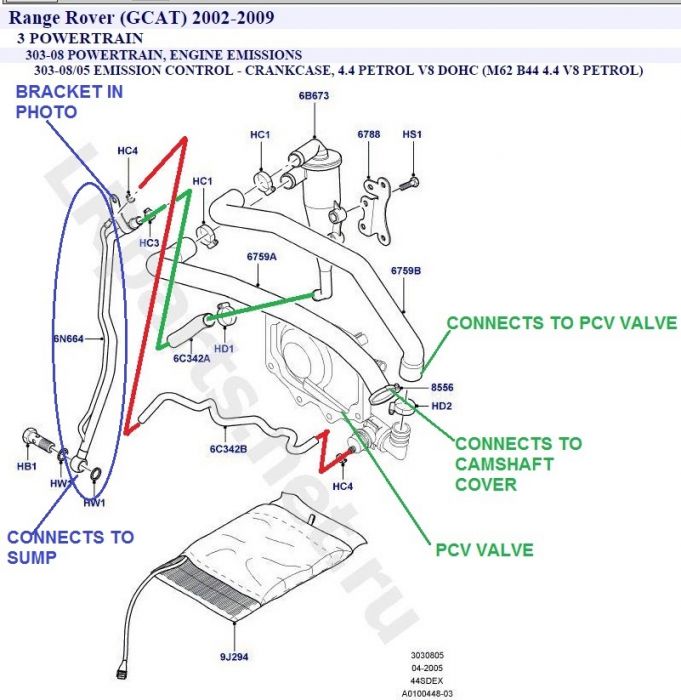
My pcv valve wasn't like that but i did try and take it apart after i changed mine when i had the inlet manifold off and the only way i could get that bit apart was with a hacksaw.
you could always try testing it and i changed all the pipework on mine when i had the transmission out but didn't do the pcv valve until i had the inlet manifold off. i did consider it a few times on it's own but even following saint's top class 'how to' it still felt like laying naked face down on a bed of bread knives so i aborted each time.


Click image to enlarge


Click image to enlarge


Click image to enlarge


it's kind easy when it is on the bench Smile


Post #459134 1st Dec 2017 2:02am
View user's profile Send private message View poster's gallery Reply with quote
Danwilderspin


Member Since: 15 Jun 2016
Location: Cambridgeshire
Posts: 2180

United Kingdom 2007 Range Rover Vogue SE 4.2 SC V8 Zermatt Silver

ok - just a point these - is it just the diaphragm that packs up? if it is I may have a go with that more simple method first - or is there more tat goes wrong with them? with the hvac out and access mode in place can you access it ok?

Also I was thinking of cleaning the pipe that goes from it to the sump with a massive pipe cleaner would that work as mine is gunky... Current stable:
2006 BMW M6
2007 4.2 V8 S/C FF
Gone:
2002 4.4 V8 FF

Post #465688 23rd Jan 2018 12:48pm
View user's profile Send private message View poster's gallery Reply with quote
Sandyt


Member Since: 07 Nov 2013
Location: Wraysbury Windsor
Posts: 2213

United Kingdom 2007 Range Rover Supercharged 4.2 SC V8 Buckingham Blue

Good to see you here Saint read many posts on Landyzone Thumbs Up Thumbs Up

Post #465723 23rd Jan 2018 7:04pm
View user's profile Send private message View poster's gallery Reply with quote
holidaychicken


Member Since: 06 Nov 2013
Location: Kent
Posts: 1086

United Kingdom 2004 Range Rover Vogue 4.4 V8 Java Black

You can see if you can just change the diaphragm but I couldn't separate that part without a hacksaw, the pipes normally turn to mush and the ridiculous tiny little pipe that feeds under the intake manifold will most likely break if you even look at it funny and is a bit of a pig to reconnect.

I tried doing mine in situ and gave up as it was too awkward but the large mat that Saint used probably helped a lot.
If you are going to try and clean the pipes you will need to remove them or you will poke all the crap into your sump or into the cyclone.

Saint is the king of fiddly horrible jobs like these whereas i prefer big lumps like the gearbox and vanos to mess around with.

If your pipes feel all squishy my advice to you would be replace all the pipes, clean out the cyclone or replace that and prepare yourself for a pain in the butt job but if you take your time and follow Saints how to then you should be fine. See if you can remove the bolts first before attempting anything else.

Post #465888 24th Jan 2018 6:55pm
View user's profile Send private message View poster's gallery Reply with quote
Danwilderspin


Member Since: 15 Jun 2016
Location: Cambridgeshire
Posts: 2180

United Kingdom 2007 Range Rover Vogue SE 4.2 SC V8 Zermatt Silver

ok great - if I remove the cyclone only to begin with will that give an idea of the state of the rest? I don't even know that I have a problem its just I had both rocker cover gaskets fail and some say it can be due to this... Current stable:
2006 BMW M6
2007 4.2 V8 S/C FF
Gone:
2002 4.4 V8 FF

Post #465995 25th Jan 2018 4:19pm
View user's profile Send private message View poster's gallery Reply with quote
holidaychicken


Member Since: 06 Nov 2013
Location: Kent
Posts: 1086

United Kingdom 2004 Range Rover Vogue 4.4 V8 Java Black

Its easy enough to feel the pipes that run from the cyclone and to the top of the cam cover and pcv. If they feel like a durex half full of semolina then they need to be replaced.
The cam covers fail mainly because the rubber seals turn to hard plastic and crack or fall apart but can also be assisted by the PCV system failing and pressurising the system. If you remove your dipstick and put a piece of latex glove or cling film over it you should get a slight amount of vacuum.

Post #466035 25th Jan 2018 9:22pm
View user's profile Send private message View poster's gallery Reply with quote
Danwilderspin


Member Since: 15 Jun 2016
Location: Cambridgeshire
Posts: 2180

United Kingdom 2007 Range Rover Vogue SE 4.2 SC V8 Zermatt Silver

Right mr chicken not sure if you saw my other post but today was very s**t potentially had a cable tie go into the engine praying a) it didn’t b) if it did it’s smashed to tiny pieces!

Also found the corner of the gasket had popped out and i won’t be able to sort for a week not leaking though Sad

Anyway keeping in line with the thread - the hose that goes from cyclone to rocker cover I felt it and it was so thin I think I made it split or it was already split. The other cyclone hose was also split... what problems would I be getting from this? Are they the hoses you meant to check or are there more? Current stable:
2006 BMW M6
2007 4.2 V8 S/C FF
Gone:
2002 4.4 V8 FF

Post #466288 28th Jan 2018 12:26am
View user's profile Send private message View poster's gallery Reply with quote
holidaychicken


Member Since: 06 Nov 2013
Location: Kent
Posts: 1086

United Kingdom 2004 Range Rover Vogue 4.4 V8 Java Black

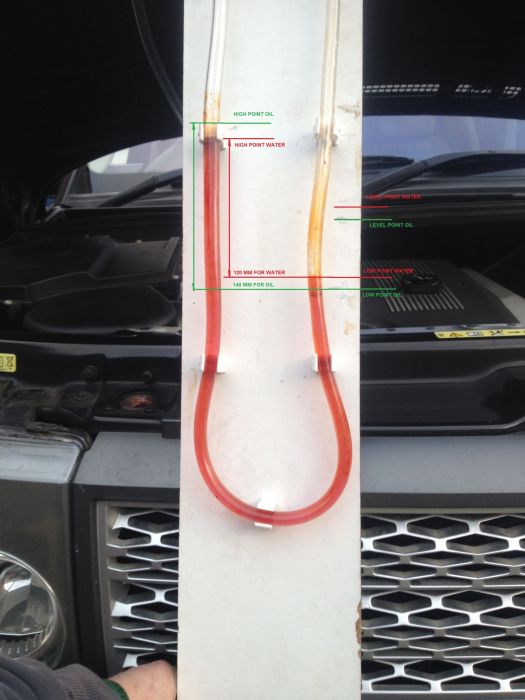
This is from above showing some of the symptoms of a faulty PCV, i have heard of an engine fail caused by pcv but cant remember the explanation but mainly you are potentially getting running issues and oil leaking.


Click image to enlarge


Click image to enlarge


pipework shown below.

Click image to enlarge


Not sure how correct these part numbers are, i think i put them together quickly back in 2014

Click image to enlarge


check microcat site for the part numbers to be safe

http://new.lrcat.com/

http://lrparts.ru/engl/

Post #466291 28th Jan 2018 1:15am
View user's profile Send private message View poster's gallery Reply with quote
Danwilderspin


Member Since: 15 Jun 2016
Location: Cambridgeshire
Posts: 2180

United Kingdom 2007 Range Rover Vogue SE 4.2 SC V8 Zermatt Silver

Sorry talking over two threads lol I will ask something different from this does the drain hose from the cyclone to the sump go bad too? Current stable:
2006 BMW M6
2007 4.2 V8 S/C FF
Gone:
2002 4.4 V8 FF

Post #466331 28th Jan 2018 12:13pm
View user's profile Send private message View poster's gallery Reply with quote
holidaychicken


Member Since: 06 Nov 2013
Location: Kent
Posts: 1086

United Kingdom 2004 Range Rover Vogue 4.4 V8 Java Black

you are indeed, keep this one to your pcv woes, that the two drain pipes normally just get blocked, change the other 3 along with valve and clean / replace cyclone

Post #466344 28th Jan 2018 2:56pm
View user's profile Send private message View poster's gallery Reply with quote
Danwilderspin


Member Since: 15 Jun 2016
Location: Cambridgeshire
Posts: 2180

United Kingdom 2007 Range Rover Vogue SE 4.2 SC V8 Zermatt Silver

Hi holiday chicken - I have (I think) managed to rope my mate into this a little put off currently after rocker cover gate. He is a Bmw mechanic so has done it loads of times bit was going to ask if you know if the parts are the same lr/Bmw ? I imagine they all are but wasn’t sure if the sump drain would be? I have messsged Dan but he’s been rather quiet so was going to get a price from Bmw that’s all...

Thanks Current stable:
2006 BMW M6
2007 4.2 V8 S/C FF
Gone:
2002 4.4 V8 FF

Post #466525 29th Jan 2018 10:05pm
View user's profile Send private message View poster's gallery Reply with quote
Post Reply  Back to top
Page 1 of 4 1234>
All times are GMT + 1 Hour

Jump to  
Previous Topic | Next Topic >
Posting Rules
You cannot post new topics in this forum
You cannot reply to topics in this forum
You cannot edit your posts in this forum
You cannot delete your posts in this forum
You cannot vote in polls in this forum


Site Copyright © 2006-2024 Futuranet Ltd & Martin Lewis
fullfatrr.com RSS Feed - All Forums


Switch to Mobile site