Advertise on fullfatrr.com »

Home > Maintenance & Mods (L322) > Fitting deployable side steps
Post Reply  Down to end
Page 1 of 1
Print this entire topic · 
Eirik34


Member Since: 16 Dec 2014
Location: Norway
Posts: 420

Norway 2007 Range Rover Vogue SE TDV8 Stornoway Grey
Fitting deployable side steps

Today the BIG package with the deployable side steps from FamousFour arrived Very Happy

I've now briefly looked at the LR fitting instructions provided. And then I thought (being a newbe in this...): since I'll be fitting this to a LH wheeled FFRR (MY 07) and not a RH wheeled (UK) car as described in the instruction diagrams, is there anything I should be aware of when pullling cables etc to the opposite side compared with the descriptions in the fitting instructions? Anything that should NOT be mirrored when mounting this? Confused

Post #340880 5th Aug 2015 5:28pm
View user's profile Send private message View poster's gallery Reply with quote
Eirik34


Member Since: 16 Dec 2014
Location: Norway
Posts: 420

Norway 2007 Range Rover Vogue SE TDV8 Stornoway Grey

Ok, I think that I just have to try to take this step by step - hopefully everything will fit in the end Smile

Post #340936 5th Aug 2015 11:19pm
View user's profile Send private message View poster's gallery Reply with quote
Cam-Tech-Craig


Member Since: 04 Aug 2011
Location: Gloucestershire
Posts: 16170

England 2015 Range Rover SVAutobiography SDV8 Loire Blue

The issue you have sir is the steering wheel is on the wrong side Whistle

All joking aside, i guess members that have fitted their own on a LHD are few and far between sir Whistle Bow down

Post #341091 7th Aug 2015 12:26am
View user's profile Send private message View poster's gallery Reply with quote
Eirik34


Member Since: 16 Dec 2014
Location: Norway
Posts: 420

Norway 2007 Range Rover Vogue SE TDV8 Stornoway Grey

Now the deployable steps are fitted - and working perfectly Very Happy

I have to admit that the fitting task was a bit more difficult than I had imagined. I used 10 hours all-in-all to fit the steps - I could have saved 4-5 hours if I hadn't got into trouble under way...

I had to mirror the instructions to fit our LH wheeled car, and it turned out that the LR deployable step kit had two issues for a LH wheeled MY07 ffrr:

1) The earth connector was too short - it seems that the earth grounding to use for this is at the RH footwell for both RH and LH wheeled cars... It was easy to extend the earth wire and then connect it to the correct grounding bolt, however.
2) The place to fit the Step controller box behind the driver footwell panel was not identical to the description in the instructions - there should have been a flat surface to place the controller to with the supplied velcro strips, but the backside of the drivers footwell panel had a switch (left/right arrow) at that place... I solved this by fastening the step "controller box" at the bottom of the footwell panel, just above the footwell ventilation outlet, with two strips

What caused the most trouble was the removal of all the facies, panels, glove box etc and the corresponding connectors. I also managed to misread the instructions wrt which of the through-hull openings to use, resulting in that I removed too much of the foot mat incl. the white plastic trim that is under the mat... At a point in time I thought that I had to remove the passenger seat to get it back in, but I managed to avvoid that...

There were one connector (seemed to be a coax/fiber connector) that I struggled quite a bit with in the very cramped condition under the fuse box at the passenger side, but I managed to remove it in the end. During the reassembly of the panels, I managed to break one of the plastic trim clips when monting the panels back on....

Fitting the steps under the car was a bit more straight forward. It wasn't very easy to get the machine bolts to fit in the predrilled holes, but it worked in the end (first time doing such a task for me...). Doing this myself, I could lubricate the parts and make sure that the "through-hull" connector got really water tight.

My wife and the kids are really happy about the steps - much easier to get in and out Cool

Post #341487 9th Aug 2015 6:19pm
View user's profile Send private message View poster's gallery Reply with quote
stan
Site Moderator


Member Since: 13 Jul 2010
Location: a moderate moderated moderator moderating moderately in moderation
Posts: 34916

United Kingdom 

nice one Thumbs Up ... - .- -.


click link for ,

FORUM WIKI

HOW TO Ǝꓕ∀ꓕOꓤ PICS

workshop manual downloads are in our wiki

.

Post #341490 9th Aug 2015 6:22pm
View user's profile Send private message View poster's gallery Reply with quote
PaulB


Member Since: 17 Jul 2011
Location: Hampton
Posts: 877

2017 Range Rover Autobiography SDV8 Loire Blue

Well done Thumbs Up

Post #341493 9th Aug 2015 6:43pm
View user's profile Send private message View poster's gallery Reply with quote
Eirik34


Member Since: 16 Dec 2014
Location: Norway
Posts: 420

Norway 2007 Range Rover Vogue SE TDV8 Stornoway Grey

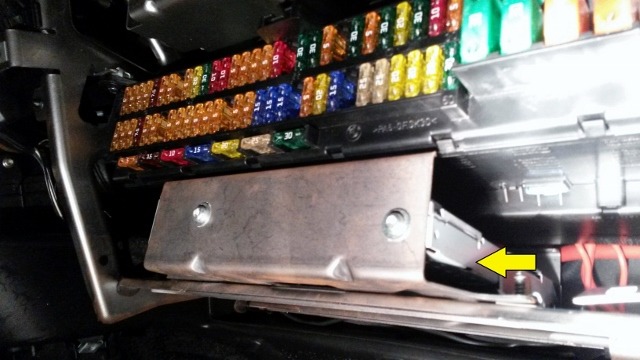
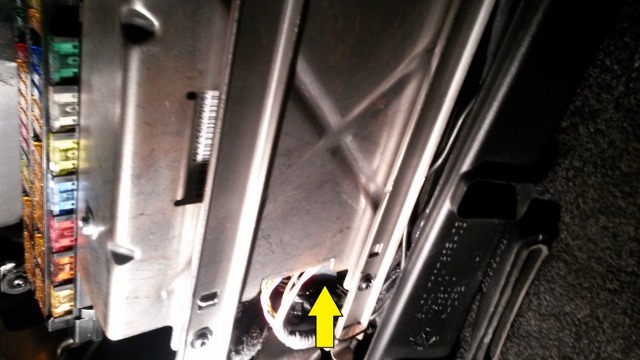
When reassembling the glowbox, I took these two pictures of the unit (ECU?) which I had difficulties to disconnect and reconnect the coax/fiber Connector.

The deployable steps are now connected to this unit - but which "brain" / ECU / BCU is this?


And this is how it looks from below:


Just in case the problematic coax/fiber connector makes trouble in the future....

Post #341549 9th Aug 2015 10:04pm
View user's profile Send private message View poster's gallery Post Reply
Post Reply  Back to top
Page 1 of 1
All times are GMT + 1 Hour

Jump to  
Previous Topic | Next Topic >
Posting Rules
You cannot post new topics in this forum
You cannot reply to topics in this forum
You cannot edit your posts in this forum
You cannot delete your posts in this forum
You cannot vote in polls in this forum


Site Copyright © 2006-2024 Futuranet Ltd & Martin Lewis
fullfatrr.com RSS Feed - All Forums


Switch to Mobile site