garyRR
Member Since: 13 Mar 2021
Location: Hampshire
Posts: 1356


|
| How to: 4.4 TDV8 Oil Change (Drain method) | |
Conscious the Wiki post isn't the best and has no pictures so, here's my 'how to' which also follows the workshop manual. I have to say that this has to be the easiest oil change I've ever done on a vehicle so, don't let the size of the car or engine put you off.
You will need:
- plastic gloves
- 36mm oil socket (best place to source is eBay)
- small torque wrench capable of 27Nm
- Rags and brake cleaner / degreaser
- 12L or larger drain container (a word of warning here - the jerrycan type won't work and will create a massive mess. The flow is too high and over too wide of an area when this drains. If you can fit a bucket underneath, just use a £2 bucket from Toolstation or Screwfix. If you can't and need a drain pain, Machine Mart sell a good 14L drain pan with spout for £14)
Time required:
Oil Change : 20 minutes
Reading level and topping up: 30-40 minutes
There's little difference in oil filter and filter parts but, I do like to use a recognised brand. A brand who provide a product catalogue to look up specific vehicle parts on their own website is always an indication of a good brand to choose I find.
Tip: Order all your service parts online because then it gives you a big cardboard box to place under the vehicle when you drop the oil, to catch any mess.
For the oil filter, I used a Mahle filter (product code OX 153/7D2) costing me £7.50. For the oil, there's very few manufacturers who sell the required oil in the UK. Basically, this leaves you with two premium brands: Shell or Valvoline and one budget brand: Miller's. The oil you require is 5W-30 Fully Synthetic in ACEA C1 specification (very important!). I purchased 2x 5L of Valvoline SynPower (product code 872592), costing me £64. Subsequent purchases I have opted for Petronas 5000 FJ (this complies with the 5005 JLR spec) from Opie Oils (costs £40-50 when on offer). This will give you some spare oil also. You'll struggle to get this oil from places like Euro Car Parts.
Step 1: Ideally, start the engine from cold and allow to run for 10-12 minutes, to warm up the oil
Be careful if the engine is already hot. Running the engine from cold for 10 minutes will warm the oil to bath temperature but, it won't burn you. Hot oil from a hot engine will.
Step 2: Raise the vehicle
Whilst the engine is warming up, raise the suspension to it's highest setting and if you live on a hill, use ramps to get the car level.
Place axle stands underneath the front sub frame and leave the driver's door open. This way, the axle stands stop the car dropping on you if the suspension were to suddenly drop or fail and, leaving the door open prevents the computer from dropping or levelling the suspension.
Step 3: Drain the oil
I actually prefer to do this step in a slightly different order to the workshop manual by draining the oil first then, loosening the oil filter housing and the oil filler cap, to hold some element of vacuum until the oil has largely drained so, it doesn't gush out like mad.
For this step, it's best to wear some eye protection.
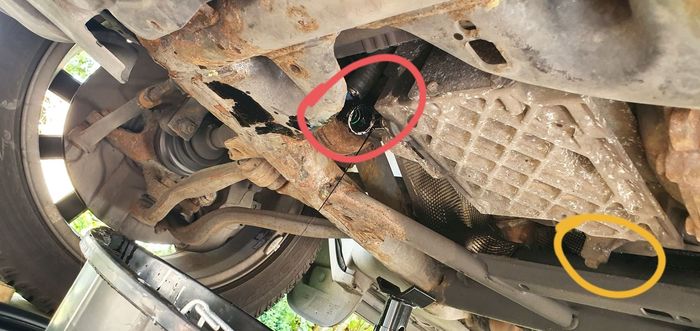
Position your drain pan underneath the sump, locate the large hose with a clip head to it. Press in both clips and give it a wiggle. It will suddenly pull off and the oil will begin quickly gushing out, with 90% of it within a few minutes.
The red circle shows the hose to release. If you would like, you can also remove the sump plug circled in yellow. This is the turbo oil return and you'll get a bit out of here too. I chose not to because the workshop manual doesn't tell you to and because it's only about 5cm clear of a sub frame rail, unless you have an appropriate shaped container, you'll get oil all over your sub frame.
This is the one time living on a slope comes in handy because I can put the vehicle nose first facing downhill, levelled by ramps and it gives me so much space underneath, I can fit a bucket instead of a drain pain, so I don't really get any mess or splashes whatsoever.
Step 4: Loosen the oil filter housing
This step is straightforward and by now, you've given the engine an opportunity to begin cooling. Undo the oil filler cap and put in a safe place.
 | | Click image to enlarge |
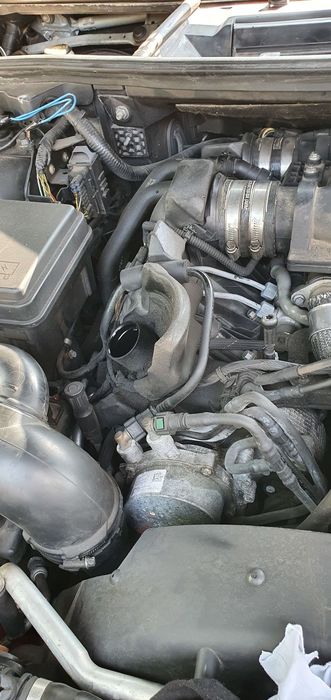
Clean around the oil filter housing with a rag as best you can so, any debris doesn't make it's way into the opening when you remove the filter.
Now put your 36mm socket on the oil filter housing and unscrew until you hear the air suddenly get sucked in. You'll then hear some additional oil dropping underneath.
 | | Click image to enlarge |
Step 5: Change the oil filter
Remove the oil filter from the housing simply by pulling it out and replace with the new filter. You'll feel a 'clonk' as it pushes into place. Be sure to ensure the plastic tube stays in place / re-fit it if it comes out.
 | | Click image to enlarge |
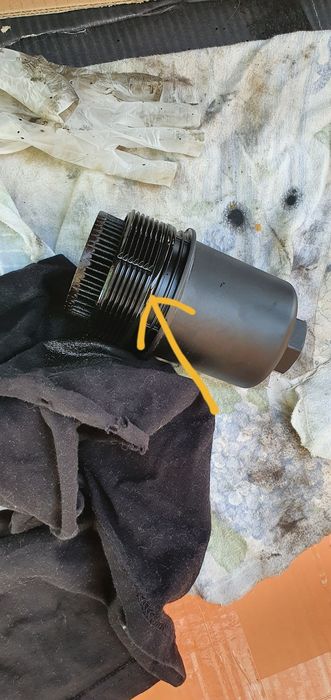
Replace the O ring on the filter housing marked with the arrow. Be sure to lubricate it with some oil.
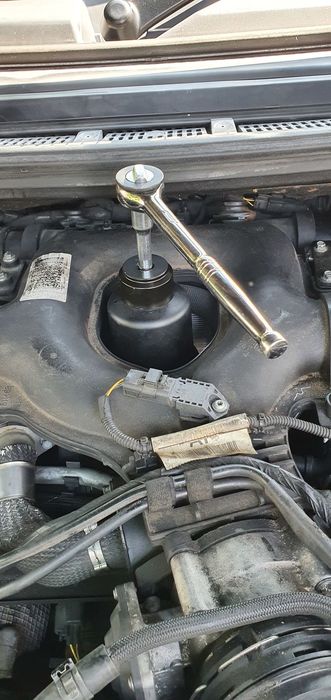
Step 6: Re-install the oil filter housing
Thread the filter housing on by hand as much as you can.
Now swap your ratchet for your Torque wrench. Set your torque wrench to 27Nm (many torque wrenches this size are 25Nm so, set to 25Nm if you need to then give the housing a further 1/16 of a turn) and torque until your wrench clicks.
Step 7. Put the sump hose back on
Clean the mating surfaces with a rag then re-install the hose. You'll hear a definite 'click' when it's secured in place.
Now, clean up any residue on the plug, bottom of the sump and sub frame with some brake cleaner or degreaser and a rag.
Step 8. Fill with oil
Exactly 9 litres came out of my engine and from the last service, the level meter kept teetering on the edge of full/slightly overfilled. The Owner's Manual says 9 litres to replace. I may have achieved another 0.5-1L if I'd drained the turbo oil return and raised the car slightly so the sump outlet was facing downhill.
Use a funnel with some rags around it to catch residue and fill with fresh oil.
I poured in 8 litres, knowing I'd be putting in slightly less than I took out. It's much easier to add than take away and 8 litres is enough to register on the oil level scale.
!Re-install the oil filler cap!
Step 9. Start the engine
Run the engine for 10 minutes then turn off, leave and allow the level to stabilise for 20 minutes (the workshop manual says 10 minutes but mine never gives me a reading after 10 minutes and it's more like 20).
Turn on the ignition and navigate to the service menu then 'Oil Level Display'. It will say "Not Available" if the level is still stabilising (this is what takes the time!)
I took this photo from online but, this is what the display should look like:
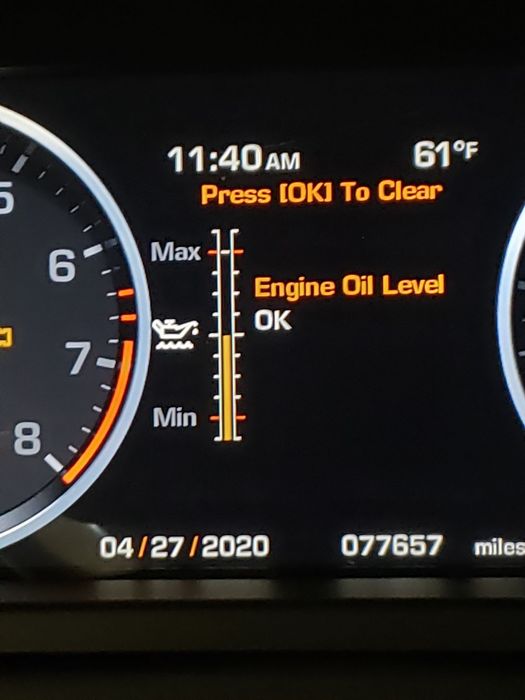 | | Click image to enlarge |
My oil level said the same kind of level with a message "Add 0.5l". You will likely get similar or, want to add more to get the oil level somewhere close to the maximum. Top up the oil as necessary.
Step 10. Check for leaks
Use a torch and check the sump hose area and the oil filter housing for leaks.
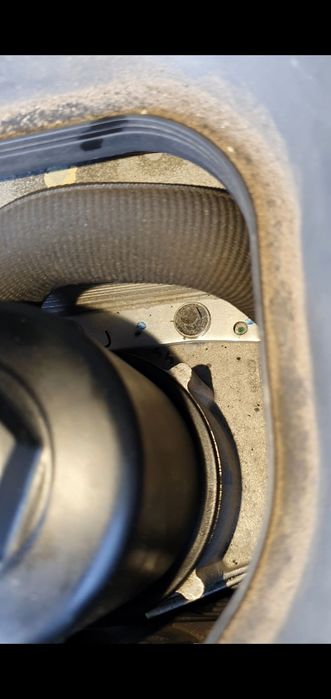 | | Click image to enlarge |
You can get a good view around the oil filter housing. In this case all was dry around the housing and the sump so, we were good to move on.
Step 11. Run the engine again
Run the engine for 10 minutes, allow to stabilise then re-check oil level. This time it should be spot on. Keep topping up a small amount at a time and following step 10 until you get there.
In the end, my engine took 8.5L to reach the final bar before maximum.
Step 12. Reset the service indicator
Use the IID tool to reset the service indicator: Car Config -> IPC Instrument Pack -> Service Reset.
If you don't have an IID tool: 1; open the bonnet, 2; turn the ignition on by pushing the start button with your foot off the brake, 3; push the brake pedal and accelerator pedal for 30 seconds, 4; let off the pedals and turn the ignition off. Close the bonnet
Dispose of the oil safely! It's good to have an empty 5L bottle somewhere from used coolant, de-ionised water or washer fluid, as you will have some spare oil left over in one of the bottles of oil you bought and therefore, need a spare container for the remaining used oil. 2015 Range Rover Autobiography 4.4 SDV8
Last edited by garyRR on 9th Jun 2022 6:24pm. Edited 2 times in total
|