|
Tools etc required :
- 10mm socket & short extension bars + ¼ inch drive & 3/8 inch drive ratchets,
- 8mm socket, 7mm socket for the above.
- 21mm open jaw spanner
- 22mm ring spanner (PAS HP output)
- 21mm ½ inch drive socket, short extension & 18 inch or longer breaker bar (normal socket wrench if you’re strong – lol)
- Hose clamp remover
- Viscous fan spanner (36mm)
- Posidrive / Phillips screwdriver
- Small adjustable mirror on long flexible handle.
- Torch / portable light
- 1 litre of PAS fluid (Land Rover STC 50515 or equivalent)
- 1 litre of OAT engine coolant
NB LHS , RHS etc refer to side of vehicle when looking from rear of vehicle towards the front.
Minor work underneath car : Raise vehicle to Extended ride height, remove front towing point cover, radiator splash shield retaining screws & shield.
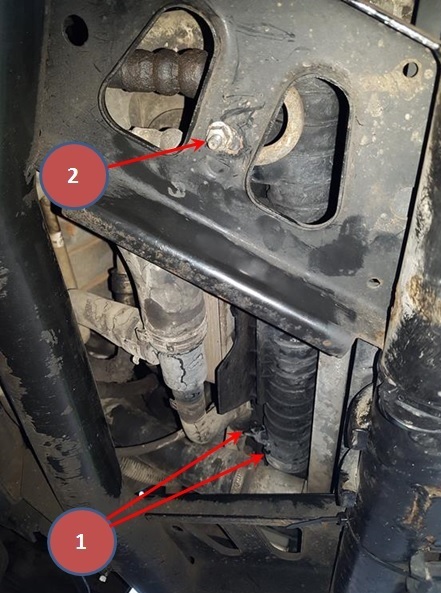
1) Attach drain pipe to radiator drain plug on LHS of rad bottom, drain a approx. 1 litre from cooling system (collect via adding pipe on drain point. Objective is to get coolant level just below top hoses).
2) Remove 10mm nut from HP steering pipe rubber mtg on RHS of front subframe (21mm open jaw on flats on rubber mtg above subframe ). Push stud head out of hole to allow more scope to move HP steering pipe later.
 | | Click image to enlarge |
3) Use ¼ inch drive 7mm socket to loosen LHS engine bank front air inlet duct flexible hose clamp from moulded plastic airbox “pipe”.
Lower vehicle to Access ride height for remainder of work in engine bay (Not needed if you’re tall – lol).
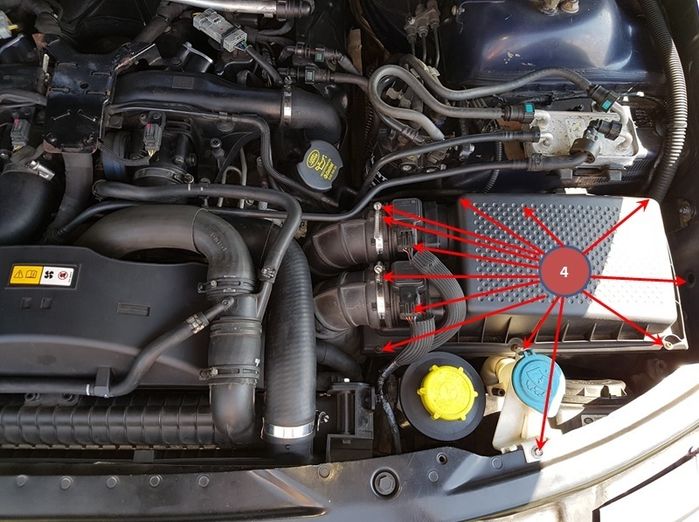
Remove air filter box : 4) Loosen & partially remove 6 cross head screws, disconnect MAF electrical plugs x 2, loosen MAF / Airbox outlet pipe clamps x 2 & remove small rubber pipe off suspension strut side of lower half of air box & remove air filter box top & air filter (rubber outlet pipes require pushing towards centre of car to free MAFs ). Remove MAF outlet pipe clamps from hoses to avoid damage & flex the pipes hard towards the centre of the car & lift the RHS of the lower half of the airbox up & out & remove the whole part from the spigots in rubber bungs in the inner wing (BEWARE : Don’t lose the large, loose rubber grommet between the air box & inner wing). Remove 8mm bolt retaining the windscreen washer bottle neck to the slam panel & carefully push the plastic mounting off the slam panel (avoids risk of breakage later)
Remove Viscous fan & fan top cover : 5) Loosen pipe clamps & remove RHS intercooler pipe from intercooler & plastic engine intake manifold.
Loosen RHS radiator end water pipe clamp & remove pipe from radiator. Free small cross radiator hose pipe from viscous fan top cover clips, loosen pipe clamp & remove pipe from LHS moulded plastic junction.
Loosen small rear facing pipe clamp & remove pipe from LHS plastic pipe junction.
Loosen main rear facing & radiator side pipe clamps & remove pipes from LHS plastic pipe junction.
Do same again for downward facing small pipe & remove the plastic junction piece.
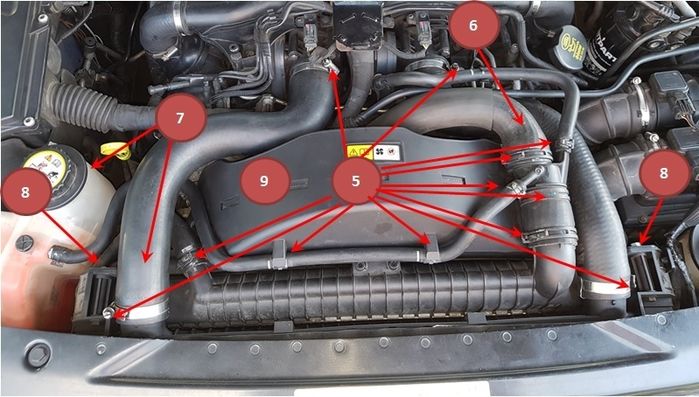
6) Tie back LHS main water pipe (still connected) to allow access to LHS intercooler pipe clamps. Loosen intercooler pipe clamps & intercooler pipe from intercooler & plastic inlet manifold.
7) Loosen & remove 8mm bolts holding coolant expansion tank (at rear of tank, 4 or 5 inches below cap). BEWARE : Bolt threads may be rusty & tight (not moved in 10 years+). NB Workshop Manual doesn’t mention doing this step , but I found it helps a lot to create space when removing viscous fan top cover.
Disconnect viscous fan electrical connector from RHS of top cover rear face.  Remove 10mm fast thread bolts securing the fan top cover on LHS & RHS. 9) Push fan top cover backwards slightly & move it to the right to free it from RHS radiator water outlet. Manipulate top cover LHS free of LHS radiator water outlet & MAF outlet pipes & lift it upwards. Slide viscous fan electrical connector block towards the vehicle centre to remove it from cover. Remove 10mm fast thread bolts securing the fan top cover on LHS & RHS. 9) Push fan top cover backwards slightly & move it to the right to free it from RHS radiator water outlet. Manipulate top cover LHS free of LHS radiator water outlet & MAF outlet pipes & lift it upwards. Slide viscous fan electrical connector block towards the vehicle centre to remove it from cover.
You now have access to the fan !
10) Use viscous fan spanner to loosen large viscous fan retaining nut & remove the fan. I jammed a small chisel in between 1 of the 3 pulley retaining bolt heads & the fuel pump bracket to lock the pulley (special spanner necessary due to lack of space for normal open jaw spanner or adjustable spanner). BEWARE 1: Retaining nut is Left Hand thread ! BEWARE 2 : Some spanners are relatively short & leave the end you’re going to hit with a hammer very close to the fan blades – which are not very strong / easy to break ( I used some Loctite to repair 1 blade). Remove fan & it’s attached electrical connection.
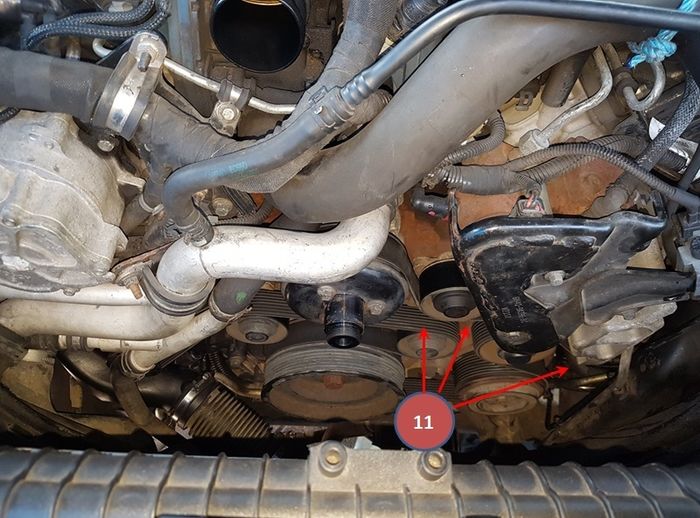
Remove Auxiliary Belt : 11) Using 19mm socket, short extension & 18inch breaker bar, place socket on hex head of aux belt tensioner (in middle of the 3 idler pulleys) & apply torque in clockwise direction until belt can be slid from lower idler pulley. Then lift loose belt off PAS pump pulley.
Remove PAS pump : Use floor protection to avoid fluid stains. Empty PAS reservoir (Eg suck out contents with syringe & small bore plastic pipe OR lift from support bracket & attempt to pour carefully into a small container until almost empty . Total is less than 0.5litres). With reservoir lifted off its support bracket, loosen & remove reservoir inlet & outlet pipe clamps & pull off pipes / remove reservoir . Have absorbent cloth underneath to catch excess fluid !
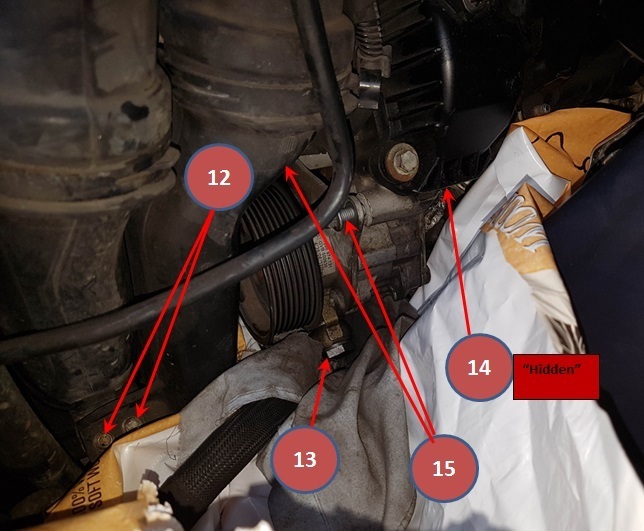
Unclip plastic & additional small diameter rubber pipe from (engine bay centre side) the LH engine bank moulded air inlet pipe. 12) Loosen & remove 2 x 8mm bolts retaining moulded pipe to LHS side of radiator housing (from inner wing side of moulding). Thin hands required to extract moulded pipe from flexible pipe to Turbo (loosened from underneath while at Access height earlier) & remove curved section from around chassis rail & PAS pump / PAS pump pipes.
13) Loosen & remove PAS pump HP outlet banjo connection using 22mm ring spanner . Use absorbent cloth on floor or immediately under banjo to collect excess fluid draining from pipe / pump. NB Feed pipe from reservoir will also contribute to the volume ! Manipulate banjo & pipe around the PAS pump pulley towards centre of engine bay (out of the way for pump removal).
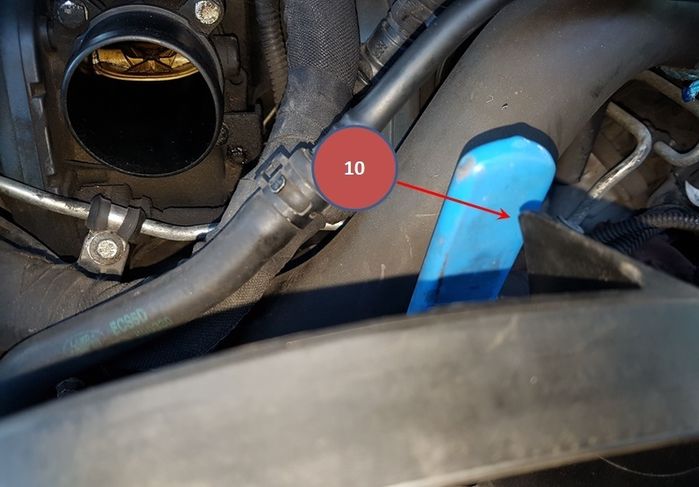
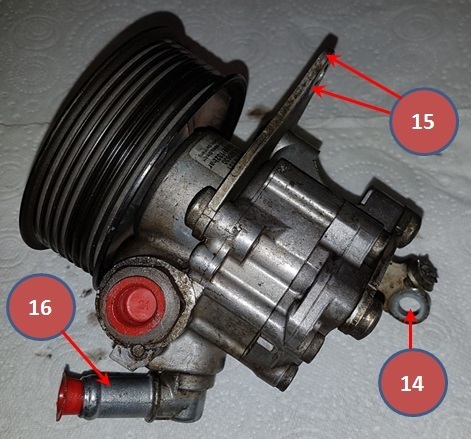
14) Using a mirror, identify location of rear PAS pump 10mm flange headed M8 retaining bolt (Not easily visible due to “hidden” position & foil protected AirCon compressor electrical wire in the way. See photo of pump off the car for assistance. BEWARE : If AirCon compressor wire is held by a cable tie to the bracket, cut or break cable tie to free wire. DON’T damage wire !
Using ¼ inch drive 10mm socket & short extension, attempt to get socket onto bolt head & loosen / remove bolt. Thin fingers are a big advantage. This step took me more than 30 mins ! NB Access / might be easier with the small sound deadening foam / cloth pad pealed off the inner wing ( I stuck ours back after installing replacement pump.
15) Loosen & remove both 10mm head retaining bolts on the front PAS pump mounting bracket (inner bolt will require short socket extension for access from centre of engine bay). Lift PAS pump out of place, avoiding fluid loss from still attached & open LP feed pipe.
NB : While Aux drive belt is detached, check all idler pulleys, AC compressor pulley, alternator pulley etc for smooth, noise free rotation. Resolve any issues.
Prepare replacement PAS pump for installation : Loosen LP feed pipe hose clamp & remove pipe from removed pump. Compare old & new pumps & ensure identical - especially pipe connections & pulley (BEWARE : Petrol engined & TD6 diesel pumps are similar, but have different connector positions & are NOT suitable). 16) If LP pipe connector inlet direction is not as removed pump, inlet can be rotated using force while holding pump in a vice & carefully gripping outlet with “cushioned” molegrips / adjustable spanner etc. Fit LP feed pipe onto new pump, ensuring pipe clamp tabs are pointing roughly towards HP connection position to avoid interference with engine parts on re-assembly.
Fit replacement pump : Manipulate pump into place, ensuring correct position of LP feed pipe & HP outlet pipe (HP pipe not fitted yet). Fit front face mounting bolts x 2 first, but don’t tighten. Locate rear ,“ hidden” bolt through bracket & into mounting hole. Ensure AirCon wire is not trapped before tightening all 3 bolts. Re-fit sound deadening pad with evostick or similar if it was removed earlier. Locate HP pipe connection banjo bolt in PAS pump threads – ensuring not cross-threaded before tightening.
Re-fit everything removed in reverse order of removal as above !
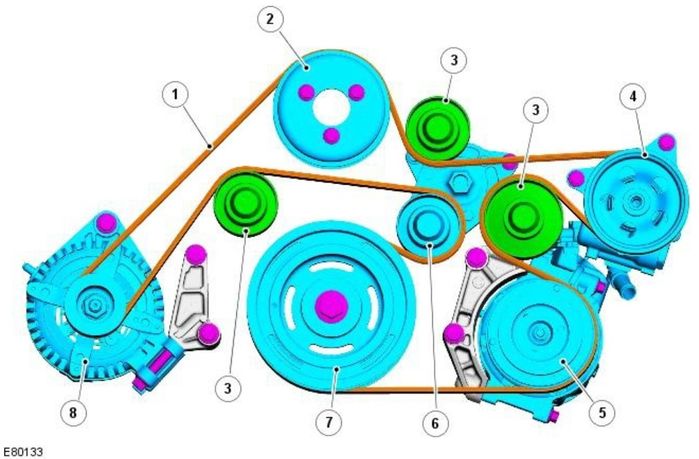
See schematic below if you’ve forgotten orientation of Aux drive belt round the pulleys
Underneath : Ensure radiator outlet drain plug is tightened & power steering pipe mounting isolator is re-fitted / secured on the sub-frame underneath.
Top up engine coolant with reservoir bleed screw open (I re-used drained coolant as it was in great condition), re-fill PAS reservoir with correct spec. fresh fluid.
Start engine, turn steering left & right a few times & re-check / top-up PAS fluid as required.
After running engine for a while, check & top coolant level as required (If only small amount removed originally, system appears not to require the full bleeding procedure).
Job Done – Enjoy the fully assisted steering experience – lol. Paul,
2001 Discovery 2 TD5, 211,000 miles & climbing
2006 FFRR TDV8 Vogue 151,000 miles & now sold
Member of Midland (Land) Rover Owners Club, www.mroc.co.uk
|