Advertise on fullfatrr.com »

Home > Maintenance & Mods (L322) > How To: P040D-00 - Replacing the Exhaust Temp Sensor 4.4TDV8
Post Reply  Down to end
Page 1 of 2 12>
Print this entire topic · 
garyRR


Member Since: 13 Mar 2021
Location: Hampshire
Posts: 1340

United Kingdom 
How To: P040D-00 - Replacing the Exhaust Temp Sensor 4.4TDV8

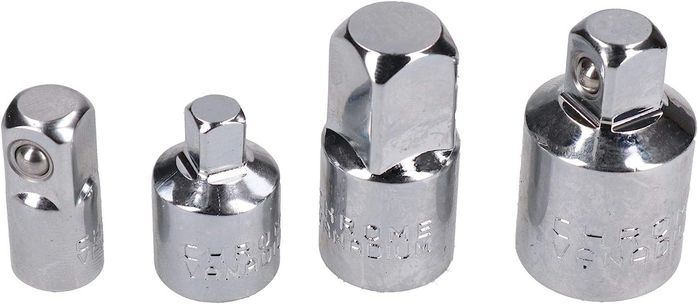
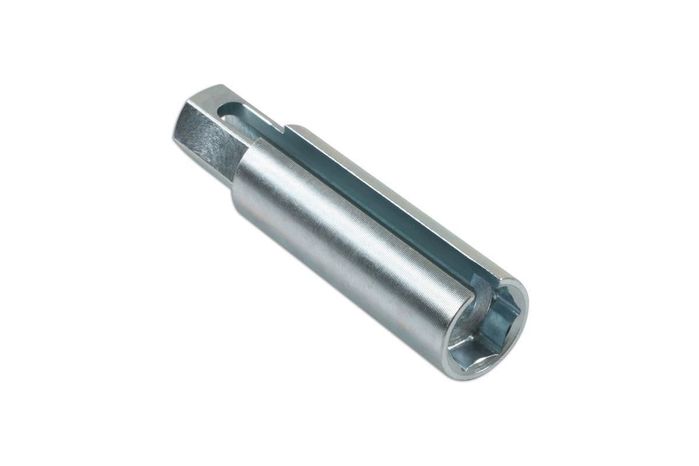
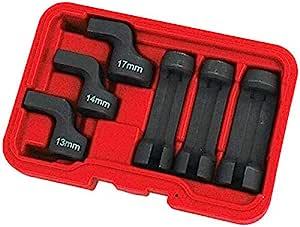
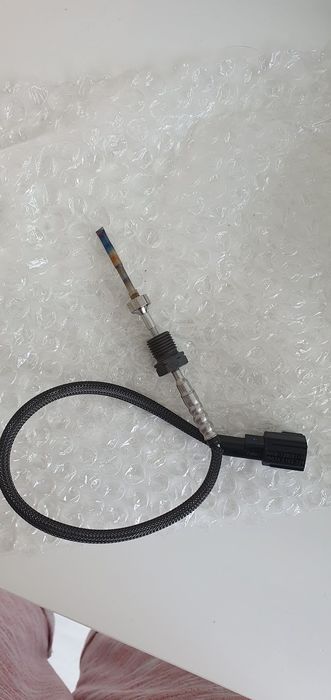
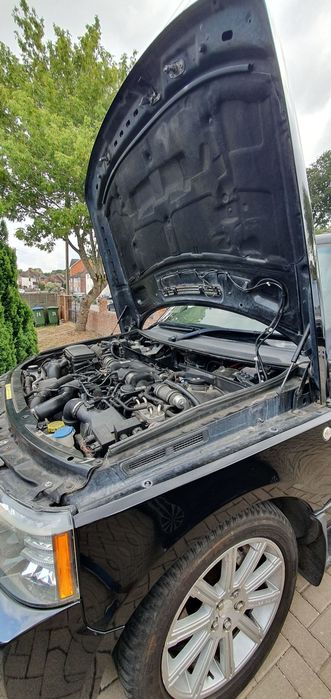
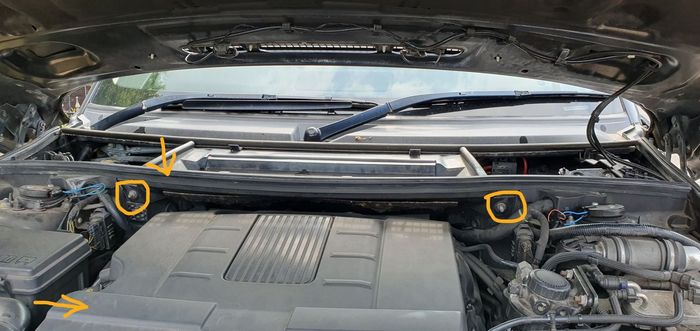
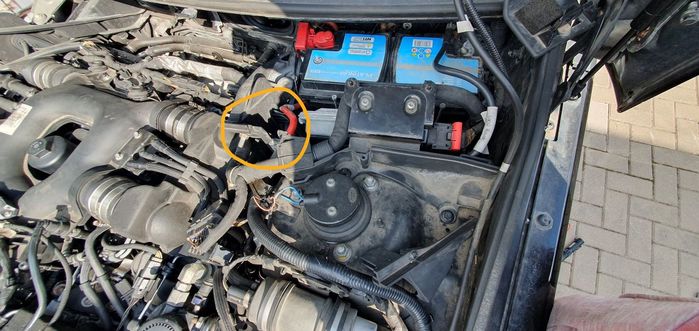
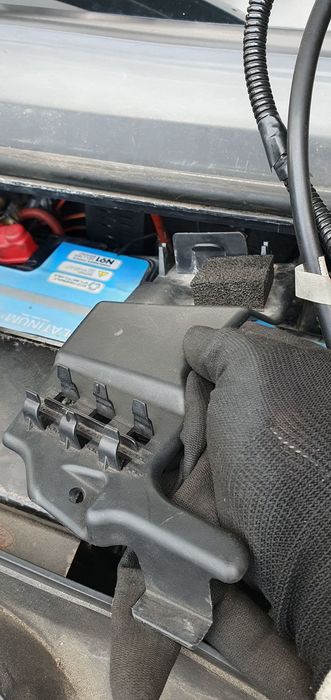
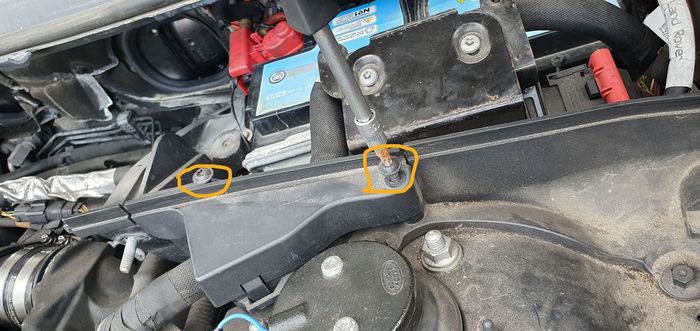
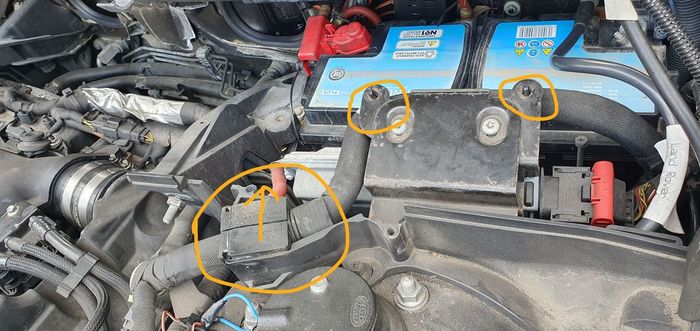
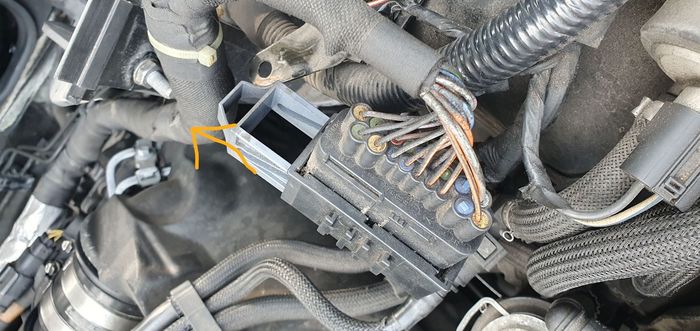
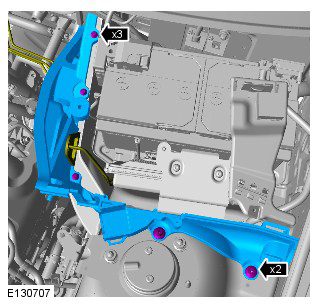
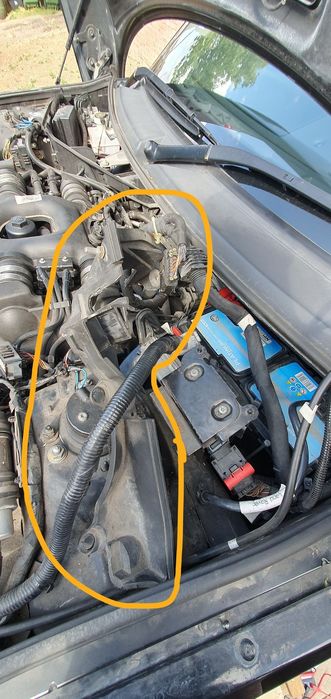
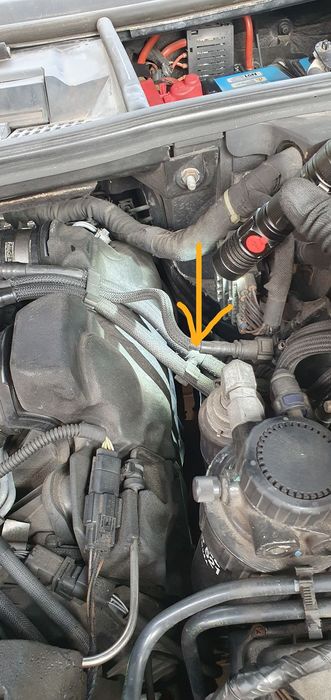
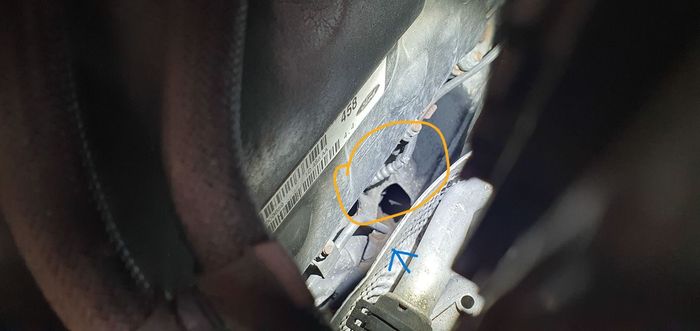
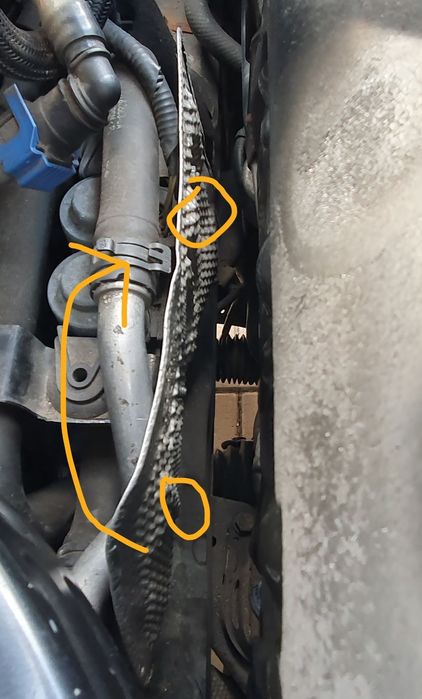
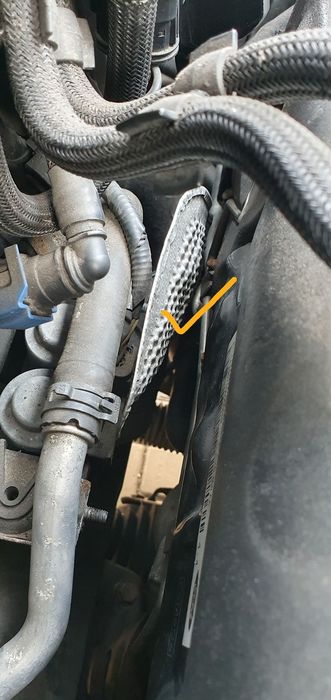
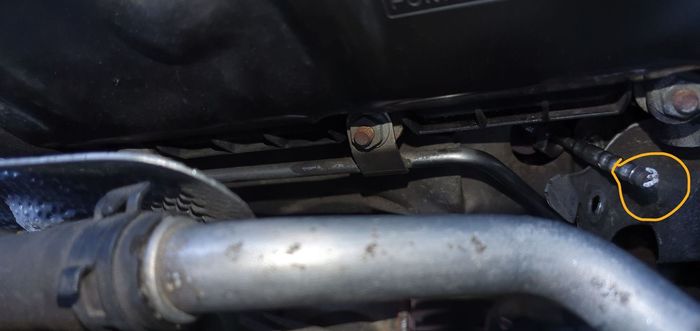
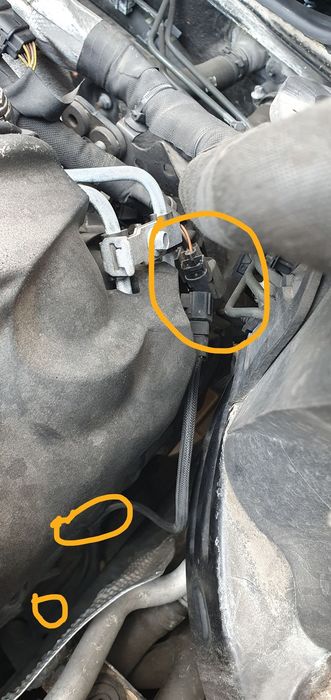
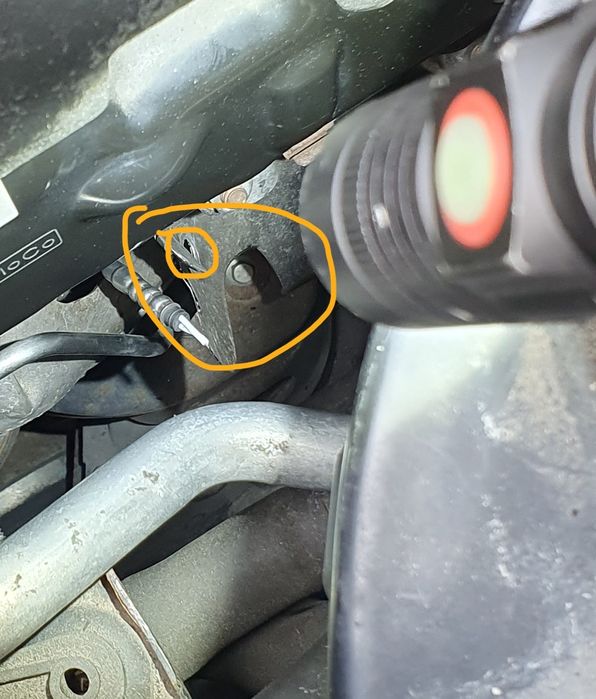
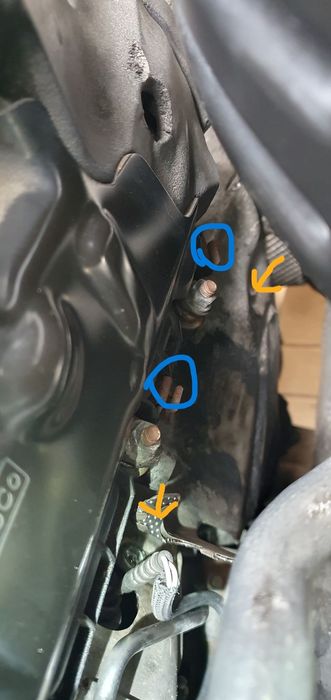
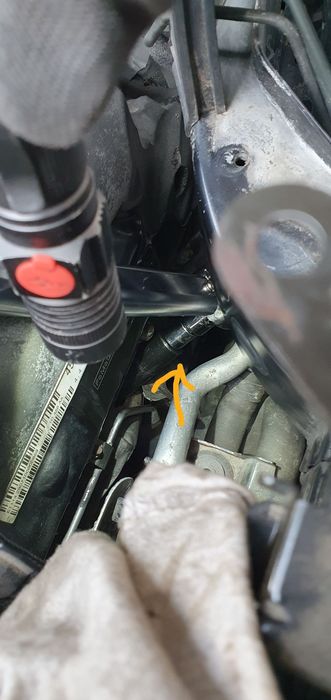
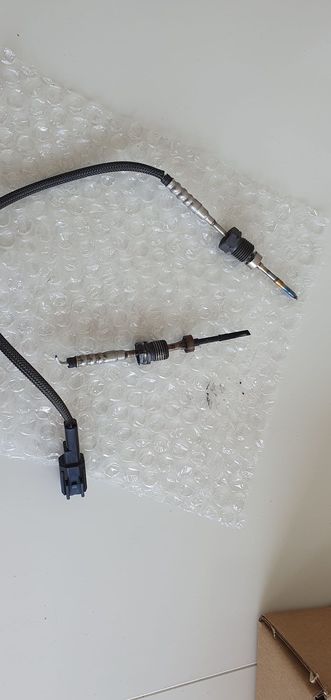
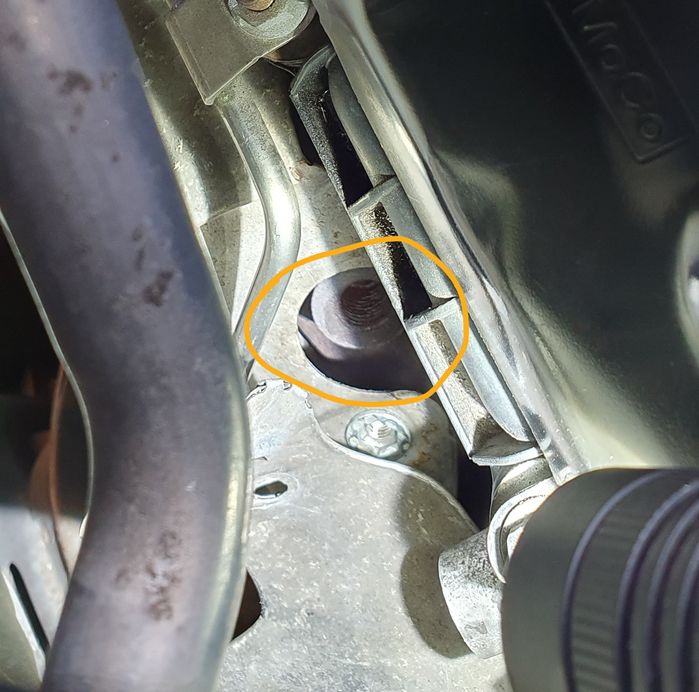
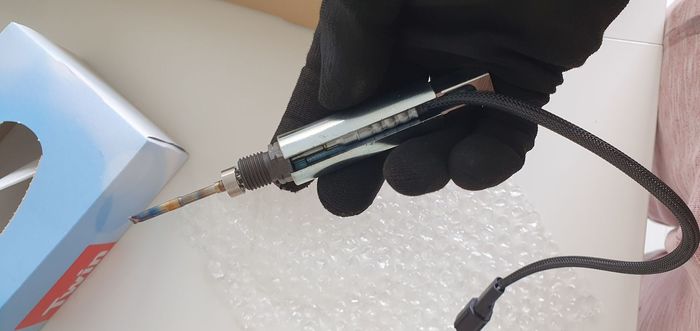
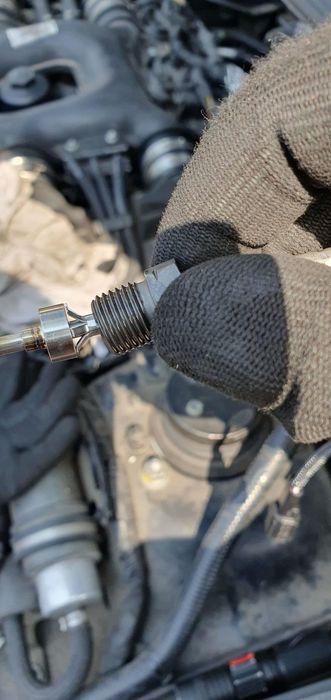
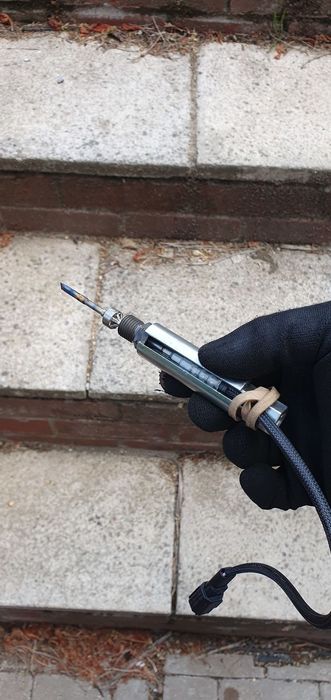
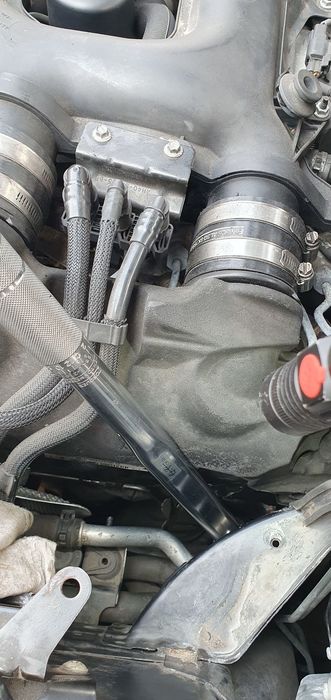
I thought I'd write a guide for anyone who has encountered the P040D-00 error or needs to visit this as a culprit as a result of the 'Restricted Performance' message on the dashboard for the 4.4 TDV8 or 4.4 SDV8 (this fix is largely the same for both the L322 and L405).

Thanks massively to this thread here, where a number of other forum members have posted their experiences and tips: https://www.fullfatrr.com/forum/topic50202.html

This is a common fault on the 4.4 TDV8, a part known to fail. It has also been known to cause 'Restricted Performance' or 'DPF Full' messages on the dashboard.

Some key points about this job:
1. In their infinite wisdom, JLR decided to use a 13mm nut on this sensor, which is an unusual size for EGT sensors, so there's really only 2 different sockets to choose from
2. As always, the sensor isn't right on top of the engine or underneath where it's easy to access - it's in one of the tightest spots down the side of the V, sandwiched against the chassis rail
3. Cutting the cable and using a 13mm deep socket is by far the most efficient means of removing the old sensor


Difficulty: Difficult

Time: 3-5 hours


Tools Required:

Small socket set with extensions (optional, but useful)
Medium socket set with extensions (3/8" set is fine)
Ratchet spanner set
T30 Torx bit and screwdriver
Flat blade screwdriver
13mm deep Hex socket
Breaker bar
2x sets of step-down/step-up sockets such as these:


13mm Exhaust Gas Sensor installation tool, such as the Laser 6850 (which i do not recommend based on my own personal experience and a manufacturing defect), or Neilsen EGT Socket Set
https://www.lasertools.co.uk/Product/6850/...et-for-JLR

https://www.amazon.co.uk/gp/product/B07R6S...&psc=1

(there are also some 'restricted access' sockets out there that will do the job also)


Exhaust Gas Temperature Sensor LR052169

Click image to enlarge


For this, I chose the genuine part, which cost me £105 from Maltings 4x4 (great company) on next day delivery.


Steps Involved:


Step 1: Put the bonnet into the workshop position (5 minutes)

There's a guide on YouTube on how to do this:

Click image to enlarge


Step 2: Remove the engine cover, bonnet seal and plenum (5 minutes)

Lift the front of the engine cover up and slide forward to remove.

The bonnet seal lifts up and pulls off.

To remove the Plenum, use a 13mm socket or spanner to remove the nuts either side of the chamber then slide it out. Re-fit the nuts to their threads so you don't lose them.


The area you will be working is marked in amber.


Step 3: Remove the battery shroud (5 minutes)

Remove the washer hose trim.

Click image to enlarge


Use the T30 bit to remove the 2x torx screws on the ground cable, and remove the ground cable from its seal. Unclip it from the clips highlighted also.


Disconnect the following plug by pulling the tab.


Remove the 5x M10 bolts (3x metal and 2x plastic and pull the shroud out (up and towards the wing).


Click image to enlarge


Pull the positive and ground cables out the way.


Step 4: Locate the sensor and remove the wing heatshield (20 minutes)

This is where you'll want to look:

Click image to enlarge


You will see the sensor highlighted. Marked in blue is the heatshield you'll need to remove next.

Use an M10 ratchet spanner or 1/4" socket to remove the closest 2x nuts, and rotate the heatshield towards the front of the car, so it is out of the way.

Click image to enlarge


Click image to enlarge


You will most likely to need to move the rear heatshield out of the way.


Step 5: Cut the sensor cable (5 minutes)

Use the wire cutters to cut the sensor on the cable.


Now remove the cable form its cleats and the multiplug and remove.

Click image to enlarge


Step 6: Move the exhaust manifold heatshield (20 minutes)

This heatshield will most likely be covering the nut you need to access.

It needs 2x M10 screws removed with a 1/4" socket set, which gives enough space to rotate it slightly and bend the section covering the nut out of the way.

Click image to enlarge


In blue, you can see the cleats the cable pushes into.


Click image to enlarge


Step 7: Remove the exhaust gas temperature sensor (20 minutes)

Use the 13mm deep socket, plus either an articulated socket adapter and extension bars or a breaker bar (you may need to use several socket step up/down adapters to allow the bar to stick up through the gap). The longer the bar, the easier this will be. Use the bar to 'crack' the seal on the nut and then switch to a ratchet to continue unscrewing the sensor.

Click image to enlarge


You can see a deep socket, plus 2x socket adapters gave me plenty of space to fit a long ratchet in to unscrew it from the top of the engine bay.

The sensor came out this way with ease.


Step 8: Clean the thread and compare old sensor to new (5 minutes)

Click image to enlarge


Note, you can quite easily test the old sensor from the multiplug before removing. Putting the old sensor on a multimeter, sure enough it had gone open loop. The new sensor was reading approximately 0.2kohm and ambient temperature.

Now clean the thread as best you can with cotton buds soaked in brake cleaner or similar.


Step 9: Fit the new sensor (30 minutes)

Now this is where it all went wrong for me. After about an hour, i thought it had gone so well.

I ordered the Laser 6850 socket, however as can be seen in the photo below, there was a manufacturing defect and it didn't actually fit the 13mm nut. This made the job VERY slow going and what would have been half an hour, turned into 2 hours. On the whole, i wasn't overly impressed with the quality of the Laser socket and would have preferred the Neilsen socket. As i didn't have much choice but to make do and go slow, i soldiered on.


Add a small amount of anti-seize or 3-in-1 oil to the thread of the new sensor, to aid fitment.

Click image to enlarge


Assuming you have better luck than i did, fit the socket to the sensor and use a rubber band or some masking tape to secure the cable to the head of the socket (something which will be easy to remove later in the tight space) and prevent it fouling/getting damaged by the socket as you try to wind.

Click image to enlarge


Now begin hand-winding the sensor into the thread as best and as far as you can. I found the thread pitch is too small to get any real kind of feel, so i wound in and out a few times to gain some confidence in what was the thread.

Click image to enlarge


Once in as far as you can go by hand, grab a breaker bar with as small head as possible (ideally 3/8 with a 3/8 13mm shallow socket) and begin winding in a few turns at a time, taking off the EGT special socket and repeating over and over again until tight.

The workshop manual states a torque of 32Nm, however i highly doubt you would get it reliably torqued, when the wrench is quite far displaced from the socket head.

Click image to enlarge


Note that this time, you're so much further away from the nut, no socket adapters are required.

Once secure, check visually. The nut should be proud slightly proud of the exhaust manifold, but importantly tight (but not too tight).


...next steps to follow. 2015 Range Rover Autobiography 4.4 SDV8

Post #668535 6th Jul 2023 6:49pm
View user's profile Send private message View poster's gallery Reply with quote
Dolphinboy


Member Since: 08 Dec 2009
Location: Bristol
Posts: 3058

United Kingdom 2011 Range Rover Vogue TDV8 Atacama Sand

great work Gary. Many thanks for your efforts. Thumbs Up

Post #668537 6th Jul 2023 7:31pm
View user's profile Send private message View poster's gallery Reply with quote
DrRob


Member Since: 16 Apr 2015
Location: Petersfield, Hampshire
Posts: 4228

United Kingdom 2011 Range Rover Vogue SE TDV8 Buckingham Blue

One for the Wiki Thumbs Up 2011 4.4 TDV8 Vogue SE Buckingham Blue with Ivory and clear glass = "Rory"
New Defender D300 90 on order so "Rory" will be going to a new home....!
1974 Series 3 Lightweight = "Millie"
My preferred specialist: www.glenrands.co.uk
--------------------------------------------------

Post #668541 6th Jul 2023 9:30pm
View user's profile Send private message View poster's gallery Reply with quote
stan
Site Moderator


Member Since: 13 Jul 2010
Location: a moderate moderated moderator moderating moderately in moderation
Posts: 34916

United Kingdom 

it is .. Thumbs Up ... - .- -.


click link for ,

FORUM WIKI

HOW TO Ǝꓕ∀ꓕOꓤ PICS

workshop manual downloads are in our wiki

.

Post #668543 6th Jul 2023 9:39pm
View user's profile Send private message View poster's gallery Reply with quote
Cam-Tech-Craig


Member Since: 04 Aug 2011
Location: Gloucestershire
Posts: 16170

England 2015 Range Rover SVAutobiography SDV8 Loire Blue

Can you believe the book time is less than 1hr on topix Rolling with laughter Rolling Eyes Banging Head Sniggering

Post #668545 7th Jul 2023 1:02am
View user's profile Send private message View poster's gallery Reply with quote
garyRR


Member Since: 13 Mar 2021
Location: Hampshire
Posts: 1340

United Kingdom 

I would say potentially possible in a workshop, with an air ratchet, on a new engine, with clean threads, with heatshields not covering the nut, doing a job you've done several times before.

I think if I did it again, with a better 'special tool', it would be possible to do on the driveway in less than 2 hours.

I know even garages experienced with L322s struggle matching the book time for jobs on these cars! 2015 Range Rover Autobiography 4.4 SDV8

Post #668547 7th Jul 2023 1:14am
View user's profile Send private message View poster's gallery Reply with quote
Cam-Tech-Craig


Member Since: 04 Aug 2011
Location: Gloucestershire
Posts: 16170

England 2015 Range Rover SVAutobiography SDV8 Loire Blue

I’ve refused to do them for a long time now! Take them to our local main dealer and they struggle to do them in 3-4hrs! With all the kit in the world BUT! Their hands are tied by JLR to follow topix procedures! So, yes I’m sure a good mechanic with experience in this job could hone their skills to reduce that time considerably…

32yrs have fought me to pick my battles! This is one I’m not interested in perfecting for sure… 🫢😉🫶

Post #668557 7th Jul 2023 9:24am
View user's profile Send private message View poster's gallery Reply with quote
Tommybuk


Member Since: 17 Jan 2024
Location: Ellon
Posts: 6

Scotland 2016 Range Rover Autobiography SDV8 Barolo Black

I tackled the EGT on the left manifold today on a 2016 L405.

The heat shield didn't need to be moved. I got a socket over it no problem. My steps were:-

1. wd40 every day for several days.

2. Remove fuel filter.

3. Disconnect the old sensor, then cut the sensor wire at the sensor head.
4. Cut the sensor head off below the corrugated tip. Dremel worked well here.

5. Put a 13mm socket over the sensor at the manifold. You'll need a longish extension and adapter to get the wrench on.

6. Mine cracked loose no problem.

7. I cleaned up the old nut from the old sensor, then jammed it into a 13mm socket with a bit of paper. Then with a tiny bit of grease/wd40 worked it in and out of the manifold thread until it was easy and free.

8. I used the Laser special socket to insert the new sensor by hand, then it just needed a nip up with the wrench.

9. Connect the sensor.

10. Refit the fuel filter.

Took me 3 hrs. But I read through all the posts first. Maybe there's a tiny bit more access on the 405's and the heat shield issue has been resolved?

Bow down


Thumbs Up Yawn

Post #685284 10th Feb 2024 8:26pm
View user's profile Send private message View poster's gallery Reply with quote
pcourtney


Member Since: 14 Jan 2020
Location: Stansted
Posts: 648

England 2011 Range Rover Vogue 4.4 V8 Sumatra Black

Even 1 hour using Topix guide would be £200 at a main dealer, I guess its swings and roundabouts Smile

Post #685285 10th Feb 2024 8:35pm
View user's profile Send private message View poster's gallery Reply with quote
GGDR


Member Since: 26 Nov 2016
Location: London
Posts: 3519

United Kingdom 2011 Range Rover Vogue SE TDV8 Stornoway Grey

Quote:
I tackled the EGT on the left manifold today on a 2016 L405.
The heat shield didn't need to be moved.


different engine bay on the L405 so access is very different. sounds a lot better.
the complexity to this job is the access on the L322.
Interested to hear the sensors are still dying as late as 2016 Cheers, Greg
- - - - - - - - - - - - - - - - - - - - - - - - - - - - - - - - - - - - - - - - - -
2011 Vogue SE 4.4 with lots of toys in Stornaway

Post #687946 13th Mar 2024 9:03am
View user's profile Send private message View poster's gallery Reply with quote
garyRR


Member Since: 13 Mar 2021
Location: Hampshire
Posts: 1340

United Kingdom 

My 2025 L405 has the code, which the previous owner took to main dealer and I quote from the receipt (i think it was in for something else):

"Identified P040D-00 DTC. Took vehicle for a test driven and vehicle runs well"

Rolling with laughter


It will be on my list to do this summer, so I shall report back on the differences between doing the job on the L405 vs L322. 2015 Range Rover Autobiography 4.4 SDV8

Post #687947 13th Mar 2024 9:08am
View user's profile Send private message View poster's gallery Reply with quote
Tommybuk


Member Since: 17 Jan 2024
Location: Ellon
Posts: 6

Scotland 2016 Range Rover Autobiography SDV8 Barolo Black

The fault codes on my 2016 L405 were different to what is reported on this post. It was on changing the manifold sensor, however, that cleared the fault in the end.

P0546-17 and P2080-62. Both bank1 sensor1. EML on too. Runs and drives fine.

Post #687964 13th Mar 2024 11:04am
View user's profile Send private message View poster's gallery Reply with quote
dpm


Member Since: 14 May 2018
Location: grimsby
Posts: 32

United Kingdom 2012 Range Rover Westminster 4.4 V8 Stornoway Grey

I'm doing this job and got the retaining nut off the old sensor, the stub of the old sensor feels loose and i can wiggle it but it won't pull out, any idea what is holding it in ?

Post #688731 22nd Mar 2024 6:48pm
View user's profile Send private message View poster's gallery Reply with quote
Tommybuk


Member Since: 17 Jan 2024
Location: Ellon
Posts: 6

Scotland 2016 Range Rover Autobiography SDV8 Barolo Black

From memory it's just seated in the manifold. Mine just wiggled out after I got the nut off. Maybe leave it soaked in wd40 overnight and try again. Last thing you want is to break the probe off in the manifold.
Big Cry Thumbs Up

Post #688732 22nd Mar 2024 7:07pm
View user's profile Send private message View poster's gallery Reply with quote
GGDR


Member Since: 26 Nov 2016
Location: London
Posts: 3519

United Kingdom 2011 Range Rover Vogue SE TDV8 Stornoway Grey

once the nut is off there is nothing holding it on but heat may have stuck it in place. as said above WD40 soaker suggested

Good luck!

. Cheers, Greg
- - - - - - - - - - - - - - - - - - - - - - - - - - - - - - - - - - - - - - - - - -
2011 Vogue SE 4.4 with lots of toys in Stornaway

Post #688734 22nd Mar 2024 7:59pm
View user's profile Send private message View poster's gallery Reply with quote
Post Reply  Back to top
Page 1 of 2 12>
All times are GMT + 1 Hour

Jump to  
Previous Topic | Next Topic >
Posting Rules
You cannot post new topics in this forum
You cannot reply to topics in this forum
You cannot edit your posts in this forum
You cannot delete your posts in this forum
You cannot vote in polls in this forum


Site Copyright © 2006-2024 Futuranet Ltd & Martin Lewis
fullfatrr.com RSS Feed - All Forums


Switch to Mobile site