Advertise on fullfatrr.com »

Home > Maintenance & Mods (L322) > Reservoir & Valve Block Removal
Post Reply  Down to end
Page 1 of 2 12>
Print this entire topic · 
Joe90


Member Since: 29 Apr 2010
Location: Hampshire
Posts: 6399

England 
Reservoir & Valve Block Removal

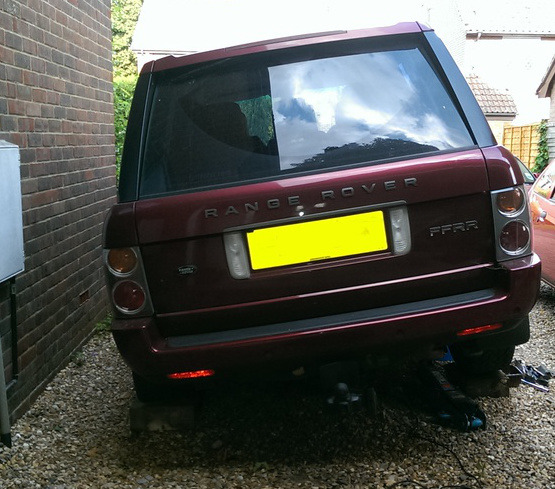
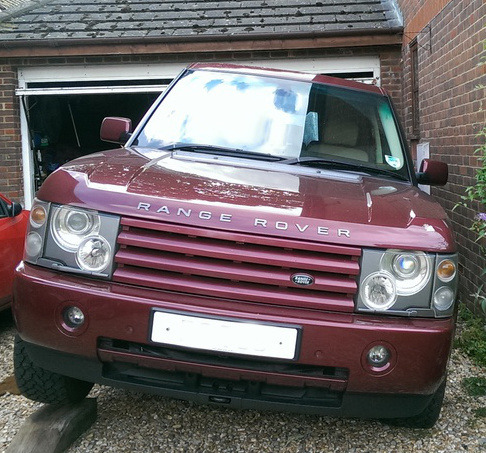
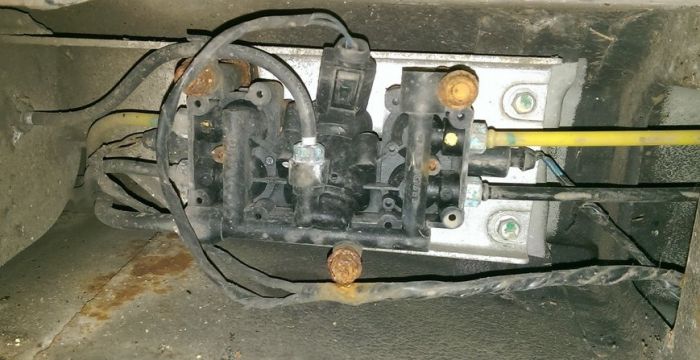
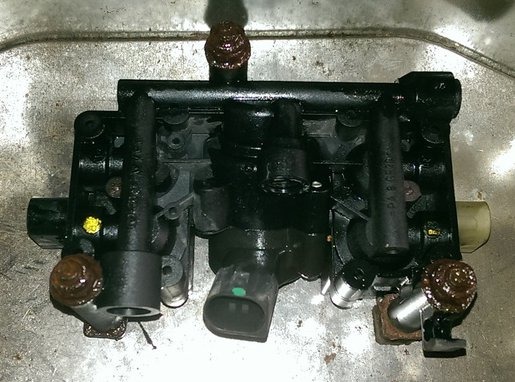
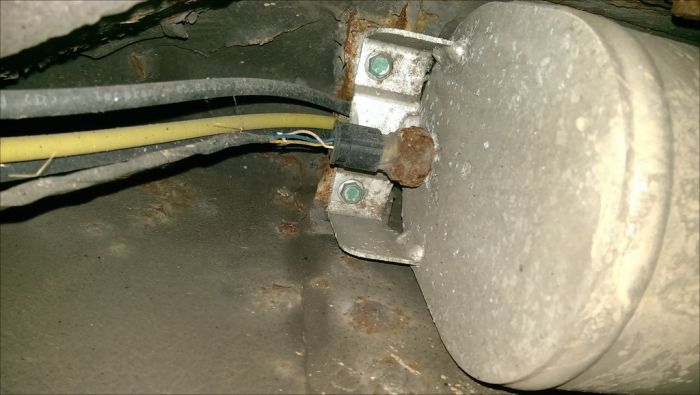
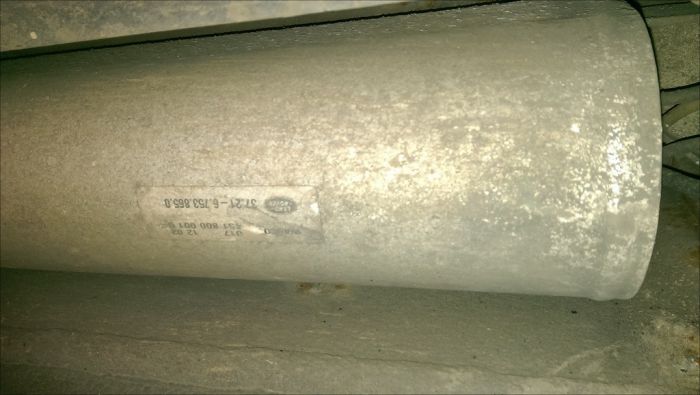
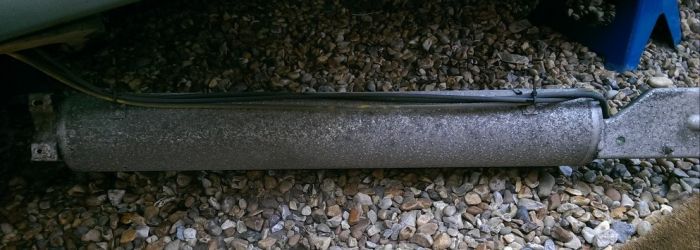
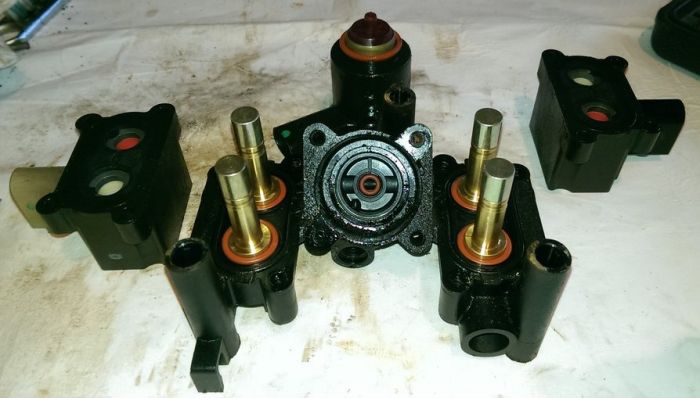
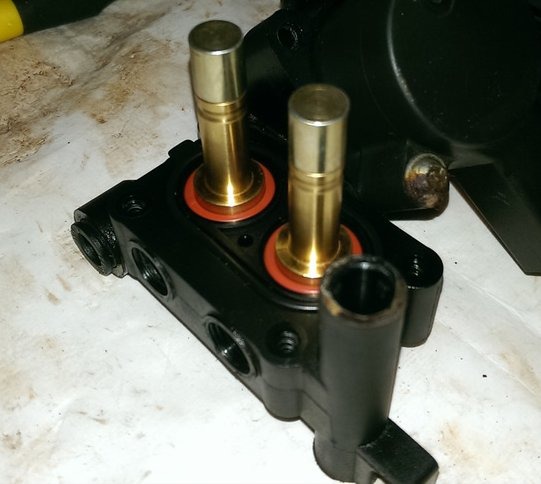
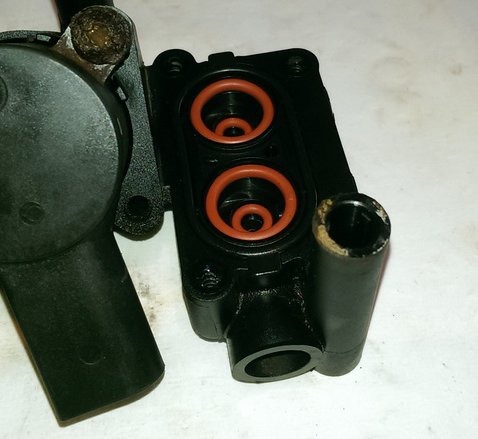
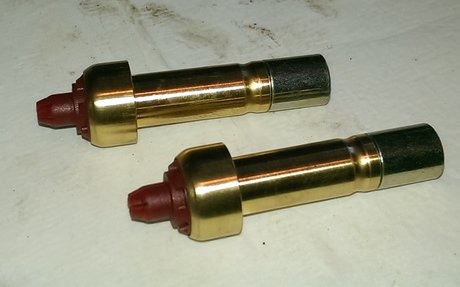
Ongoing efforts to foil "pressure static" fault - Welshdragon's replacement of the pressure switch didn't work, so I had a look at the valve block.

Things will be a bit easier for you if you don't have factory sidesteps fitted, as these prevent the removal of the reservoir, in fact I spent more time pfaffing around with the sidestep than I did on the object of the exercise!

Tools:

Jacks, stands, blocks
IID Tool
10, 12, 13, 14 mm spanners and sockets
Long extension for ratchet
Small torx driver (sorry not sure of the size)

Electric drill and hardened drill bits for repairing sidestep fixings!

1. Put car in off road mode and reverse up onto blocks on drivers side (RH)
2. Chock passenger wheels (LH)
3. Axle stands under RH jacking points
4. Using IIDTool choose "deflate all", stand clear, and car drops onto axle stands and lifts wheels (just like a Citroen!)
5. Place jacks under front subframe and rear lower wishbone for additional safety.


6. Undo the four 10mm self tappers which fix the heat shield to the tank cover

7. Undo the eight 13mm blots and 2 13mm nuts that secure the tank cover and ease it down to give access to the rear of the reservoir. You don't need to remove it from the car, which can be a fiddle unless you have lots of clearance below.

8. Remove plastic cover below drivers door underneath that covers the valve block.


9. Undo all pipes using 12mm spanner (noting positions), release the three electrical connectors. Cover the neds of the pipes to keep dirt and dust out.
10. Valve block is held in place by three 10mm nuts fixed to rubber mounted bolts. Mine was only hanging on by one, so I pulled it off and removed to bench. If yours is as rusty as mine just getting on the nuts or turning them will probably break the rubber mounts. Don't worry, all is not lost if this happens.


11. Release electrical connector to pressure switch.


This section is for side steps

a. Undo the 13mm M8 bolt for each leg of the side steps. If you are unlucky, like me, the nuts will shear. Both did.
b. Place a stand or support under the rear end of the side step, to prevent it falling on you.
c. Undo the two 10mm bolts on each leg which are bolted vertically to the inner sill. If you are lucky, like me, 3 of the 4 will undo, and only one will shear. The front ones are clear of the reservoir, whilst the rear ones will appear to foul the tank, but they will undo and fall out with a bit of wiggling.
d. Now manoeuvre the rear of the side step away from the car to give access to the reservoir


12. Support the reservoir, and undo the four 10mm bolts fixing it to the inner sill.


13. Gently lower as the rear pipes and compressor pipe are still attached by two clips on top.


14. Unclip the pipes and remove reservoir from vehicle.


That was enough for one evening.

##################################################

Up the following morning and commandeered the kitchen table to strip down the valve block. It's a £400+ part to replace so take care Wink

1. Using 10mm spanner and maybe pliers on the other end, remove the three mounting bolts, and set aside.
2. Have a good clean up of the valve block (I used an old toothbrush and some paper towel with WD40). This just reduces the change of getting dust and dirt into the valve chambers.
3. Using correct sized torx driver undo all 10 of the screws holding the solenoids in place. These can be very rusty too. One was so corroded I was again lucky to have enough of the star left to undo it. Fortunately they are open screws so not too tight.
4. Clean up again to remove bits of rust etc.
5. Lift each chamber cover in turn to reveals the innards. The two outer chambers are are mirror image of each other, with the plungers at one end red and the other black. The centre chamber allows air to pass from the reservoir to the "corners" (I think)


6. Carefully remove all the parts in sequence so they can go back where they came from and inspect. I was hoping to find a horror of some description, having seen the state of RS200Custom's innards but mine all seemed in good clean nick. Everything seemed to move and work as it should. Tested the centre one on a battery and it clicked away quite happily opening the valve at the top.


7. Clean up where needed, no lubricants needed inside, and rebuild the valve block.

Repairing the rubber mounted bolts

I hadn't realised that there was a bolt at either end of these things, the other end fixed to the reservoir flange. You need the reservoir out to remove these completely, but you could do the repair in situ with valve block removed. Once the nuts were undone on the reservoir each bolt needed a hefty tap with a hammer to release it.

A simple removal of all rust and dirt, a good sand down of mating surfaces with green coarse paper, and then applied viscous superglue (purchased from Tooltime) and held each one til set. Leave for a while, then refit to reservoir flange.


8. Slide the rebuilt valve block onto the rubber mounted bolts and fix. It is easier to do this off the car than on.

9. Refit the pipe from the reservoir to the valve block. (12mm)


Repairing damage done to Side Step Mountings

The more accurate among you would be able to perform a perfect sheared off nut removal and recover the original thread for the captured nuts. Not me. Too clumsy. Drilled out with cobalt drills to 8mm thus removing the thread. However, for once, LR provided useful drain holes in the chassis just close enough to provide access from the inside. Using a variety of methods (cable tie, sticky tape, thin plastic) I was able to manoeuvre a 40mm M8 bolt down through each hole for the main leg mountings. I didn't bother with the 10mm one I sheared off, hopefully one will be sufficient to take the weight of my svelt figure Smile

Enough for this day, other things to do...

###################################

Refit

Note, all nuts and bolts run up and down their partners to make it easy to fit, and treated with copper ease and grease as needed.

1. Bring reservoir to car and and refit rear pipes and compressor pipe to valve block. Again, easier to do this off the car than on.
2. Clip the pipes back onto the reservoir
3. Offer reservoir up and fix with a couple of the 10mm bolts for now. Do not tighten just yet. (This because of side steps)

Refit SideSteps

a. Manoeuvre side step into position, first fixing loosely the two main chassis leg bolts, then the side bolts. By not fixing firm the reservoir, I had a little bit of play to assist with getting the rear leg 10mm bolts into position, even using the reservoir to hold then in place.
b. "Hand" tighten all bolts and ensure that side step is correctly positioned, then tighten up.


4. Fit remaining reservoir bolts, ensure rear pipes are not trapped, then tighten up.
5. Refit remaining front pipes
6. Refit three electrical connectors (the front one is a fiddle!) You can't get these wrong, due to number of pins, length of cable and colour coding.
7. Refit electrical connector to pressure sensor.
8. Refit tank cover. Make sure it is the correct position, especially over the two bolts by the exhaust, before fitting any bolts.
9. Refit heat shield
10. Liberal spray of preferred protective lubricant over valve block, dabs of grease etc.
11. Replace plastic cover over valve block.
12. Remove the two safety jacks
13. Start car, IIDTool, Reenable EAS.
14. Then follows some fiddling about, jacking up, removing axle stands, driving off blocks, testing heights etc.

No fault codes yet, but will probably see one tomorrow Wink .
Experience is the only genuine knowledge, but as time passes, I have forgotten more than I can remember Wink
Volvo V70 P2 2006 2.4 Petrol 170bhp Estate SE
MG Midget Mk1 1962

Previous: L322 Range Rover TDV8 3.6 2008; L322 Range Rover TD6 3.0 2002; P38A Range Rover V8 1999

Post #277310 24th Aug 2014 5:57pm
View user's profile Send private message View poster's gallery Reply with quote
Welshdragon


Member Since: 20 Jan 2012
Location: here and there...but not where I should be
Posts: 1898

Wales 2003 Range Rover Vogue 4.4 V8 Monte Carlo Blue

An excellent write up Tim, brilliant pictures too Thumbs Up Thumbs Up
Lets hope its sorted the fault out once and for all Bow down
Keep us posted Very Happy

This is a must for the wiki Stan Thumbs Up If it dont work.......burn it!

If the IId tool cant fix it.......burn the FF.

If the FF cant be fixed......buy a Land Cruiser!

If the LC cant be fixed..............................................BUY a horse !!

Post #277331 24th Aug 2014 8:32pm
View user's profile Send private message View poster's gallery Reply with quote
Joe90


Member Since: 29 Apr 2010
Location: Hampshire
Posts: 6399

England 

I forgot to mention, I also tested resistance on a few things:

Pressure Sensor Pins 2 & 3 4.63ohms (is this good ?)

Pressure Sensor BLUE wire to Compressor Connector SLATE wire -18.76 ohms ( Shocked )

Pressure Sensor YELLOW wire to Compressor RED/BLACK/YELLOW wire -18.76 ohms ( Shocked )

Not sure what the last two mean, the circuit diagram


Click image to enlarge


shows SLATE and RED/BLACK/YELLOW from sensor ???

However at least something happened, demonstrating there was a connection in the wire ? .
Experience is the only genuine knowledge, but as time passes, I have forgotten more than I can remember Wink
Volvo V70 P2 2006 2.4 Petrol 170bhp Estate SE
MG Midget Mk1 1962

Previous: L322 Range Rover TDV8 3.6 2008; L322 Range Rover TD6 3.0 2002; P38A Range Rover V8 1999

Post #277351 24th Aug 2014 10:33pm
View user's profile Send private message View poster's gallery Reply with quote
Haylands


Member Since: 04 Mar 2014
Location: East Yorkshire
Posts: 7908

England 2014 Range Rover Autobiography SDV8 Loire Blue

Jo,

Excellent write up...

I read somewhere else that the "pressure static" fault turned out to be the reed valve on top of the compressor piston had stuck open, a small bend and the fault was cleared... if your strip didn't work, maybe it's that.... Pete

__________________________________________________
2014 L405 Autobiography SDV8 4.4 Loire Blue Ebony interior
2011 L322 Vogue SE 4.4 TDV8 Baltic Blue. Parchment over Navy Interior. Sold
2012 L322 Autobiography 5.0 Supercharged Ipanema Sand, Jet Interior. Sold
2002 L322 Vogue 4.4 V8 Epson Green, Ivory over Aspen Interior (Fatty Offroader) Sold
-Click for Project Fatty off roader-

Post #277358 25th Aug 2014 12:32am
View user's profile Send private message View poster's gallery Reply with quote
Joe90


Member Since: 29 Apr 2010
Location: Hampshire
Posts: 6399

England 

Thanks Haylands - another good tip to add to the list to try and solve this annoyance Thumbs Up .
Experience is the only genuine knowledge, but as time passes, I have forgotten more than I can remember Wink
Volvo V70 P2 2006 2.4 Petrol 170bhp Estate SE
MG Midget Mk1 1962

Previous: L322 Range Rover TDV8 3.6 2008; L322 Range Rover TD6 3.0 2002; P38A Range Rover V8 1999

Post #277360 25th Aug 2014 12:48am
View user's profile Send private message View poster's gallery Reply with quote
stan
Site Moderator


Member Since: 13 Jul 2010
Location: a moderate moderated moderator moderating moderately in moderation
Posts: 34921

United Kingdom 

wikified . Thumbs Up ... - .- -.


click link for ,

FORUM WIKI

HOW TO Ǝꓕ∀ꓕOꓤ PICS

workshop manual downloads are in our wiki

.

Post #277385 25th Aug 2014 10:47am
View user's profile Send private message View poster's gallery Reply with quote
Weejock


Member Since: 31 Dec 2011
Location: UK
Posts: 416

2002 Range Rover Vogue 4.4 V8 Epsom Green

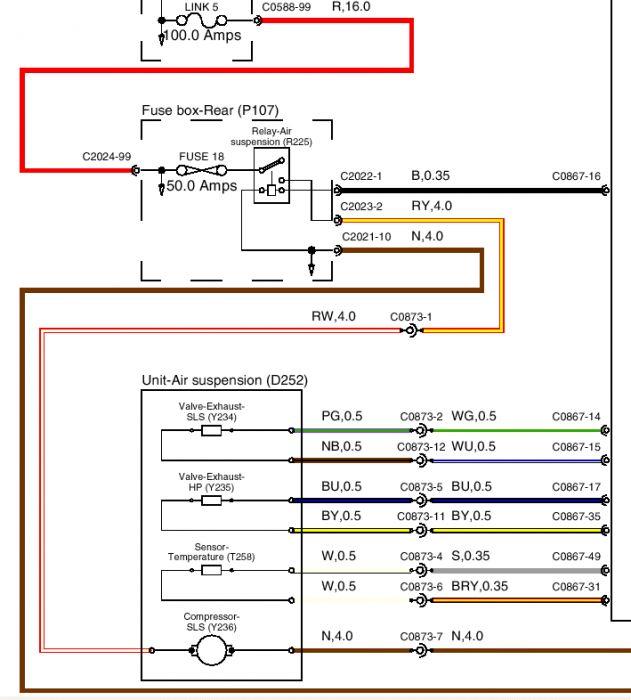
That's the wrong diagram for the pressure sensor, it shows the compressor temperature sensor and valves in the compressor. You want the next page of the manual Wink
For the pressure sensor:
The Yellow wire is the supply from the Air Suspension ECU.
The White wire is the earth.
The Blue wire is the return signal back to the Air Suspension ECU.

You should get a 5V reference voltage on the Yellow wire.
The White wire should show continuity with earth.
The Blue wire should output a voltage relating to the pressure, so will be somewhere between 0-5V.

If you aren't getting the above there is a wiring, sensor or ECU problem.
If it checks out then there's likely a blockage/restriction or leak in the system somewhere between the pump and reservoir.

Post #277422 25th Aug 2014 8:08pm
View user's profile Send private message View poster's gallery Reply with quote
Joe90


Member Since: 29 Apr 2010
Location: Hampshire
Posts: 6399

England 

Oh well, it lasted a day before it faulted again. Onto the next fix Crying or Very sad .
Experience is the only genuine knowledge, but as time passes, I have forgotten more than I can remember Wink
Volvo V70 P2 2006 2.4 Petrol 170bhp Estate SE
MG Midget Mk1 1962

Previous: L322 Range Rover TDV8 3.6 2008; L322 Range Rover TD6 3.0 2002; P38A Range Rover V8 1999

Post #277475 26th Aug 2014 8:13am
View user's profile Send private message View poster's gallery Reply with quote
paulmoran2


Member Since: 27 Nov 2013
Location: Leeds
Posts: 1422

England 2013 Range Rover Vogue SDV8 Mariana Black

Joe90...sorry to hijack, but you say that if the car is on axles stands and you deflate the susp airbags, the wheels will lift?...is that on all years as I thought that the system only allowed wheels to raise when under weight from gravity ( ie when car pushes them down)?

P GONE 2010 Facelifted 3.6 TDV8 - Stornoway Grey + 22" Overfinch Olympus
HAVE 1999 Discovery 2 GS 4.0 V8 - Silver - Off Road Toy
GONE 2013 L405 4.4 SDV8 Vogue. Black with Silver roofline and 22" s
HAVE 2015 Jaguar XF.

Post #277477 26th Aug 2014 8:28am
View user's profile Send private message View poster's gallery Reply with quote
Joe90


Member Since: 29 Apr 2010
Location: Hampshire
Posts: 6399

England 

I only had axle stands under one side of the car, and with this side wheels up on 4" blocks, so the tilt as the other side went right down may have caused this effect. That said there was no weight on the axle stands when I started to deflate and the wheels were off the blocks when finished, so there must have been a bit of "Citroen" effect going on.

Took a while for car to sort itself out getting it back to normal ride height afterwards.


Also RAVE always says to ensure car completely off the suspension before depressurising, so could be doing it wrong. .
Experience is the only genuine knowledge, but as time passes, I have forgotten more than I can remember Wink
Volvo V70 P2 2006 2.4 Petrol 170bhp Estate SE
MG Midget Mk1 1962

Previous: L322 Range Rover TDV8 3.6 2008; L322 Range Rover TD6 3.0 2002; P38A Range Rover V8 1999

Post #277485 26th Aug 2014 9:27am
View user's profile Send private message View poster's gallery Reply with quote
paulmoran2


Member Since: 27 Nov 2013
Location: Leeds
Posts: 1422

England 2013 Range Rover Vogue SDV8 Mariana Black

Got'it. Ta. Was hoping wheel swapping had got easier
Crying or Very sad GONE 2010 Facelifted 3.6 TDV8 - Stornoway Grey + 22" Overfinch Olympus
HAVE 1999 Discovery 2 GS 4.0 V8 - Silver - Off Road Toy
GONE 2013 L405 4.4 SDV8 Vogue. Black with Silver roofline and 22" s
HAVE 2015 Jaguar XF.

Post #277493 26th Aug 2014 10:01am
View user's profile Send private message View poster's gallery Reply with quote
Haylands


Member Since: 04 Mar 2014
Location: East Yorkshire
Posts: 7908

England 2014 Range Rover Autobiography SDV8 Loire Blue

Joe90 wrote:
Oh well, it lasted a day before it faulted again. Onto the next fix Crying or Very sad


Jo

Did you check the reed valve... could be a free fix!! Pete

__________________________________________________
2014 L405 Autobiography SDV8 4.4 Loire Blue Ebony interior
2011 L322 Vogue SE 4.4 TDV8 Baltic Blue. Parchment over Navy Interior. Sold
2012 L322 Autobiography 5.0 Supercharged Ipanema Sand, Jet Interior. Sold
2002 L322 Vogue 4.4 V8 Epson Green, Ivory over Aspen Interior (Fatty Offroader) Sold
-Click for Project Fatty off roader-

Post #277535 26th Aug 2014 2:13pm
View user's profile Send private message View poster's gallery Reply with quote
Welshdragon


Member Since: 20 Jan 2012
Location: here and there...but not where I should be
Posts: 1898

Wales 2003 Range Rover Vogue 4.4 V8 Monte Carlo Blue

And after all that work too Big Cry

Have you also changed the pressure switch as well ??

Im not saying mines fixed the issue ( not happened since ALL fault codes reset, I only did the eas faults first time round then fault reapeared) but the old one was just finger tight (yep not tight on at all) on the reservoir, where it fits into the recess the rubber o ring sits was pitted too.

Sorry to here the valve block not sorted problem out Sad

Im on that waiting game for it to go again. If it dont work.......burn it!

If the IId tool cant fix it.......burn the FF.

If the FF cant be fixed......buy a Land Cruiser!

If the LC cant be fixed..............................................BUY a horse !!

Post #277574 26th Aug 2014 6:32pm
View user's profile Send private message View poster's gallery Reply with quote
Joe90


Member Since: 29 Apr 2010
Location: Hampshire
Posts: 6399

England 

@ Welshdragon

I didn't change the pressure switch, so could be my next port of call.

@ Haylands

I'll have to find it first. I have done the piston ring swap ala bagpipeandy, but not sure where the reed valve is?


Found new compressors for £254 on eBay, wondering if a group buy might bring the price down a bit more ? .
Experience is the only genuine knowledge, but as time passes, I have forgotten more than I can remember Wink
Volvo V70 P2 2006 2.4 Petrol 170bhp Estate SE
MG Midget Mk1 1962

Previous: L322 Range Rover TDV8 3.6 2008; L322 Range Rover TD6 3.0 2002; P38A Range Rover V8 1999

Post #277576 26th Aug 2014 6:37pm
View user's profile Send private message View poster's gallery Reply with quote
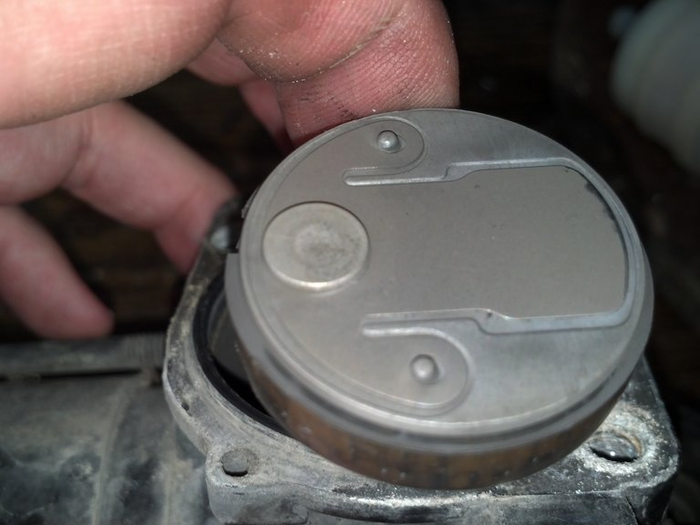
pcourtney


Member Since: 14 Jan 2020
Location: Stansted
Posts: 648

England 2011 Range Rover Vogue 4.4 V8 Sumatra Black

when you remove the head off the wabco compressor, you should see the flat reed ( metal) valve shown below as you turn it over


this thin metal flap is called the Reed Valve

Haylands read somewhere that the "pressure static" fault can be attributed to the reed valve on top of the compressor piston which can remain stuck open, a small bend of the metal and the "Pressure Static" fault cleared

Post #557436 12th Jun 2020 2:46pm
View user's profile Send private message View poster's gallery Reply with quote
Post Reply  Back to top
Page 1 of 2 12>
All times are GMT + 1 Hour

Jump to  
Previous Topic | Next Topic >
Posting Rules
You cannot post new topics in this forum
You cannot reply to topics in this forum
You cannot edit your posts in this forum
You cannot delete your posts in this forum
You cannot vote in polls in this forum


Site Copyright © 2006-2024 Futuranet Ltd & Martin Lewis
fullfatrr.com RSS Feed - All Forums


Switch to Mobile site