Advertise on fullfatrr.com »

Home > Technical (L322) > VANOS alignment problem plus seal replacement
Post Reply  Down to end
Page 1 of 1
Print this entire topic · 
Pepi


Member Since: 04 May 2015
Location: Doncaster
Posts: 125

England 
VANOS alignment problem plus seal replacement

Can anyone help please?
VANOS unit on M62 tub44 RH bank (1-4) is not showing a continuity when trying to time up.
LH bank (5-Cool VANOS is fine and showing continuity.
I would suspect the unit is out of alignment on the RH bank.
I have taken it off the car and checked Alignment marks they look OK!
I have tried moving the meshing one cog at a time a full rotation and checking from the pins to the sprocket/ cog teeth for continuity but no luck.the unit is clean and only a thin film of oil on it.
Can anyone tell me how to realign and how to check that it is in properly before I reinstall it.  Eddie the eagle watch out 👀


Last edited by Pepi on 6th Aug 2016 8:05pm. Edited 1 time in total

Post #398675 1st Aug 2016 3:25pm
View user's profile Send private message View poster's gallery Reply with quote
Haylands


Member Since: 04 Mar 2014
Location: East Yorkshire
Posts: 7908

England 2014 Range Rover Autobiography SDV8 Loire Blue

Pete, Johnboy has done this, he'll be along soon with some words of wisdom... Thumbs Up Pete

__________________________________________________
2014 L405 Autobiography SDV8 4.4 Loire Blue Ebony interior
2011 L322 Vogue SE 4.4 TDV8 Baltic Blue. Parchment over Navy Interior. Sold
2012 L322 Autobiography 5.0 Supercharged Ipanema Sand, Jet Interior. Sold
2002 L322 Vogue 4.4 V8 Epson Green, Ivory over Aspen Interior (Fatty Offroader) Sold
-Click for Project Fatty off roader-

Post #398676 1st Aug 2016 3:41pm
View user's profile Send private message View poster's gallery Reply with quote
Pepi


Member Since: 04 May 2015
Location: Doncaster
Posts: 125

England 

Cheers Pete
Can't find any info on re aligning the VANOS helical gear meshing and anything that tells me what I should be checking and how to check it.
I prefer not to have to buy a new unit if there is little or nothing wrong with this. I think it was working fine before took it off the cam.
I washed it out with isopropinol on the bench but I didn't think I had moved the gearing settings.
Should this be able to give me a continuity reading on the bench or will I have to put it back on the cam?

 Eddie the eagle watch out 👀

Post #398704 1st Aug 2016 5:38pm
View user's profile Send private message View poster's gallery Reply with quote
Weejock


Member Since: 31 Dec 2011
Location: UK
Posts: 416

2002 Range Rover Vogue 4.4 V8 Epsom Green

I've not done this yet so only going by what I've found online and a bit of judgement.
If you haven't removed the centre shaft from the body then I would have thought you would be OK as that's all the marks are needed for is when rebuilding the VANOS unit (the centre is balanced compared to the body so needs to align correctly).

Going by another website then rotating the centre counter clockwise to it's stops turns the inner VANOS piston to the meet against the inner face of the outer gear. With a test lead connected to a test pin (which is connected to the inner gear) and the other lead connected to the outer gear you should get a 0Ohm reading when they meet (fully retarded position).
However one website did say that you may only get a reading while pressure is applied, when released it may become open circuit. They did also say you might not get a reading at all.

They did perform the test with the VANOS re-installed, which I guess makes life easier and allows more pressure to be applied. Quoted below from here ( https://vanos-bmw.com/m62tu-vanos-procedure-e39-e38-e53 ) and although on a VANOS M62TU rather than a TUB the same principles I would assume apply (for setting fully retarded):

"Fully retard bank 1 & 2 vanos timing. For each vanos perform following.
Connect ohm meter positive lead to one of vanos test pins and negative lead to intake camshaft first bearing cap stud (digital multimeter & alligator clip wires).
Turn on ohm meter (digital multimeter on ohm setting).
Install vanos turning tool onto vanos center shaft. Insert tool pins into vanos shaft pin holes.
Turn vanos shaft counter clockwise until end adjustment position (vanos turning tool & 24mm socket 1/2″ / 1/2″ ratchet).
Ohm meter will display 0 ohm when vanos at fully retarded position.
Note: Vanos internal piston will connect with vanos test pins when fully retarded and cause a short reading (0 ohm).
Note: When ratchet pressure is released ohm reading can change to open circuit (infinite ohm). This is normal.
Note: In many cases a short will not be achieved and a 0 ohm reading will not occur. This is normal.
Remove ohm meter and wires."

I hope that helps.


Last edited by Weejock on 2nd Aug 2016 5:14pm. Edited 1 time in total

Post #398790 2nd Aug 2016 9:18am
View user's profile Send private message View poster's gallery Reply with quote
Pepi


Member Since: 04 May 2015
Location: Doncaster
Posts: 125

England 
VANOS original alignment marks !?

Hi Colin
Thanks for taking the trouble to try and bail me out once again.
I have inspected the unit microscopicly for signs of the original meshing alignment marks and I think I have Identified them.
They are very faint but they do align when the centre gear is inserted fully.
The outer cog has a very slight radial score line, which is the only one that radiates all the others are honing marks and scratches that do of align. The inner race has two marks on it one a tiny centre pop mark and a scribe mark aprox. 10mm to the left of the centre pop. When I align the centre pop marks with the VANOS unit fully pressed home and then turn the hub to the point that I should get a reading. The scribe Mark aligns with the Per-referral outer radial scribe mark.
But still no continuity reading.
Any idea why and does it matter?
I am stabbing in the dark hear mate. Well out of my depth. The last comment on your post is interesting & the only place I have seen it. So I guess I shouldn't worry to much.
Beware folks! I have highlighted the position of the marks with "not so" perminant marker pen to aid my point.
Don't trust to Perminant marker pen😖 It's not!


You can just make out the centre pop mark on the bottom right of pic. And the scribed line centre left.
Now I am in a quandary whether or not to fit the new seal I have just orded or leave well alone. Maybe Johnboy will let us know just how difficult it really is to change out the seals. And which kit he used. Did he use the special crimping mandrill.
 Eddie the eagle watch out 👀

Post #398821 2nd Aug 2016 12:57pm
View user's profile Send private message View poster's gallery Reply with quote
Weejock


Member Since: 31 Dec 2011
Location: UK
Posts: 416

2002 Range Rover Vogue 4.4 V8 Epsom Green

Personally I don't think you need to worry too much about the alignment despite what is said in some procedures. According to what I've seen and read the alignment is only marked for reassembling because the inner piston is balanced relative to the outer. Ideally you would want to keep it aligned but if you've got into a situation where the alignment is unknown I wouldn't be too worried. The worst that I could see happening is the seals may fail a bit earlier than normal but it could be years before that happens.

I seen rebuild videos where the unit was completely ripped apart, new internals fitted and rebuilt with no consideration for the alignment.

I think you need to refit the unit and then try the electrical test again, I'm not sure you can get the correct pressure doing it in the hands to make a reliable contact.

Anyway that's what I would do.

It's always best to get someones opinion who's done it before though. Hopefully someone will come along soon!

Post #398854 2nd Aug 2016 5:10pm
View user's profile Send private message View poster's gallery Reply with quote
Pepi


Member Since: 04 May 2015
Location: Doncaster
Posts: 125

England 
Rule of thumb!

Hi Colin
Many thanks. The only response I could give you that's worth its salt is that you aught to have been born a Yorkshireman. 👍😀😎🍻 Eddie the eagle watch out 👀

Post #398887 2nd Aug 2016 7:50pm
View user's profile Send private message View poster's gallery Reply with quote
Pepi


Member Since: 04 May 2015
Location: Doncaster
Posts: 125

England 
VANOS pressing tool

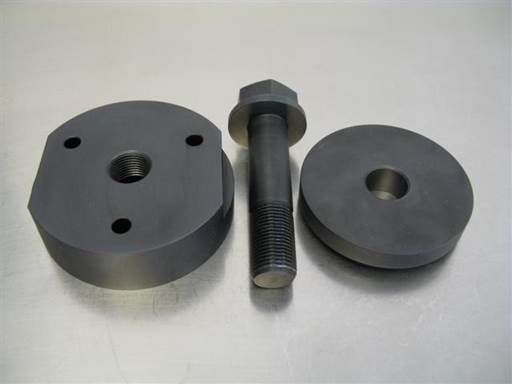
Has anyone got a pressing tool for the M62 TUB unit. I could borrow or buy please ? Eddie the eagle watch out 👀

Post #399054 3rd Aug 2016 7:56pm
View user's profile Send private message View poster's gallery Reply with quote
Weejock


Member Since: 31 Dec 2011
Location: UK
Posts: 416

2002 Range Rover Vogue 4.4 V8 Epsom Green

Pete you have PM Thumbs Up

Post #399099 4th Aug 2016 1:21am
View user's profile Send private message View poster's gallery Reply with quote
Pepi


Member Since: 04 May 2015
Location: Doncaster
Posts: 125

England 
VANOS seals from i6automotive

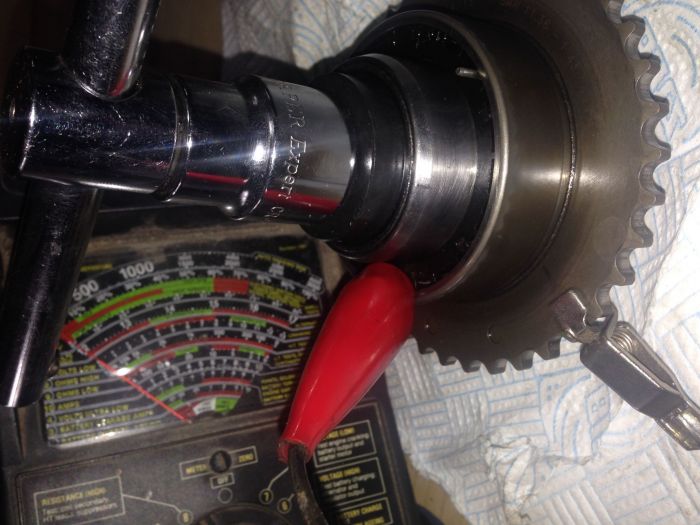
Well folks finally got all the kit today.
Including a pressing tool. With i6automotive's compliments.


Old one is the green seal

Seals and O ring are a doddle to change in this heat. 12 minutes for second one. First one about half hour.
But the pressing tool now that's a different matter.
Followed instructions to the letter.
OK 136 Nm!
Bar and needle type torque indicator. Firm and steady on a well greased on a M18 flange bolt.
Threads in bottom plate sheared at 120Nm. Oups!
Down to the engineering shop in the morning mi finks!
Now for the real tricky stuff!
The kit has a further 8 orings with it.
Two of which I think are the small ones that fit on the top chain tensioners.
Thought couple may be off the oil check valves but they are not. See the pic.
Any idea anyone?
 Eddie the eagle watch out 👀

Last edited by Pepi on 6th Aug 2016 7:41pm. Edited 1 time in total

Post #399420 6th Aug 2016 6:14pm
View user's profile Send private message View poster's gallery Reply with quote
Weejock


Member Since: 31 Dec 2011
Location: UK
Posts: 416

2002 Range Rover Vogue 4.4 V8 Epsom Green

Good to hear you're making progress! Thumbs Up

It could be they've copied the Besian systems kit, in which case quoting from their website:
"A vanos seals/O-rings repair kit can be acquired through Beisan Systems (bee-saan), www.beisansystems.com/products. It includes a vanos replacement set of high grade carbon Teflon rings and Viton O-rings. The kit also includes two O-rings for the secondary air pipe, two O-rings for the two camshaft chain tensioners, and 4 O-rings for the two engine covers two mounting bolt shafts. These extra O-rings are needed during the vanos seals repair and are provided as a value-add to the kit."

Click image to enlarge

Post #399421 6th Aug 2016 6:22pm
View user's profile Send private message View poster's gallery Reply with quote
Pepi


Member Since: 04 May 2015
Location: Doncaster
Posts: 125

England 
O rings

Cheers Wejock for the much needed help throughout this project.
Well if anyone needs some air pump seals I will post FOC as that will be two sets of them I have going spare!
Mine is missing the Air Pump and the induction hose.
Never seemed to make much differance to cold start and warm up. Emissions were Ok even with a blowing head gaskets. Eddie the eagle watch out 👀

Post #399427 6th Aug 2016 7:51pm
View user's profile Send private message View poster's gallery Reply with quote
johnboyairey


Member Since: 11 Jan 2013
Location: surrey
Posts: 2024

United Kingdom 2012 Range Rover Westminster TDV8 Orkney Grey

Pepi, I replied to your PM
John

Post #399448 6th Aug 2016 11:11pm
View user's profile Send private message View poster's gallery Reply with quote
Weejock


Member Since: 31 Dec 2011
Location: UK
Posts: 416

2002 Range Rover Vogue 4.4 V8 Epsom Green

No problem Pete, do you want to come and do mine now Laughing

I must admit it was a bit weird to include the SAS O-rings when the check valve O-rings would have been more sensible and useful!

The SAS is only used on start-up to inject air into the exhaust to bring the O2 sensors up to temperature quicker, it's purely for emissions and has very limited effect. On one car I replaced a failed SAS electric pump just because I wanted everything working on it, it only worked for around a minute on cold start-up even when working correctly.

Post #399481 7th Aug 2016 9:33am
View user's profile Send private message View poster's gallery Reply with quote
Pepi


Member Since: 04 May 2015
Location: Doncaster
Posts: 125

England 

Yep I read one of your posts in the past Colin. It would seem that you have run the same race I am now running so to speak Eddie the eagle watch out 👀

Post #399496 7th Aug 2016 11:53am
View user's profile Send private message View poster's gallery Post Reply
Post Reply  Back to top
Page 1 of 1
All times are GMT + 1 Hour

Jump to  
Previous Topic | Next Topic >
Posting Rules
You cannot post new topics in this forum
You cannot reply to topics in this forum
You cannot edit your posts in this forum
You cannot delete your posts in this forum
You cannot vote in polls in this forum


Site Copyright © 2006-2024 Futuranet Ltd & Martin Lewis
fullfatrr.com RSS Feed - All Forums


Switch to Mobile site