Advertise on fullfatrr.com »

Home > Maintenance & Mods (L322) > Auxiliary Sockets : How to convert to ignition control
Post Reply  Down to end
Page 1 of 2 12>
Print this entire topic · 
nicedayforit


Member Since: 11 Jun 2011
Location: Beside the Solway
Posts: 3951

England 2004 Range Rover Vogue Td6 Giverny Green
Auxiliary Sockets : How to convert to ignition control

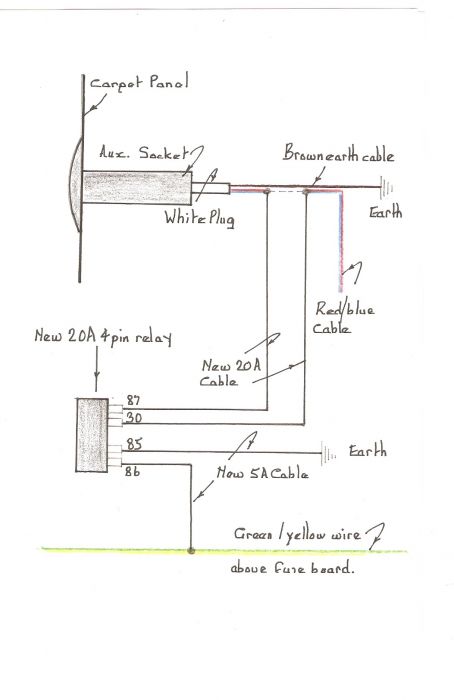
Following on from this thread,

http://www.fullfatrr.com/forum/topic32392.html

anyone contemplating converting their auxiliary sockets to ignition control from being permanently live may find this useful.

HOW TO CONVERT REAR LUGGAGE SPACE AUXILIARY SOCKET TO IGNITION CONTROL.

This applies specifically to 2002-2005 cars although the principle should be the same for later cars.

Materials : 12V 4 pin 30A relay, 2m of 20A cable, 2m of 5A cable, various spade connectors, cable connectors, insulating tape, heat shrink insulation or self amalgamating tape as you feel happy with.

The first thing you need to do is remove Fuse 7 on the rear Fuseboard to isolate the rear aux socket.
Might be worth checking the socket is dead at this point.
As an additional precaution it may be worth disconnecting the battery -ve terminal depending on the degree of confidence you have in carrying out the work.

The next thing to do is to remove the aux socket / loadspace light assembly from the carpeted panel.
To do this you put a wide flat blade under the front edge of the surround, ie the edge nearest the front of the car and pull, the assembly should pop out intact.
As per photo below.


You will then see on the back of the aux socket a white plastic plug, remove this from the auxiliary socket.
There are two wires to the plug, you are interested in the red / blue wire, the other is brown. ie Earth.
Take hold of the wires at the plug and gently pull, there should be a bit of spare cable you can pull out to make things easier.
Take off the black binding on the two wires and about 70-100mm from the white plug cut the red / blue wire.
Cut away about 12mm of the insulation on both the cut ends of the red / blue wires.
Connect a length of your new 20A cable to each of the red / blue cut ends and insulate the joints as required.
Position you new cables thro into the opening in front of the fuseboard.
Connect one of your new cables ( it doesn't matter which) to terminal 87 of your relay.
Connect your other new cable to terminal 30 of your relay.
As per diagram below.

Click image to enlarge


Refit white plug to Aux socket.

You now need to find the green / yellow ignition operated cable, this is in the small wiring harness above the rear fuseboard.
As per photo below.


Find a convenient point for yourself on the cable and connect to it a length of your new 5A cable and insulate the joint.
The other end of this cable should be connected to terminal 86 of your relay.
You then need to connect a piece of 5A cable to terminal 85 of your relay and connect the other end of the cable to a convenient earth point.
A bolt head into metalwork at the top of the compartment opening will work.
Re- inset Fuse 7 and re-connect battery terminal if appropriate.

You auxiliary socket should now be ignition controlled.

Now just tidy-up the wiring and mount the relay if required.

This should give you everything you need, if you need anything clarified just
ask.

FRONT AUXILIARY SOCKET

If you have a need to convert the operation of this socket to ignition control it can be done in a similar manner working in the rear side compartment.

The socket is fed from Fuse1 on the rear Fuseboard.

On the front face of the Fuseboard, top left is a plug connector onto the Fuseboard with a 20A Red / Green cable coming out of it. This is the cable that runs to feed the Front Auxiliary Socket. There is sufficient slack in the cable to allow you to cut it and install a 30A 12V 4 pin relay in the cable as per that installed for the Luggage Space Auxiliary Socket.

The relay could be switched from the ignition source ie Green/ Yellow cable as above.

You would then have both Auxiliary Sockets ignition controlled.

Last edited by nicedayforit on 1st Jul 2015 3:43pm. Edited 1 time in total

Post #335413 1st Jul 2015 1:51pm
View user's profile Send private message View poster's gallery Reply with quote
Weegie


Member Since: 09 Jun 2014
Location: East Sussex
Posts: 3186

Scotland 2008 Range Rover Vogue TDV8 Stornoway Grey

Nice write up NDFI Thumbs Up John
2008 Stornoway Grey 3.6 Tdv8 Vogue
2005 TD6 Java Black Vogue - Written off!!
GAP iiD BT
2003 Discovery TD5 Auto, Nanocom Evolution - gone to a new home!
MasseyFerguson 152 - No electronics!! - Sold

Post #335415 1st Jul 2015 2:17pm
View user's profile Send private message View poster's gallery Reply with quote
stan
Site Moderator


Member Since: 13 Jul 2010
Location: a moderate moderated moderator moderating moderately in moderation
Posts: 34871

United Kingdom 

put in wiki Dave Thumbs Up ... - .- -.


click link for ,

FORUM WIKI

HOW TO Ǝꓕ∀ꓕOꓤ PICS

workshop manual downloads are in our wiki

.

Post #335421 1st Jul 2015 2:42pm
View user's profile Send private message View poster's gallery Reply with quote
nicedayforit


Member Since: 11 Jun 2011
Location: Beside the Solway
Posts: 3951

England 2004 Range Rover Vogue Td6 Giverny Green

^ Ta Thumbs Up

Post #335423 1st Jul 2015 3:10pm
View user's profile Send private message View poster's gallery Reply with quote
pietertje


Member Since: 30 Nov 2014
Location: Rotterdam
Posts: 152

Netherlands 2002 Range Rover Vogue 4.4 V8 Java Black

Just did this conversion.

Works great! Even for someone with very little electronical knowhow, like me...
Thank you! 2002 L322 V8

Post #335552 2nd Jul 2015 12:33pm
View user's profile Send private message View poster's gallery Reply with quote
silentdrew


Member Since: 10 Oct 2022
Location: New York
Posts: 15

United States 2005 Range Rover Vogue 5.0 SC V8 Zermatt Silver
Thank you - and a few simple questions

Hello, I've bought a beautiful 2005 Range Rover Vogue Diesel - its just such a fantastic beast. I added a simple Bluetooth to FM adaptor but the front cig lighter stays on all-the-time, so I can't keep it plugged in for fear of draining the battery.

So I want to undertake this modification, which I believe I can pull off without too much issue. Just a few quick questions for those who have done it...

- is disconnecting the battery necessary? I don't want to cause more problems with the clock, etc if I don't have to.
- I just want to affect the 3 front aux power outputs, so I believe that I pull Fuse 1 and do the wiring as described at the end of the instructions - does that one 12VDC 30Amp relay handle the power for all three sockets?
- when I tap into yellow/green ignition operated cable, should I just peel back a bit of cable sheath to expose copper so I can join it there? Or is it better to actually cut the cable, and use a wire nut to reconnect and splice into it? That cable is completely 'dead' when the car is off correct?
- how do you mount the relay? I believe the one I'm buying on Amazon has a little screw hole, maybe just screw it in above the board? There is an old DVD player etc in there too, so I'm not quite sure where to put it actually.
- is there anything really dumb I can do here to break my Vogue? Anything I should watch out for?

Thanks so much for the help everyone, SD

Post #645303 10th Oct 2022 9:00pm
View user's profile Send private message View poster's gallery Reply with quote
nicedayforit


Member Since: 11 Jun 2011
Location: Beside the Solway
Posts: 3951

England 2004 Range Rover Vogue Td6 Giverny Green

Welcome to the forum. Thumbs Up
Can l just clarify, the modification l detailed is only applicable to the rear luggage space auxiliary socket and is not practical to use to modify the 3 front sockets you refer to.
The front socket you refer to is actually a cigarette lighter as per Land Rover.
The socket in the cubby box is actually an auxiliary socket as per Land Rover.
The rear cabin socket is actually a cigarette lighter as per Land Rover.
The rear luggage space socket is actually an auxiliary socket as per Land Rover.

Land Rover in there wisdom chose to designate 2 sockets cigarette lighters and 2 sockets auxiliary sockets and chose to wire them on separate circuits.
Generally the cigarette lighters are permanently live with the auxiliary sockets ignition controlled but not always.
For some markets LandRover chose to wire them differently.
From what you describe your car appears to be wired like mine, cigarette lighter sockets are permanently live with the auxiliary sockets ignition fed.

Is you are using a plug in blue tooth adapter the easiest way to use this is simply to fit an additional auxiliary socket fed from an ignition controlled fuse on the front fuse board.

I have an additional ignition controlled socket fitted as per the photo below.

I hope this is of some help to you.


Post #645325 11th Oct 2022 9:05am
View user's profile Send private message View poster's gallery Reply with quote
silentdrew


Member Since: 10 Oct 2022
Location: New York
Posts: 15

United States 2005 Range Rover Vogue 5.0 SC V8 Zermatt Silver

Thank you very much for your kind reply.
Our Vogue is from England, right hand drive, and it appears that all four sockets are always-on.
An idea spot for the bluetooth-to-FM transmitter would either be in the front near the shifter or in the cubby.
How do I modify the wiring to either of those sockets to be ignition controlled?

Thank you again, Andrew

Post #645340 11th Oct 2022 11:37am
View user's profile Send private message View poster's gallery Reply with quote
nicedayforit


Member Since: 11 Jun 2011
Location: Beside the Solway
Posts: 3951

England 2004 Range Rover Vogue Td6 Giverny Green

Have you a picture of the Bluetooth transmitter you are using.
Have you also got a picture of the rear fuse board and the relays above it.

Post #645346 11th Oct 2022 12:05pm
View user's profile Send private message View poster's gallery Reply with quote
silentdrew


Member Since: 10 Oct 2022
Location: New York
Posts: 15

United States 2005 Range Rover Vogue 5.0 SC V8 Zermatt Silver

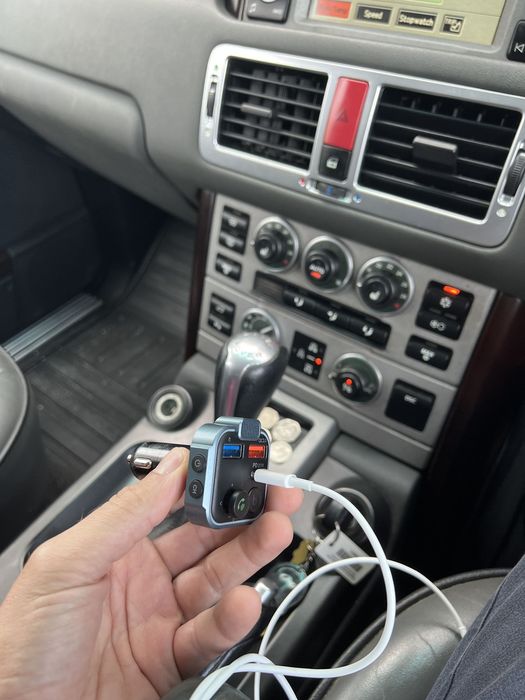
Yes. It should be pictured here. Essentially if I plug this into the socket near the shifter it remains on all the time. I’d love to rewire this socket, or the socket in the armrest to be ignition controlled!

Click image to enlarge

Post #645348 11th Oct 2022 12:13pm
View user's profile Send private message View poster's gallery Reply with quote
nicedayforit


Member Since: 11 Jun 2011
Location: Beside the Solway
Posts: 3951

England 2004 Range Rover Vogue Td6 Giverny Green

You might be in luck.
If you go to the rear fuse board in the drivers side rear side compartment you will see some relays below it as per the picture below. If so what is in position 1?


Post #645351 11th Oct 2022 12:19pm
View user's profile Send private message View poster's gallery Reply with quote
silentdrew


Member Since: 10 Oct 2022
Location: New York
Posts: 15

United States 2005 Range Rover Vogue 5.0 SC V8 Zermatt Silver

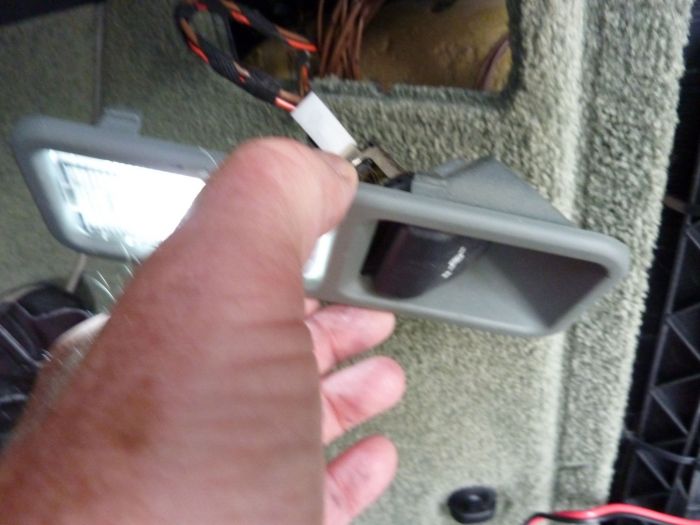
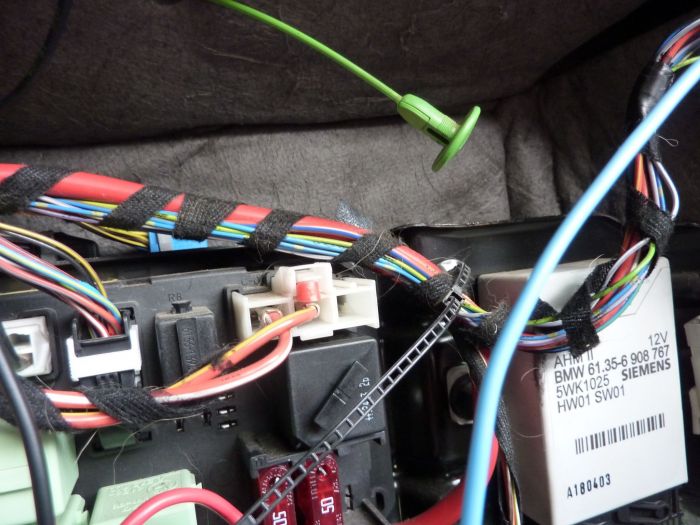
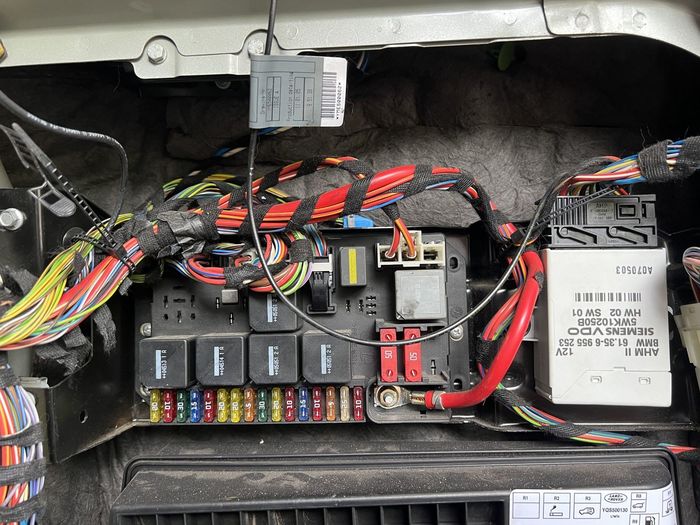
It appears to just be a jumper of some sort, pictured below. There also appears to be a relay in the bottom left position which is not the same as the diagram.

Post #645360 11th Oct 2022 12:43pm
View user's profile Send private message View poster's gallery Reply with quote
nicedayforit


Member Since: 11 Jun 2011
Location: Beside the Solway
Posts: 3951

England 2004 Range Rover Vogue Td6 Giverny Green

It is indeed a jumper which is why your 2 cigarette lighter sockets are permanently live.
Take the relay out of position 2 as per my diagram and fit it in position 1 in place of the jumper.
If l am not mistaken your two cigarette lighter sockets should now be ignition controlled. ie the front one and the one on the rear of the centre console.
If it works you need a 4 pin 30A relay to fit in position 1 permanently so that you can put the relay from position 2 back in place.
You can leave the temporary relay in place for now if you wish, all you have lost is the rear heater fan for now.

Post #645364 11th Oct 2022 12:56pm
View user's profile Send private message View poster's gallery Reply with quote
silentdrew


Member Since: 10 Oct 2022
Location: New York
Posts: 15

United States 2005 Range Rover Vogue 5.0 SC V8 Zermatt Silver

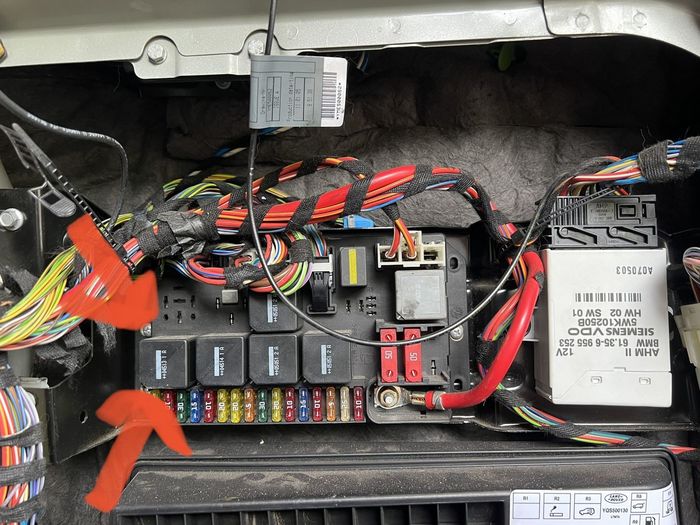
Thanks so much for this, Is it ok to just pull the relays and jumper out with the battery still connected? Also, it appears there is an extra relay in the bottom left position, should I try that one for position 1 and leave the seat heaters relay where it is? See picture below…

Post #645366 11th Oct 2022 1:04pm
View user's profile Send private message View poster's gallery Reply with quote
nicedayforit


Member Since: 11 Jun 2011
Location: Beside the Solway
Posts: 3951

England 2004 Range Rover Vogue Td6 Giverny Green

Pull the jumper and reposition relay 2, you don’t need to disconnect the battery. Nothing untoward will happen, l just tried it on my own car with no issue.
Relay 2 serves the rear blower fan. Thumbs Up
I don’t know what the bottom additional relay serves, my car doesn’t have that. I would leave well alone for now.

Post #645367 11th Oct 2022 1:09pm
View user's profile Send private message View poster's gallery Reply with quote
Post Reply  Back to top
Page 1 of 2 12>
All times are GMT

Jump to  
Previous Topic | Next Topic >
Posting Rules
You cannot post new topics in this forum
You cannot reply to topics in this forum
You cannot edit your posts in this forum
You cannot delete your posts in this forum
You cannot vote in polls in this forum


Site Copyright © 2006-2024 Futuranet Ltd & Martin Lewis
fullfatrr.com RSS Feed - All Forums


Switch to Mobile site