Advertise on fullfatrr.com »

Home > Maintenance & Mods (L322) > Heater fan lubrication ?
Post Reply  Down to end
Page 1 of 1
Print this entire topic · 
Johnte


Member Since: 23 Aug 2010
Location: North Yorkshire
Posts: 733

United Kingdom 
Heater fan lubrication ?

Is it possible to get to the heater fan? I have an annoying squeal / squeak when the fan is set in the lowest position (when you turn it up faster it's fine)
Could I just squirt some WD40 into the intake Whistle

Sounds to be coming from just behind the centre vents Confused

Post #126987 20th Jun 2012 2:11pm
View user's profile Send private message View poster's gallery Reply with quote
stan
Site Moderator


Member Since: 13 Jul 2010
Location: a moderate moderated moderator moderating moderately in moderation
Posts: 34919

United Kingdom 

it appears that the vents just pull out so possibly you might gain access to the motor that way..

Click image to enlarge
 ... - .- -.


click link for ,

FORUM WIKI

HOW TO Ǝꓕ∀ꓕOꓤ PICS

workshop manual downloads are in our wiki

.

Post #126988 20th Jun 2012 2:24pm
View user's profile Send private message View poster's gallery Reply with quote
47p2


Member Since: 05 Oct 2010
Location: Gone Beyond, Subaru
Posts: 8048

Scotland 

Don't be silly Stan, it's a Range Rover...

The engine, gearbox, front and rear diff will have to come out, you might get away with leaving the airbags in place, then remove all the interior including the head lining and the dash, you might also get away with leaving the rear parcel shelf in but this cannot be guaranteed. Once you have done all this you should just about have enough clearance to access the heater motor. Thumbs Up

Post #126989 20th Jun 2012 2:32pm
View user's profile Send private message View poster's gallery Reply with quote
Contraband


Member Since: 08 Nov 2010
Location: FIFE
Posts: 3697

Scotland 

Rolling with laughter Previously..
Vogue SE TD6
Defender 90 2.4
Defender 110 TD5
Vogue 3.5 EFI

Post #126990 20th Jun 2012 2:37pm
View user's profile Send private message View poster's gallery Reply with quote
stan
Site Moderator


Member Since: 13 Jul 2010
Location: a moderate moderated moderator moderating moderately in moderation
Posts: 34919

United Kingdom 

Laughing .........sharp today john.. ... - .- -.


click link for ,

FORUM WIKI

HOW TO Ǝꓕ∀ꓕOꓤ PICS

workshop manual downloads are in our wiki

.

Post #126991 20th Jun 2012 2:38pm
View user's profile Send private message View poster's gallery Reply with quote
47p2


Member Since: 05 Oct 2010
Location: Gone Beyond, Subaru
Posts: 8048

Scotland 

You mean blunt and to the point Stan Laughing Laughing

Post #126993 20th Jun 2012 3:04pm
View user's profile Send private message View poster's gallery Reply with quote
Rob2529


Member Since: 22 Nov 2010
Location: Wirral, uk
Posts: 1470

United Kingdom 2004 Range Rover Vogue 4.4 V8 Oslo Blue

Back to the OP the fans can be accessed a bit if you take out the pollen filter box in the engine bay, remove the seal and then 2x 13mm nuts and just pulls out. You can then get access to the two. If holes and the fan inside. [img]http://www.fuelly.com/driver/rob2529/range-rover[img/]
04, 4.4V8, Vogue Oslo Blue with LPG.
"You can sleep in your car, BUT you can't race your house!!!!"

If something can't be fixed with a hammer....... You have yourself an electrical fault!

Post #127006 20th Jun 2012 5:11pm
View user's profile Send private message View poster's gallery Reply with quote
47p2


Member Since: 05 Oct 2010
Location: Gone Beyond, Subaru
Posts: 8048

Scotland 

^^^ Spoilsport Laughing Laughing

Post #127020 20th Jun 2012 6:38pm
View user's profile Send private message View poster's gallery Reply with quote
jim2RRs


Member Since: 07 Feb 2012
Location: Genesee, Colorado
Posts: 147

United States 2005 Range Rover HSE 4.4 V8 Chawton White

However you get to the fans, you might want to actually use a LUBRICANT instead of WD-40.
Squirting anything, lubricant or WD-40 or Pepsi into the intake will do absolutely nothing other than spray that crap all over the insides of the air ducts.

If the blower is actually squeaking, you need to lubricate the SHAFT of the blower, NOT the fan blades.
Spraying WD-40 onto the shaft will likely make it worse, as the WD-40 will remove whatever lubricant is remaining. Jim
2000 NAS HSE
2005 NAS HSE

Post #127029 20th Jun 2012 8:06pm
View user's profile Send private message View poster's gallery Reply with quote
jim2RRs


Member Since: 07 Feb 2012
Location: Genesee, Colorado
Posts: 147

United States 2005 Range Rover HSE 4.4 V8 Chawton White

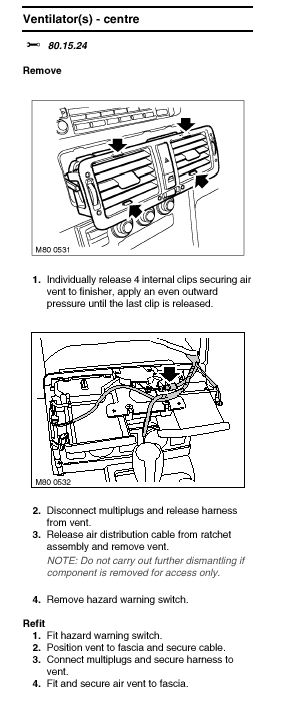
According to RAVE, fan motor access is 5 steps, as follows:

1. Remove HVAC assembly
2. Release air blend assembly and position aside.
3. Release 3 clips and remove heater fan cover.
4. Remove 3 Torx screws securing fan assembly to heater.
5. Disconnect multiplug and remove fan assembly.

Sounds easy enough.
Wait... how do you remove the HVAC Assembly?
Well, that's just 6 easy steps:

1. Remove fascia.
2. Disconnect multiplug and remove air blend motor.
3. Remove Torx screws and nuts from rear of fascia harness tray. Release clips to allow movement of harness for access. Do not cut harness tray cable ties.
4. Remove 2 nuts securing HEVAC assembly to fascia carrier.
5. Note HEVAC harness route prior to removal.
6. With assistance, withdraw HEVAC assembly from fascia.

OK, still not TOO bad. How do you remove the fascia?
Simple! Just 67 steps and you're good to go:

1. Make the SRS system safe.
2. Drain coolant.
3. Recover refrigerant from A/C system.
4. Remove air intake plenum.
5. Remove front seats.
6. Remove heater control panel.
7. Remove air suspension control panel.
8. Remove handbrake lever assembly.
9. Remove footwell closing panels.
10. Release and remove air ducts from HEVAC assembly.
11. LHD only: Remove drivers footrest.
12. Remove 'A' post lower finisher.
13. Remove 'A' post upper finishers.
14. Remove drivers side fascia finisher.
15. Remove passenger side fascia finisher.
16. Remove gearshift selector assembly.
17. Remove 4 nuts securing selector carrier to body and remove.
18. Cover studs to prevent damage to fascia on removal.
19. Remove 4 bolts securing handbrake mounting bracket to body and remove bracket.
20. Remove 4 bolts securing centre console support bracket to body and remove bracket.
21. Noting fitted position, remove Torx bolt from clamp securing steering column lower shaft to intermediate shaft.
22. Remove 2 nuts securing steering support bearing to body, release bearing and disconnect shaft.
23. Noting fitted position, remove nut and disconnect arm from wiper motor.
24. Remove 3 bolts securing wiper motor to mounting bracket, collect motor and move aside for access.
25. Remove 2 bolts securing fascia to bulkhead.
26. Remove 2 Allen bolts securing A/C pipes to bulkhead, disconnect pipes and discard 'O' rings.
CAUTION: Immediately cap all A/C pipes to prevent ingress of dirt and moisture into the system.
27. Position container to collect coolant.
28. Release clips and disconnect coolant hoses from heater matrix at bulkhead.
29. Remove 3 nuts securing heater assembly to bulkhead.
30. Remove 4 nuts and 2 bolts securing fascia assembly to body.
31. Cover fascia lower brackets to protect carpet from damage.
32. Disconnect 2 multiplugs and release harness clip from 'A' post, adjacent to top rail. Repeat on opposite side. Tape disconnected leads to windscreen.
33. Withdraw fascia sufficiently to disconnect 'A' post airbag multiplugs.
34. Passenger side only: Release 2 additional 'A' post harness clips.
35. Remove transfer box ECU.
36. Disconnect positive feed from bulkhead fuse box.
37. Disconnect relay and multiplug from bulkhead fuse box.
38. Release harness from bulkhead and position aside.
39. Disconnect 2 multiplugs from fuel burning heater, if fitted.
40. Disconnect harness from side repeater lamp, release harness grommet from inner wing and withdraw harness.
41. Remove front passenger side wheelarch liner.
42. Release harness from clips on inner wing.
43. Remove 10 Allen screws securing 'E' box cover and remove cover.
44. Remove 2 bolts securing 'E' box to suspension turret, move aside for access.
45. Release air intake duct from inner wing and remove.
46. Remove nuts and disconnect harness earth headers.
47. Remove front bumper.
48. Disconnect hose from rear washer pump.
49. Release 4 cable ties securing washer hose to armature and move hose aside.
50. Disconnect horn multiplugs.
51. Remove indicator lamp.
52. Disconnect headlamp multiplug.
53. Note fitted position of ride height sensor cable ties, remove cable ties and disconnect multiplug.
54. Disconnect multiplugs from radiator pack.
55. Disconnect multiplug from ABS sensor.
56. Disconnect multiplug from A/C switch.
57. Disconnect multiplug from A/C compressor.
58. Remove screw securing light check control module to 'A' post.
59. Move light check module aside.
60. Remove bolt securing door harness connector block to 'A' post and disconnect multiplug.
61. Remove nut securing earth header to 'A' post and release header.
62. Raise carpet and remove 3 scrivets securing harness closing panel to body, release and remove panel.
63. Release clips securing harness connector block to BCU carrier.
64. Remove 2 nuts and move BCU carrier aside.
65. Release main harness from channel and reposition carpet.
66. With assistance, withdraw harness through bulkhead and rotate fascia assembly for access.
CAUTION: Ensure evaporator drain tubes are not damaged when moving fascia.
67. Support fascia on suitably protected axle stands avoiding damage to carpet and trim.

There you have it, pretty straight-forward.
And most of those 67 steps link to other procedures that have another dozen or more steps each.

At least you don't have to remove the tail light bulbs.
Shouldn't take more than a couple days to do it yourself.
Or you could just turn the fan up a notch. Smile Jim
2000 NAS HSE
2005 NAS HSE

Post #127037 20th Jun 2012 8:31pm
View user's profile Send private message View poster's gallery Reply with quote
47p2


Member Since: 05 Oct 2010
Location: Gone Beyond, Subaru
Posts: 8048

Scotland 

So my post was almost correct then Laughing Laughing

Post #127040 20th Jun 2012 8:38pm
View user's profile Send private message View poster's gallery Reply with quote
jim2RRs


Member Since: 07 Feb 2012
Location: Genesee, Colorado
Posts: 147

United States 2005 Range Rover HSE 4.4 V8 Chawton White

pretty close.

I love that you have to remove the front bumper to get to the heater blower motors. (step 47).
I guess LR saved about $2 per vehicle by not using additional multi-plugs on the harness.
Idiots.

LR should take care of the "pretty" stuff; the wood trim, the leather, dash layout.
Then they should sub-contract EVERYTHING ELSE to people who actually know how to build cars.

At least they don't still use Lucas electrics.
And, since the engines (for a few years) weren't built by LR, they didn't leak oil everywhere.

Don't get me wrong, the "style" of LRs (except for that horrid roller-skate evoke thing) is top notch.
They just can't actually BUILD anything they design. Jim
2000 NAS HSE
2005 NAS HSE

Post #127047 20th Jun 2012 9:09pm
View user's profile Send private message View poster's gallery Reply with quote
stan
Site Moderator


Member Since: 13 Jul 2010
Location: a moderate moderated moderator moderating moderately in moderation
Posts: 34919

United Kingdom 

so it'll be squirting wd40 into the intake then... Laughing ... - .- -.


click link for ,

FORUM WIKI

HOW TO Ǝꓕ∀ꓕOꓤ PICS

workshop manual downloads are in our wiki

.

Post #127068 20th Jun 2012 10:31pm
View user's profile Send private message View poster's gallery Reply with quote
Johnte


Member Since: 23 Aug 2010
Location: North Yorkshire
Posts: 733

United Kingdom 

I think it'll be putting it in position 2 onwards, where it's nice and quiet Thumbs Up

Post #127078 20th Jun 2012 11:02pm
View user's profile Send private message View poster's gallery Post Reply
Post Reply  Back to top
Page 1 of 1
All times are GMT + 1 Hour

Jump to  
Previous Topic | Next Topic >
Posting Rules
You cannot post new topics in this forum
You cannot reply to topics in this forum
You cannot edit your posts in this forum
You cannot delete your posts in this forum
You cannot vote in polls in this forum


Site Copyright © 2006-2024 Futuranet Ltd & Martin Lewis
fullfatrr.com RSS Feed - All Forums


Switch to Mobile site