Advertise on fullfatrr.com »

Home > My Range Rover > My L322 4.2 SC
Post Reply  Down to end
Page 6 of 7 <1234567>
Print this entire topic · 
bigbo


Member Since: 07 Jul 2014
Location: Derbyshire
Posts: 535

United Kingdom 2006 Range Rover Supercharged 4.2 SC V8 Buckingham Blue

So new shoes etc have failed to cure the problem, so time to order new cables, Rob at Duckworth's has given me a good price so I will get those ordered.

Because it requires removal of the centre console to get access I will at the same time replace the cubby gas struts as well.
I've been waiting for an excuse to do those.

I will also remove the side steps and the wheel arch liners and cill covers to do a proper inspection to see what horrors are brewing. Additionally I will look at the brake lines to see if they are rusted.

Fingers crossed that I don't find to much to deal with.

David
PS will be ordering Hydrate-80, high zinc primer and probably Bilt Hamber epoxy mastic.
If brake lines are rusted then will order pipe and fittings (already have the tools) Range Rover 4.2 Supercharged 2006
Ford Focus EcoBoost 1.5 2017
MG TF 2003

Previous Cars of note
Land Rover Discovery 2
Jaguar Mk2 3.8 - Company car
MG Midget 1974 - Concours

Post #632597 23rd May 2022 3:38am
View user's profile Send private message View poster's gallery Reply with quote
bigbo


Member Since: 07 Jul 2014
Location: Derbyshire
Posts: 535

United Kingdom 2006 Range Rover Supercharged 4.2 SC V8 Buckingham Blue

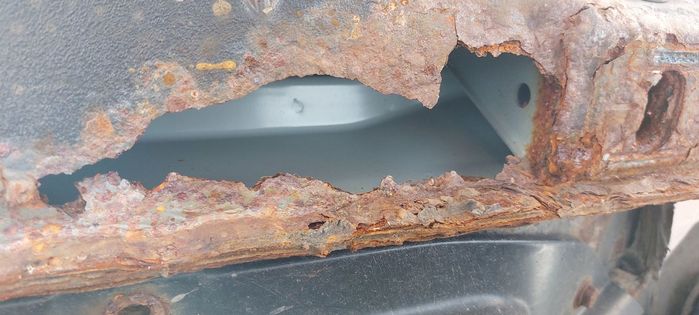
I have now removed the rear arch liner and the cill cover on the nearside.

The rust is a lot better than some have posted on this forum but still bad.

Would love to show you but uploading photos is not working at the moment.

I have treated light surface corrosion in the wheel arch, Hydrate 80, high zinc primer and finished with stonechip.

I have ordered a rear arch repair panel but will be cutting that down (cost was £63 on eBay). I need about 150mm at the leading edge and around 100mm at the trailing edge. So a nice easy repair.

However under the cill there is severe perforation and needs a lot of grinding out. However it's still an easy repair as it just needs a piece of flat steel with a simple 90 bend where it is spot welded to the inner cill, between the spot welds are the drain channels.

When removing the side steps three of the 5mm screws sheared so these will need drilling out, hopefully an extractor will sort that. I have ordered a 90 degree air drill as space is a bit tight. What LR engineer thought 5mm screws would do the job!
The side steps are in a shocking state, looking at the paint I am surprised they have lasted this long, a very thin coat of paint on bare steel, no corrosion protection at all.

I've had a quote for £150 to blast and powder coat them so I will be doing those myself!

David
PS I found that removing the arch liners to be very easy, some have said that it can be tricky. Now my liners are different to the manual. There are two screws and two plastic scrivits plus one stud at the highest point of the arch, I then used a plastic trim removal tool to lift the liner against the arch lip and then ran a trim tool down the arch either side of the stud and the arch fell out. Hope that helps others.

PS2 I used loads of PlusGas on the side step screws to no avail. Range Rover 4.2 Supercharged 2006
Ford Focus EcoBoost 1.5 2017
MG TF 2003

Previous Cars of note
Land Rover Discovery 2
Jaguar Mk2 3.8 - Company car
MG Midget 1974 - Concours

Post #638807 6th Aug 2022 12:09am
View user's profile Send private message View poster's gallery Reply with quote
bigbo


Member Since: 07 Jul 2014
Location: Derbyshire
Posts: 535

United Kingdom 2006 Range Rover Supercharged 4.2 SC V8 Buckingham Blue

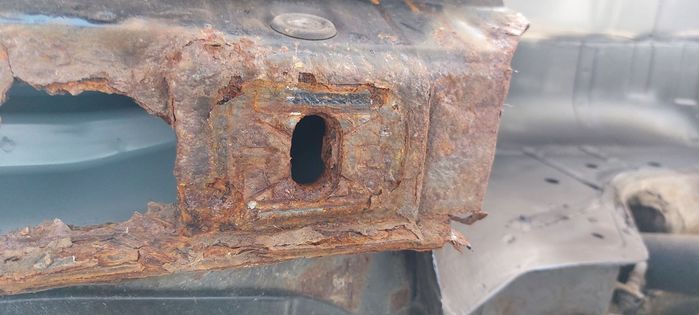
Looking up at the cill they were like this


Small update. photos now uploading


But the insides were very clean. I have cut all the rusty areas out and am nearly ready to make the repair panels.

More to follow......

David Range Rover 4.2 Supercharged 2006
Ford Focus EcoBoost 1.5 2017
MG TF 2003

Previous Cars of note
Land Rover Discovery 2
Jaguar Mk2 3.8 - Company car
MG Midget 1974 - Concours

Post #641026 27th Aug 2022 2:00am
View user's profile Send private message View poster's gallery Reply with quote
dhallworth


Member Since: 10 Oct 2011
Location: Glasgow
Posts: 2951

United Kingdom 2012 Range Rover Autobiography TDV8 Baltic Blue

Nice work!

It's amazing how many L322's are starting to look crusty and have holes in them underneath the cill covers! 2002 4.6 Vogue SE - Alveston Red with Lightstone Leather
2007 Range Rover Supercharged in Java Black with Ivory Leather
2012 Range Rover 5.0 SC Autobiography in Indus Silver with Jet/Ivory Interior
2012 Range Rover 4.4 TDV8 Autobiography in Baltic Blue with Sand Interior

Post #641043 27th Aug 2022 9:28am
View user's profile Send private message View poster's gallery Reply with quote
Haylands


Member Since: 04 Mar 2014
Location: East Yorkshire
Posts: 7879

England 2014 Range Rover Autobiography SDV8 Loire Blue

Caught just in time from the expensive to repair inner sills... Thumbs Up Pete

__________________________________________________
2014 L405 Autobiography SDV8 4.4 Loire Blue Ebony interior
2011 L322 Vogue SE 4.4 TDV8 Baltic Blue. Parchment over Navy Interior. Sold
2012 L322 Autobiography 5.0 Supercharged Ipanema Sand, Jet Interior. Sold
2002 L322 Vogue 4.4 V8 Epson Green, Ivory over Aspen Interior (Fatty Offroader) Sold
-Click for Project Fatty off roader-

Post #641053 27th Aug 2022 10:17am
View user's profile Send private message View poster's gallery Reply with quote
bigbo


Member Since: 07 Jul 2014
Location: Derbyshire
Posts: 535

United Kingdom 2006 Range Rover Supercharged 4.2 SC V8 Buckingham Blue

Yes pleased about that,

Looking inside the cills today I noticed that they contain reinforcements that are bonded in place. So I am guessing difficult to repair.

Waiting for the wheel arch repair panel to arrive (Yodal lost it for a few days) so that I can cut out the rest of the rust.

Then down to a friends workshop for him to weld for me.

Thinking of when the welding is complete I'm wondering how to get some decent protection inside the cill. I'm thinking of high zinc primer. Has anyone done this.

Naturally I will treat with cavity wax post treatment throughout all of these panels.

David Range Rover 4.2 Supercharged 2006
Ford Focus EcoBoost 1.5 2017
MG TF 2003

Previous Cars of note
Land Rover Discovery 2
Jaguar Mk2 3.8 - Company car
MG Midget 1974 - Concours

Post #641155 28th Aug 2022 12:48am
View user's profile Send private message View poster's gallery Reply with quote
Haylands


Member Since: 04 Mar 2014
Location: East Yorkshire
Posts: 7879

England 2014 Range Rover Autobiography SDV8 Loire Blue

When you have it all cut out and ready to weld use weld through primer on all of it, then afterwards use the cavity protection of your choice, personally I like Dinitrol... outside, again, use whatever you like, just remember to keen an eye on it..... Thumbs Up Pete

__________________________________________________
2014 L405 Autobiography SDV8 4.4 Loire Blue Ebony interior
2011 L322 Vogue SE 4.4 TDV8 Baltic Blue. Parchment over Navy Interior. Sold
2012 L322 Autobiography 5.0 Supercharged Ipanema Sand, Jet Interior. Sold
2002 L322 Vogue 4.4 V8 Epson Green, Ivory over Aspen Interior (Fatty Offroader) Sold
-Click for Project Fatty off roader-

Post #641185 28th Aug 2022 8:07am
View user's profile Send private message View poster's gallery Reply with quote
bigbo


Member Since: 07 Jul 2014
Location: Derbyshire
Posts: 535

United Kingdom 2006 Range Rover Supercharged 4.2 SC V8 Buckingham Blue

Yes I have some weld through primer, just wondered how much gets burnt off and how to deal with that.

Thanks will treat after welding as well.

David Range Rover 4.2 Supercharged 2006
Ford Focus EcoBoost 1.5 2017
MG TF 2003

Previous Cars of note
Land Rover Discovery 2
Jaguar Mk2 3.8 - Company car
MG Midget 1974 - Concours

Post #641608 31st Aug 2022 11:59pm
View user's profile Send private message View poster's gallery Reply with quote
bigbo


Member Since: 07 Jul 2014
Location: Derbyshire
Posts: 535

United Kingdom 2006 Range Rover Supercharged 4.2 SC V8 Buckingham Blue

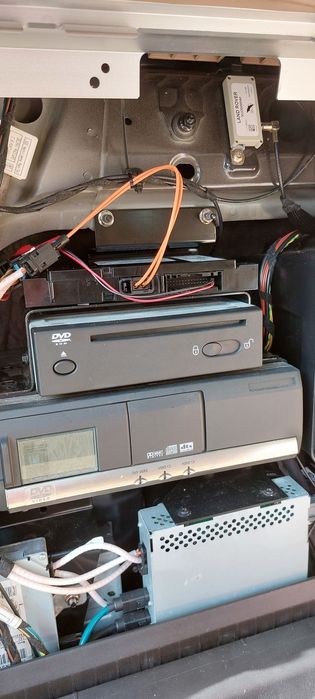
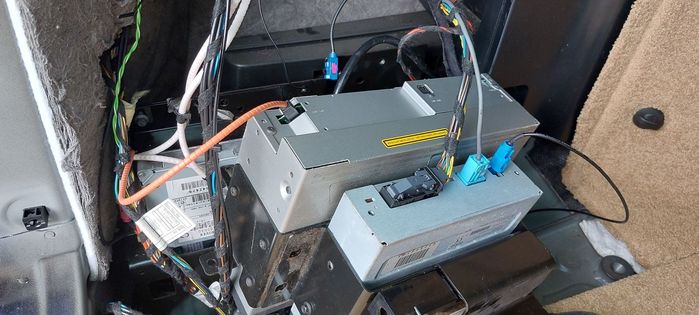
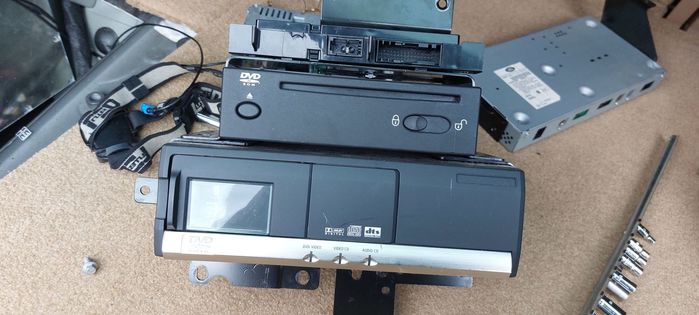
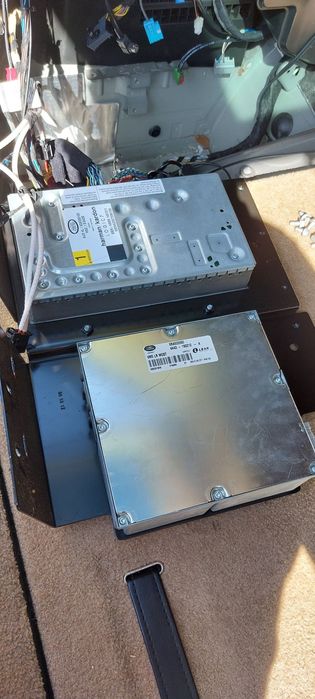
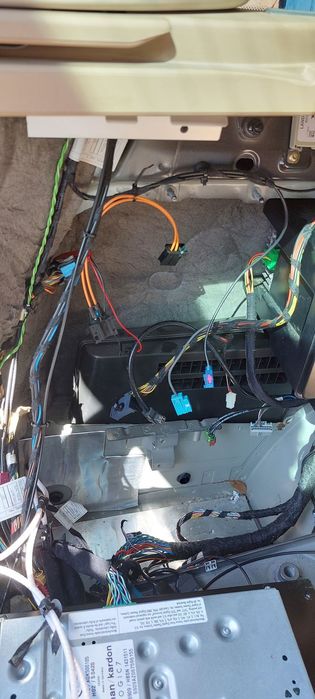
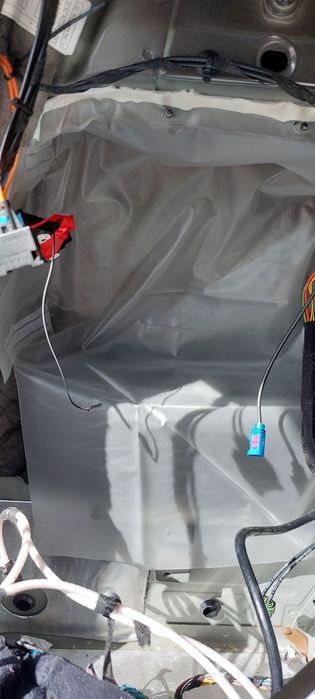
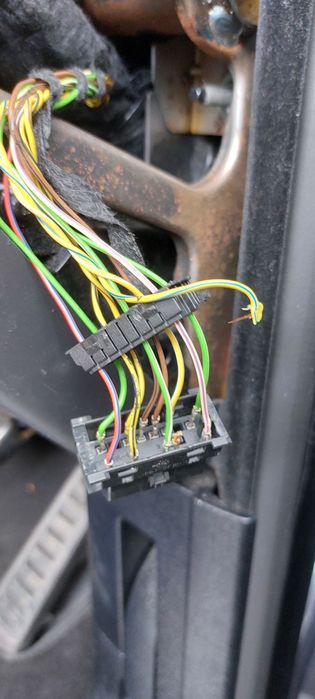
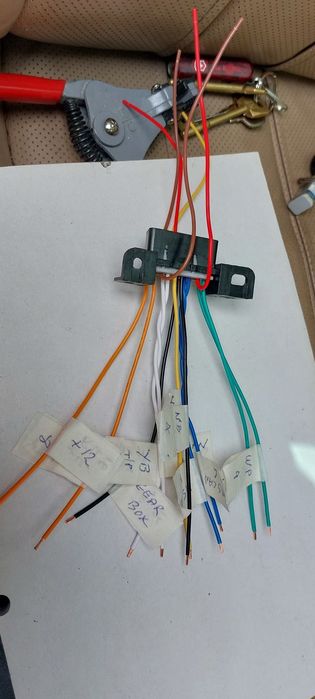
I needed to change my TV module to a newer hybrid one, so as I have to remove everything, I decided to add in the LR Water Shedder. As most of the posts covering this that I have been able to find have no pictures, or the pictures are missing I thought I would document the process.

Here is my Audio Bay before starting, at the top is the Bluetooth module, then the Sat Nav below that the DVD player. The module at the bottom is the Entertainment Module that needs to be removed first, just two screws to release, be careful with the S-Video cable its easily damaged.

Click image to enlarge


Remove the two nuts at the top just above the Bluetooth Module and the 5 screws under the DVD player (mine only had 4)
Tilt the whole assembly forward and up until you have access to remove all the cables. Near the top of the picture there is a loose cable with a blue and pink plug, if anyone knows what it is I'd love to know.


Take assembly out and set aside


Sorry I am missing two pictures, they just will not upload, but the modules are easy to remove. First remove the TMC Module, then unplug all the cables on the TV module. Undo the remaining screws and the Logic 7 and TV modules come out as one unit. It's then straight forward to remove and replace the TV tuner. They are different sizes but I did not bother to drill new holes and used 3M double sided tape to replace two of the bolts

Click image to enlarge


This is what the Audio Bay looks like now


Click image to enlarge


Then came the time to fit the water shedder


Click image to enlarge


All that needs doing now is to replace it all. All in all, it took about 3 hours, but I could do it in less than an hour now, so I am not concerned into having to replace the TV Module as that has proved to be faulty! The next time I see one at a sensible price I'll buy.
I did this on a very hot sunny day, with the sun shining into the boot! it got very hot in there.

David Range Rover 4.2 Supercharged 2006
Ford Focus EcoBoost 1.5 2017
MG TF 2003

Previous Cars of note
Land Rover Discovery 2
Jaguar Mk2 3.8 - Company car
MG Midget 1974 - Concours

Post #642300 7th Sep 2022 6:20pm
View user's profile Send private message View poster's gallery Reply with quote
dhallworth


Member Since: 10 Oct 2011
Location: Glasgow
Posts: 2951

United Kingdom 2012 Range Rover Autobiography TDV8 Baltic Blue

Nice work.

I had mine removed the other day to look at the faulty DVD player. Unfortunately my unit is toast so I need to look for another at some point.

I notice you’re using a MOST extension for the Bluetooth module. Where did you buy that from? I’d like to extend mine as it’s just a little bit tighter then I’d like.

Thanks,
David. 2002 4.6 Vogue SE - Alveston Red with Lightstone Leather
2007 Range Rover Supercharged in Java Black with Ivory Leather
2012 Range Rover 5.0 SC Autobiography in Indus Silver with Jet/Ivory Interior
2012 Range Rover 4.4 TDV8 Autobiography in Baltic Blue with Sand Interior

Post #642301 7th Sep 2022 6:40pm
View user's profile Send private message View poster's gallery Reply with quote
bigbo


Member Since: 07 Jul 2014
Location: Derbyshire
Posts: 535

United Kingdom 2006 Range Rover Supercharged 4.2 SC V8 Buckingham Blue

Hi David

I had two bypass loops one male and one female and just reconfigured them into an extension cable. Nice easy job and very effective.
I would love to get some white spiral wrap to complete the job but not taken to time to look for some, it's on my job list.

David Range Rover 4.2 Supercharged 2006
Ford Focus EcoBoost 1.5 2017
MG TF 2003

Previous Cars of note
Land Rover Discovery 2
Jaguar Mk2 3.8 - Company car
MG Midget 1974 - Concours

Post #642309 7th Sep 2022 7:26pm
View user's profile Send private message View poster's gallery Reply with quote
dhallworth


Member Since: 10 Oct 2011
Location: Glasgow
Posts: 2951

United Kingdom 2012 Range Rover Autobiography TDV8 Baltic Blue

That’s a good idea, I hadn’t thought of that!

I now have a pair of bypass loops arriving tomorrow thanks to Amazon!

Thanks! Smile

David. 2002 4.6 Vogue SE - Alveston Red with Lightstone Leather
2007 Range Rover Supercharged in Java Black with Ivory Leather
2012 Range Rover 5.0 SC Autobiography in Indus Silver with Jet/Ivory Interior
2012 Range Rover 4.4 TDV8 Autobiography in Baltic Blue with Sand Interior

Post #642311 7th Sep 2022 8:14pm
View user's profile Send private message View poster's gallery Reply with quote
bigbo


Member Since: 07 Jul 2014
Location: Derbyshire
Posts: 535

United Kingdom 2006 Range Rover Supercharged 4.2 SC V8 Buckingham Blue

No problem, pleased to help. Thumbs Up

David Range Rover 4.2 Supercharged 2006
Ford Focus EcoBoost 1.5 2017
MG TF 2003

Previous Cars of note
Land Rover Discovery 2
Jaguar Mk2 3.8 - Company car
MG Midget 1974 - Concours

Post #642313 7th Sep 2022 8:21pm
View user's profile Send private message View poster's gallery Reply with quote
bigbo


Member Since: 07 Jul 2014
Location: Derbyshire
Posts: 535

United Kingdom 2006 Range Rover Supercharged 4.2 SC V8 Buckingham Blue

I have tried to add detailed information about my rust repairs here but for some reason I cannot upload pictures on this thread, So I created a new posting https://www.fullfatrr.com/forum/post650136.html#650136

As I still cannot upload pictures to this thread part 2 and 3 are in the above post.
Hopefully future progress will be on here....

David Range Rover 4.2 Supercharged 2006
Ford Focus EcoBoost 1.5 2017
MG TF 2003

Previous Cars of note
Land Rover Discovery 2
Jaguar Mk2 3.8 - Company car
MG Midget 1974 - Concours

Post #650137 8th Dec 2022 4:15am
View user's profile Send private message View poster's gallery Reply with quote
bigbo


Member Since: 07 Jul 2014
Location: Derbyshire
Posts: 535

United Kingdom 2006 Range Rover Supercharged 4.2 SC V8 Buckingham Blue
Diagnostics port repair

First update in quite a while, I've been working on my wife's MG, major service and cam belt change which led to head gasket replacement.

Out for a drive and the EML came on, which was a real pain as the diagnostics port doesn't work.
So forced to repair that in order to read the code.
I tried to get hold of a second hand socket but all the ones I could find were 9 wire mine is 11 wires. I contacted several breakers but only one responded and that was negative. So I decided to purchase a generic socket.

Started with this


Click image to enlarge

Added this

Click image to enlarge

Creating this

Click image to enlarge


The wires pointing to the right are the unused connections. I added an extension cable
to the new socket and threaded this through the dash ready for future use.
I left the tags on the new socket wires for future reference.

To help I created this spreadsheet


And used this and other online resources to identify the socket wiring.


After all that the EML code had disappeared, I assume because I had the battery disconnected so I am expecting it to return.

David Range Rover 4.2 Supercharged 2006
Ford Focus EcoBoost 1.5 2017
MG TF 2003

Previous Cars of note
Land Rover Discovery 2
Jaguar Mk2 3.8 - Company car
MG Midget 1974 - Concours

Post #674112 23rd Sep 2023 11:32pm
View user's profile Send private message View poster's gallery Reply with quote
Post Reply  Back to top
Page 6 of 7 <1234567>
All times are GMT

Jump to  
Previous Topic | Next Topic >
Posting Rules
You cannot post new topics in this forum
You cannot reply to topics in this forum
You cannot edit your posts in this forum
You cannot delete your posts in this forum
You cannot vote in polls in this forum


Site Copyright © 2006-2024 Futuranet Ltd & Martin Lewis
fullfatrr.com RSS Feed - All Forums


Switch to Mobile site