Advertise on fullfatrr.com »

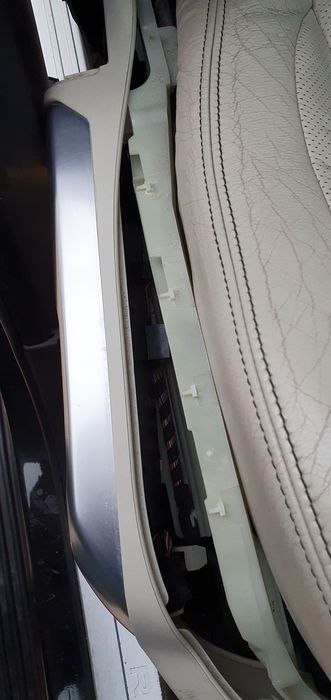
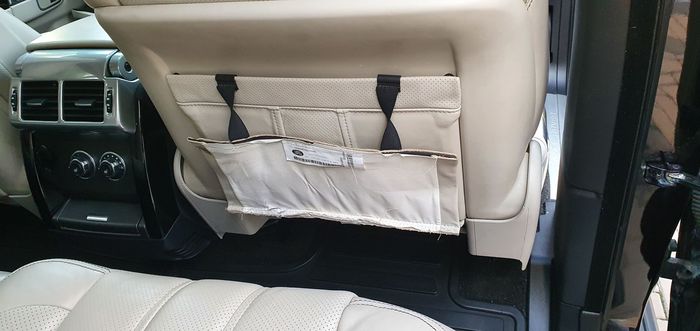
Home > Maintenance & Mods (L322) > How To: Remove Seat Backs on 2010-2012 Cars
Post Reply  Down to end
Page 1 of 1
Print this entire topic · 
garyRR


Member Since: 13 Mar 2021
Location: Hampshire
Posts: 1286

United Kingdom 
How To: Remove Seat Backs on 2010-2012 Cars

Ok so the wiki page and video on YouTube are of earlier cars and as I found out when trying to diagnose a peltier unit fault with my seats, how to remove the back differs to earlier cars.

So, here's the how to *WITH THE SEATS IN SITU*

Time: 1 hour 30 minutes

Difficulty: Medium

Tools Required:
Long flat bladed Screwdriver
Ratchet with T20 and T30 bits and 10mm and 13mm sockets
Screwdriver with T20 bit

Step 1: Lower the seat to remove the inside screw

Contrary to what you might think, you need the power still on for this first step.

Lower the seat to its minimum height and put it as far back as possible. Here you will be loosening the screw on the centre console side of the seat trim. Lowering the seat and putting it as far back as possible makes this screw easily accessible. It's a T30 bit.

Click image to enlarge


Step 2: Move the seat and cut power

Once you've got this screw out, move the seat as far forwards as possible and as high as possible.

Then follow the instructions inside the bonnet and remove the negative (M10) and positive (M13) terminals from the battery to cut power. Remember the seats have airbags in and you'll be working right next to one of the sensors.

Step 3: Remove the outside seat trim

Remove the seat belt anchor point trim. This pulls up slightly then out.

Click image to enlarge


Click image to enlarge


Under the seat are 2x T20 screws to remove. These are accessible with a ratchet.


Now, the seat trim will gently pry off. There's a panel clip at the back, middle and front so, focus any pressure on these areas.

The panel will then pull off. There's no need to remove any cabling.

Click image to enlarge


Click image to enlarge


Step 4: Unclip the rear pouch and remove the white joining trim

This is quite simple. The rear pouch just has some bungee clips underneath to undo.


Stow out the way like this:


The white joining trim will bend easily so, this is a simple step. See the back of it as to how it fits:


First, unclip the tab at the top on both the left and right. Then just bend the white plastic and pull it out of its channel on one side. Then it will simply pull out the other.


Step 5: Remove the rear panel

There's a couple of steps here. First you need to remove the panel from the spindles on either side of the seat:

Click image to enlarge


Click image to enlarge


Just flex the panel over the spindles.

Now, the panel is ready to be removed. Start firmly pulling downwards. There is a tab on either side at the top. You'll need to pull it a good 7cm or so before the panel is clear of the tabs.


Once free, you'll need to do a bit of hokey poker to get the panel free. Release the outer side first then gentle manoeuvre the panel to get the inside clear and the panel will pull out.

Click image to enlarge


Step 6: Accessing the Peltier cell screws

This is the view you should now have:

Click image to enlarge


First step is to unplug the multiplug - just push in the tab and pull.

Next step is to start removing the cell. First, unclip this wire:

Click image to enlarge


Now unclip the trim on the lower side of the air intake:


Now unclip the seat base stretcher (the screwdriver will come in handy here, as it needs a fair amount of pressure):


Step 7: Remove the Peltier cell

The 3x T20 screws should now be visible. Remove these.

Click image to enlarge


Now unclip the two clips at the top of the Peltier cell:

Click image to enlarge


The unit is now free - there's a fair amount of space so should be easy to remove for replacement or repair.


And now just the reverse for refitting!

A note when putting things back together, the inside trim may need putting back into position. Just reach in and move the tab back inside the frame of the seat:

Click image to enlarge
 2015 Range Rover Autobiography 4.4 SDV8

Last edited by garyRR on 27th Jun 2022 11:39pm. Edited 1 time in total

Post #635616 27th Jun 2022 9:50pm
View user's profile Send private message View poster's gallery Reply with quote
Full-fat-Lance


Member Since: 06 Feb 2022
Location: Essex
Posts: 112

United Kingdom 2011 Range Rover Autobiography 4.4 V8 Orkney Grey

Brilliant write up. Thanks for doing this. I’ll definitely be using it soon as I’m convinced my seat isn’t cooling as it should be in the seat back.

Post #635617 27th Jun 2022 11:13pm
View user's profile Send private message View poster's gallery Reply with quote
garyRR


Member Since: 13 Mar 2021
Location: Hampshire
Posts: 1286

United Kingdom 

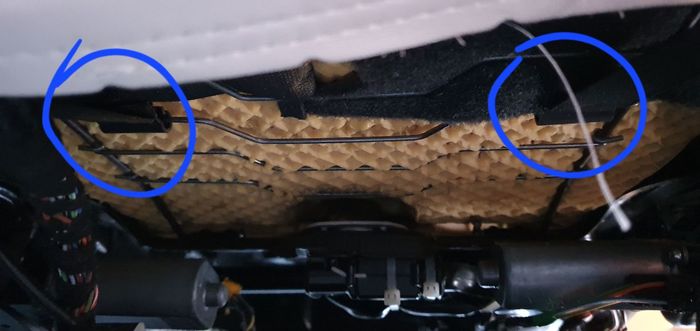
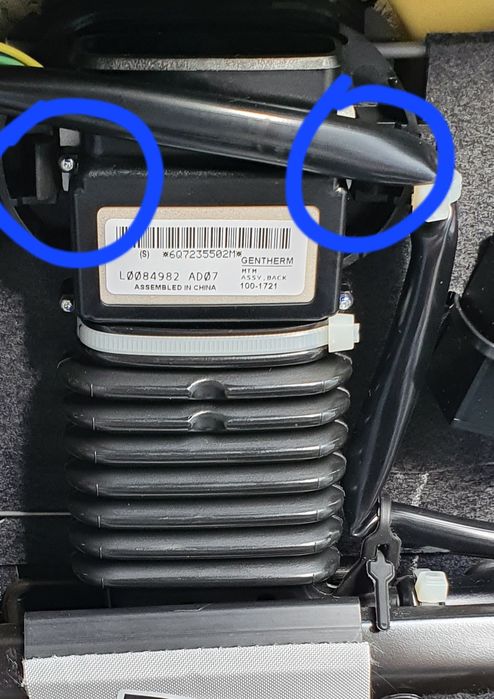
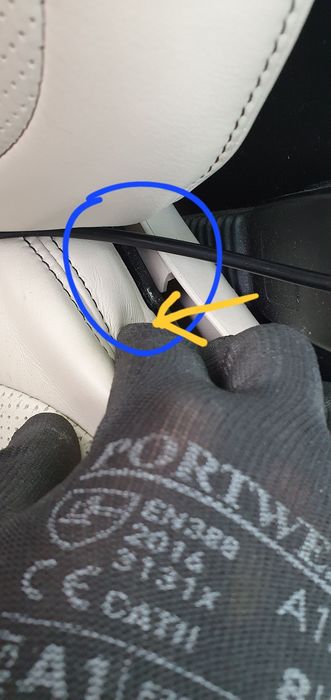
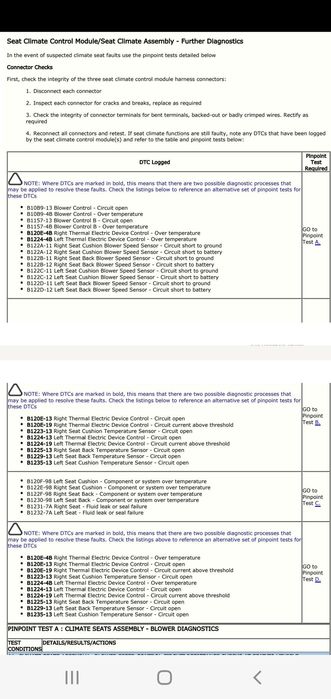
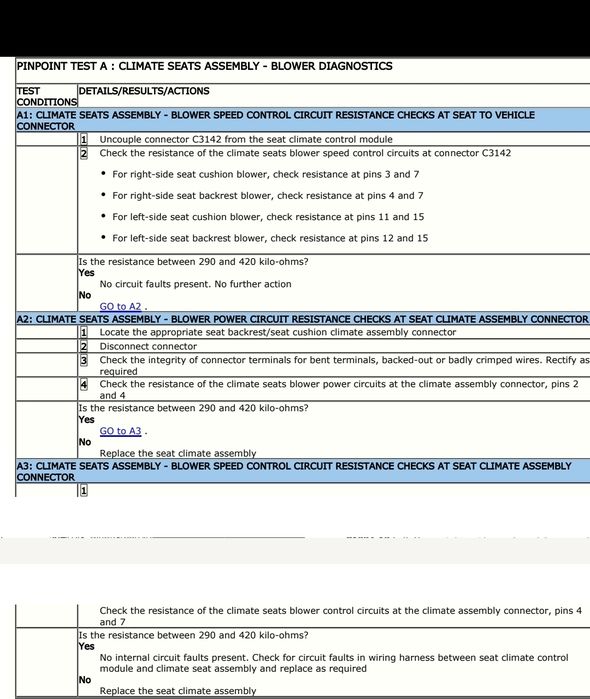
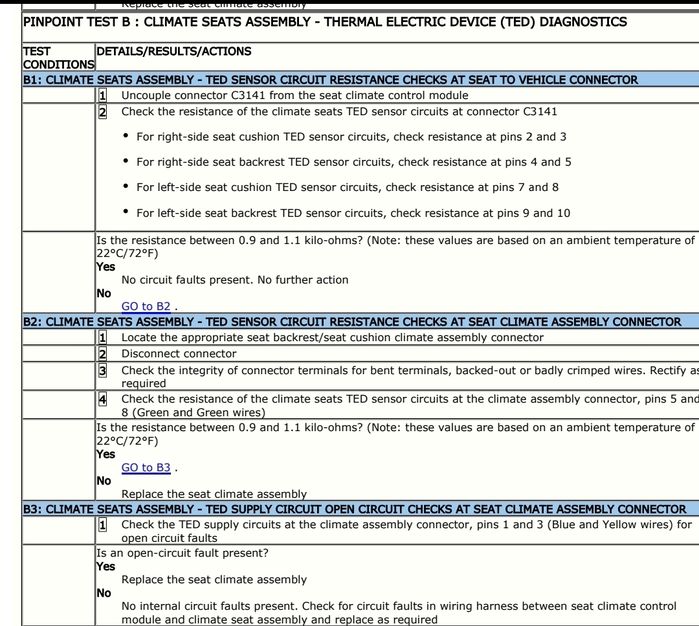
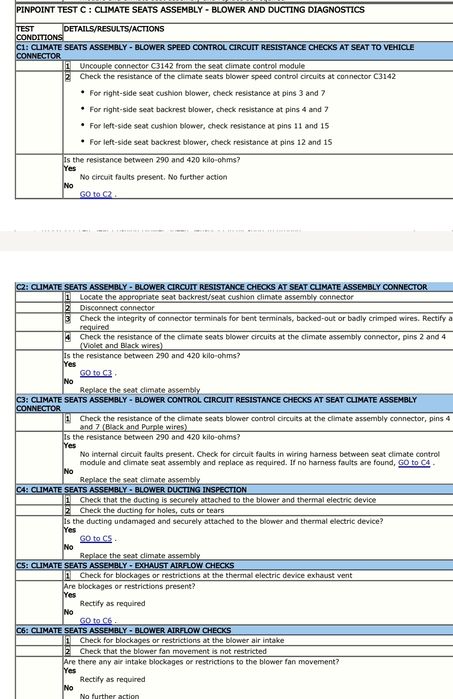
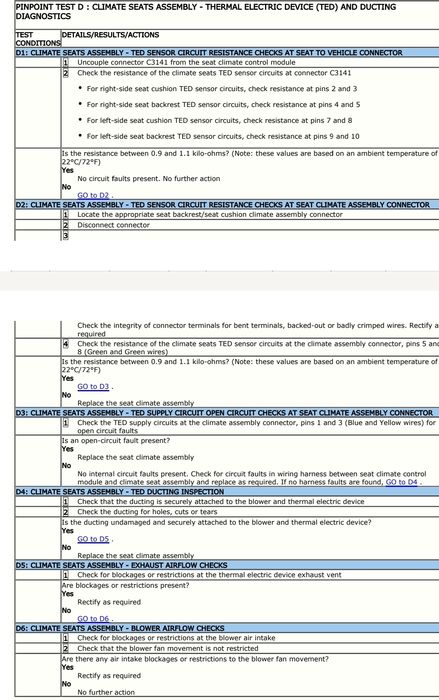
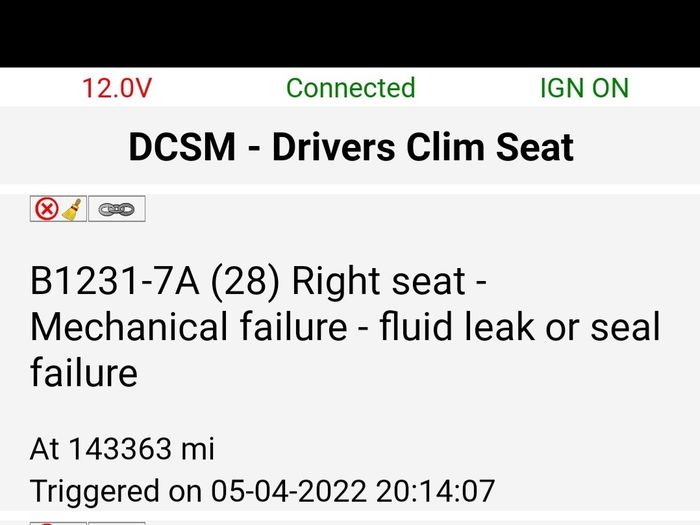
For seat heating/cooling diagnostics, the below is hidden in the workshop manual:

Click image to enlarge


Then follow the diagnostic tests A-D as the above reference table identifies based on the code you get.

Click image to enlarge


Click image to enlarge


Click image to enlarge


-------------

My symptoms: cooled seat works however heated seat does not operate and once activated, cooling will not work either. Requires a battery reconnect for cooling to start working again.

My IID tool was giving me the following error:


Following the above diagnosis guide, i should be looking at tests C for correct resistance of each unit and at the blower and ducting assembly. As you can see from the guide, there are other errors to do with open loop, current draw etc if the units were to fail and as mine specifically says seal leak, I have started with the inspections of the ducting and then working my way back to the Peltier units.

After removing the back unit for a thorough inspection, the plastic had plenty of flex, there were no cracks anywhere on the assembly and the fan functioned correctly. The unit also looked fairly new and, there was a sign the pack has been taken off the seat before so, I suspect this unit has already been changed in the the last few years. On this basis, I didn't feel resistance checking was necessary and to focus investigations on the base unit. Accessing the seat base is actually much easier. I'll write a short guide but it's actually just 4 bolts and all you have to Then do is tilt the seat backwards or forwards go access the underneath. 2015 Range Rover Autobiography 4.4 SDV8

Post #635618 27th Jun 2022 11:46pm
View user's profile Send private message View poster's gallery Reply with quote
Phoenix


Member Since: 16 May 2022
Location: Gone
Posts: 1631

United Kingdom 

That's exactly the same construction (and method, except I left the outer trim in situ) as my 08MY.

Post #635625 28th Jun 2022 6:17am
View user's profile Send private message View poster's gallery Reply with quote
ergobyte


Member Since: 03 Apr 2022
Location: bordeaux
Posts: 119

France 2012 Range Rover Vogue 4.4 V8 Java Black

Thanks Gary,
you're a natural for explanations
This is a Brilliant tutorial and it should be in the WIKI !

Cheers "it needs some intelligence to undestand you may not have enough"

Post #635651 28th Jun 2022 2:54pm
View user's profile Send private message View poster's gallery Reply with quote
DrRob


Member Since: 16 Apr 2015
Location: Petersfield, Hampshire
Posts: 4203

United Kingdom 2011 Range Rover Vogue SE TDV8 Buckingham Blue

Brilliant write up.
Stan - one for the Wiki I would suggest.... 2011 4.4 TDV8 Vogue SE Buckingham Blue with Ivory and clear glass = "Rory"
New Defender D300 90 on order so "Rory" will be going to a new home....!
1974 Series 3 Lightweight = "Millie"
My preferred specialist: www.glenrands.co.uk
--------------------------------------------------

Post #635657 28th Jun 2022 5:03pm
View user's profile Send private message View poster's gallery Reply with quote
Fla


Member Since: 26 Nov 2023
Location: South west
Posts: 137

Ireland 2012 Range Rover Westminster 4.4 V8 Zambezi Silver

Hi guys

Im in the middle of sourcing parts and trying to fix a few issues with my new to me RR Westminster

One of the issues I want to tackle as its cold is the heated seats. I see on another post Jag XFs might have the same unit to fix the heated seat not working.

https://rrr.lt/en/used-part/kdd9771-l00849...fan-blower

This is a link for a Jag XF complete Peltier unit with the same model number L0084982 but on pictures above the land rover one has AD07 after the model number where as the Jag one has AD05

Is there any chance this is the same unit or would have at least the same insides as 2 of these would cost me 180 Euro where as 1 unit onlibe is 500 euro or for the plastic and Peltier its cost me 400 euro delivered and customs.

Im sorry if I am repeating prvious questions or posts its just I amd trying to read 70 pages of posts relating to all my issues!

Thanks Current yokes
2012 4.4 TDV8 Westminster
2006 Disco 3
Scoobie GT wagon
Mx5 G Ltd
TT S Line
Pajero JDM Exceed

Post #679446 4th Dec 2023 5:23pm
View user's profile Send private message View poster's gallery Reply with quote
garyRR


Member Since: 13 Mar 2021
Location: Hampshire
Posts: 1286

United Kingdom 

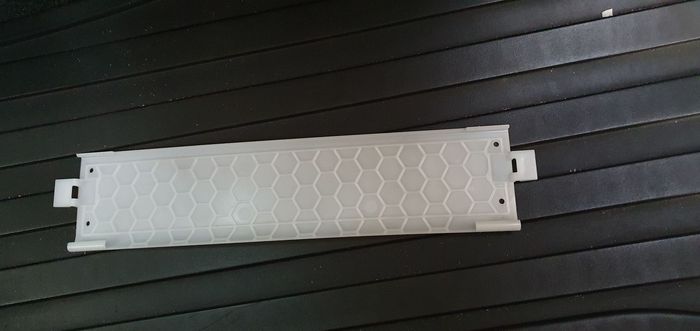
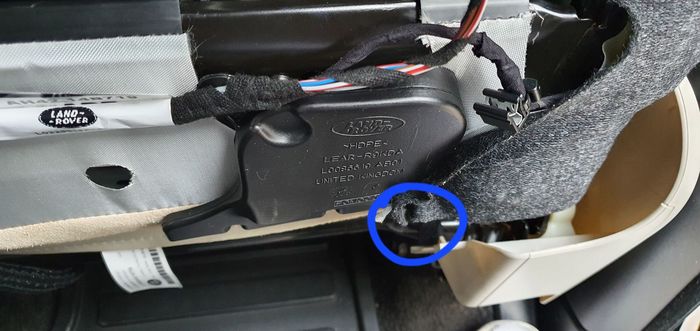
Yes, it's the same unit. Part number is HHK500060 on all 2002-2012 cars with heated and cooled seats. Only the peltier cell needs replacing, unless the ducting is damaged, or the motor isn't working.

There's supply problems on them at the moment (including to Land Rover themselves).

If your seat blowers continue running on cool but trip out after a few seconds on heat, you can almost guarantee its the rear peltier cell. To confirm, remove the seat back and disconnect the multiplug. Then put a multimeter across the blue and the yellow cable. A healthy unit is around 10ohms. A faulty unit often reads around 1kohm. 2015 Range Rover Autobiography 4.4 SDV8

Post #679450 4th Dec 2023 6:03pm
View user's profile Send private message View poster's gallery Reply with quote
Fla


Member Since: 26 Nov 2023
Location: South west
Posts: 137

Ireland 2012 Range Rover Westminster 4.4 V8 Zambezi Silver

Thanks Gary

Ripped the drivers side and even though I have an intact duct (might be a revised part as the rubber/plastic is soft) I'm afraid I do have 1.4komh across the blue and yellow.

The only source I have seen on here is JNC but that costs 150 sterling which will be around 220-240 euro by the time I convert to euro, delivery and customs here.

Have we any other site source for just the peltier unit at present?

Thanks Current yokes
2012 4.4 TDV8 Westminster
2006 Disco 3
Scoobie GT wagon
Mx5 G Ltd
TT S Line
Pajero JDM Exceed

Post #679468 4th Dec 2023 8:26pm
View user's profile Send private message View poster's gallery Reply with quote
garyRR


Member Since: 13 Mar 2021
Location: Hampshire
Posts: 1286

United Kingdom 

There's a shipment due at some point in the next few weeks, so if you can, hold on for a bit. 2015 Range Rover Autobiography 4.4 SDV8

Post #679470 4th Dec 2023 8:38pm
View user's profile Send private message View poster's gallery Reply with quote
Fla


Member Since: 26 Nov 2023
Location: South west
Posts: 137

Ireland 2012 Range Rover Westminster 4.4 V8 Zambezi Silver

Ah ya its not vital, no harm in learning how to rip the unit anyways. The posts and pictures on here were very helpful.

Is this shipment the ones that cost £150 for the duct and peltier? Current yokes
2012 4.4 TDV8 Westminster
2006 Disco 3
Scoobie GT wagon
Mx5 G Ltd
TT S Line
Pajero JDM Exceed

Post #679472 4th Dec 2023 8:52pm
View user's profile Send private message View poster's gallery Post Reply
Post Reply  Back to top
Page 1 of 1
All times are GMT

Jump to  
Previous Topic | Next Topic >
Posting Rules
You cannot post new topics in this forum
You cannot reply to topics in this forum
You cannot edit your posts in this forum
You cannot delete your posts in this forum
You cannot vote in polls in this forum


Site Copyright © 2006-2024 Futuranet Ltd & Martin Lewis
fullfatrr.com RSS Feed - All Forums


Switch to Mobile site