Advertise on fullfatrr.com »

Home > Technical (L322) > 2010 3.6 TDV8, dreaded oil cooler water leak.
Post Reply  Down to end
Page 1 of 2 12>
Print this entire topic · 
Healeyv8


Member Since: 25 Dec 2023
Location: Research Victoria
Posts: 5

Australia 2010 Range Rover SE TDV8 Causeway Grey
2010 3.6 TDV8, dreaded oil cooler water leak.

Gidday from Australia, I have a 2010 RR Sport TDV8, 290000, dreaded oil cooler water leak, just wondering if any one has just replaced the gasket and not the whole assemble ? and any recommendations for the aftermarket assemble? with oil filter, original price I have found down here is around $2700 ASD. also any advice on the best manual download for the L322. any advice would be gratefully excepted, thanks all the best Lance.

Post #721376 16th Jul 2025 8:03am
View user's profile Send private message View poster's gallery Reply with quote
Red Hot one


Member Since: 09 Dec 2018
Location: Herefordshire
Posts: 238

United Kingdom 2009 Range Rover Vogue TDV8 Stornoway Grey

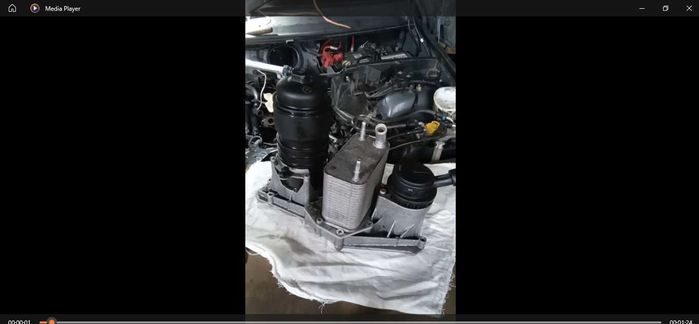
I assume you mean the assembly deep in the "V" of the engine with the oil filter housing, fuel cooler and crank breather. Where is the coolant leaking from, front of the engine, middle or at the back, several options for leaking.

Post #721479 18th Jul 2025 12:06am
View user's profile Send private message View poster's gallery Reply with quote
Healeyv8


Member Since: 25 Dec 2023
Location: Research Victoria
Posts: 5

Australia 2010 Range Rover SE TDV8 Causeway Grey

Thanks for your reply, really hard to determine, I have been able to smell the coolant leak for awhile, no stains on the driveway yet, had a mate pressure test it, small leak seems to be at the firewall side of the oil filter. I am after the better after market parts, the OMParts are way over the top here in Australia. I guess I will have to start pulling stuff off and find the leak. It’s definitely not coming from the thermostat housing. Using about one liter a week. The om rubber gasket for the oil cooler , oil filter is around $180 ASD. Thanks again regards Lance.

Post #721485 18th Jul 2025 7:52am
View user's profile Send private message View poster's gallery Reply with quote
Steveg


Member Since: 06 Apr 2024
Location: Norfolk
Posts: 71

United Kingdom 2011 Range Rover Autobiography TDV8 Orkney Grey

Yes people have just changed the gaskets and that works fine. I think that because it’s not much more here to get a whole unit from an ok brand like Nissens, they take that option instead.

If it’s just leaking at the rear, and there’s no oil in the coolant expansion tank, it’s likely to be just the two o rings at the rear. You’ll be able to source vitron replacements of these locally.

cheers, Steve

Post #721487 18th Jul 2025 9:25am
View user's profile Send private message View poster's gallery Reply with quote
Healeyv8


Member Since: 25 Dec 2023
Location: Research Victoria
Posts: 5

Australia 2010 Range Rover SE TDV8 Causeway Grey

Thanks for that, I will try and find if someone in Australia sells that brand, all the best Lance.

Post #721489 18th Jul 2025 9:50am
View user's profile Send private message View poster's gallery Reply with quote
Red Hot one


Member Since: 09 Dec 2018
Location: Herefordshire
Posts: 238

United Kingdom 2009 Range Rover Vogue TDV8 Stornoway Grey

Not sure on the Sport but on the FF if you remove the cabin air filter housing (2 bolts) you can, whilst lying on the engine, get a better view of the oil filter/ fuel cooling block and determine whether there is coolant visible, on mine the seal of the fuel cooler went, there is no seal available for that so I left the seals and sealed it with JB Weld Ultimate Black RTV, seems to have done the job. As Steveg mentions, when you are that far into the engine you might as well change the seal, part no:LR002340, it does involve taking the EGR's off, the coolant block on the front of the engine (1 bolt is hidden onderneath it)and you will have to do an oil change, coolant everywhere. Having flexible reach hose clamp pliers will make your life a lot easier as there are a whole lot of hoases that need to come out.
Just as an aside, the bolts for the EGR pipe at the back of the engine are non magnetic, don't drop them...
When doing it make photos or video bits to make reassembly a more pleasurable experience.
Good luck.
Will

Post #721493 18th Jul 2025 10:21am
View user's profile Send private message View poster's gallery Reply with quote
Healeyv8


Member Since: 25 Dec 2023
Location: Research Victoria
Posts: 5

Australia 2010 Range Rover SE TDV8 Causeway Grey

Thanks Will great advice, do love this Ford derivative engine twin turbo 3.6 280 hp, I have chipped it , blocked the egr valves and now it’s 350 hp. I will pull the cabin filter out tomorrow, thanks again, all the best Lance.

Post #721494 18th Jul 2025 11:08am
View user's profile Send private message View poster's gallery Reply with quote
Red Hot one


Member Since: 09 Dec 2018
Location: Herefordshire
Posts: 238

United Kingdom 2009 Range Rover Vogue TDV8 Stornoway Grey

Hi Lance,

I came across these prvious posts that will get you all the way to the oil filler/fuel cooler/ crank breather block.

All the way to removing the EGR valves
https://www.fullfatrr.com/forum/topic32601.html

Loosen/remove the thermostat housing, there is one bolt that you need to get to in order to remove the block, this link has info on that, I was lucky, nothing broke on the thermostat housing but I did manage to break the block at the back of the coolant system, split on the seam.
https://www.fullfatrr.com/forum/topic36312.html

I have tons of bits of video but this is a more concise writeup.

Will

Post #721674 21st Jul 2025 5:57pm
View user's profile Send private message View poster's gallery Reply with quote
Healeyv8


Member Since: 25 Dec 2023
Location: Research Victoria
Posts: 5

Australia 2010 Range Rover SE TDV8 Causeway Grey

Thanks Will, that’s a great link, I have been searching for a manual ( obviously for free) 😀 , this link was what I have been looking for. I remember way back in my old two door, it had a cracked, used cemieweld for about six years to stop the leak. I am not game to put it in this engine. Thanks again Will.

Post #721751 23rd Jul 2025 1:33am
View user's profile Send private message View poster's gallery Reply with quote
mpwdhc


Member Since: 22 Oct 2025
Location: Adelaide
Posts: 4

Australia 

Hi from Australia. A question about the oil cooler - does coolant pass through it into the engine, or just from one top outlet to the other top outlets? Have a TDV8 with oil in the coolant. Cooler was replaced some months ago. The engine is too happy to really consider HG failure. I’m trying to decide whether to do the whole assembly or just the cooler itself.

Post #726614 22nd Oct 2025 10:44am
View user's profile Send private message View poster's gallery Reply with quote
Red Hot one


Member Since: 09 Dec 2018
Location: Herefordshire
Posts: 238

United Kingdom 2009 Range Rover Vogue TDV8 Stornoway Grey

Morning,

there is one inlet on the cooler, the outlet is via the engine block

Post #726655 22nd Oct 2025 7:53pm
View user's profile Send private message View poster's gallery Reply with quote
mpwdhc


Member Since: 22 Oct 2025
Location: Adelaide
Posts: 4

Australia 

Ok, thank you. I presumed based on pics the coolant just passed in and out through the outlets on top, and only oil flow through the lower outlets.

So perhaps a good plan is new housing to block gaskets, and a new cooler. I was hoping to just have to do the cooler, if no coolant passed through the housing to block

Post #726670 22nd Oct 2025 11:06pm
View user's profile Send private message View poster's gallery Reply with quote
Red Hot one


Member Since: 09 Dec 2018
Location: Herefordshire
Posts: 238

United Kingdom 2009 Range Rover Vogue TDV8 Stornoway Grey

I also replaced the "O" rings on the oil filter housing and breather, can't remember the sizes but I used Viton or some other high quality "O" rings and it all sealed beautifully.
As was mentioned earlier in the tread, it is a messy job and you will have to do an oil change afterwards but if it stops the leak it is worth the effort.

Post #726688 23rd Oct 2025 8:52am
View user's profile Send private message View poster's gallery Reply with quote
mpwdhc


Member Since: 22 Oct 2025
Location: Adelaide
Posts: 4

Australia 

Thank you, so are the two small fittings on the top of the cooler oil pipes to turbo or similar?

How many hours did it take you?

Post #726703 23rd Oct 2025 10:46am
View user's profile Send private message View poster's gallery Reply with quote
Red Hot one


Member Since: 09 Dec 2018
Location: Herefordshire
Posts: 238

United Kingdom 2009 Range Rover Vogue TDV8 Stornoway Grey

The 2 fittings on top are fuel lines, one to the back of the engine, the other one to the fuel filter area.
Having never done anything like this before it took me 8 or so hours to dismantle everything and remove the whole assembly. The most useful tools I found were an 8mm ratchet spanner for the heat shields, easier than trying sockets and a flexible hose clamp removal tool, I did use a hot air gun to heat up any hoses as they some were pretty tight. the vacuum hoses are fragile, there is one connected to the air intake assembly that broke on me, managed to clean out the broken end with a drill bit held in my hand and very gently scrape the offending bit of plastic out.
You have to remove the air filter box and the cabin filter box, 2 bolts and loosen the aircon bracket nut.
There are a couple of hard to reach nuts on the injector heat shields and getting the shields out is a bit of a faff.
Be methodical in removing electrical connectors, there are loads of them but they all have a counter part on either side, a small screwdriver helps in opening the release clips on the connectors. the EGR connectors on top of the air intake are a bit counter intuitive, the back bit comes out, the front bit is clipped to the air intake.
For the injector electrical clips I used some long nosed pliers, I found it impossible to depress the clip and pull at the same time, the come in pairs and one of the pair is numbered i.e. 2,4 6, 8 I think but you get the idea, putting them back in the wrong order won't help your case.. Don't pull on the wires!
You will spend a lot of time on top of the engine, I stood on 4 pallets to get enough height to be able to reach behind the engine, you will have to disconnect the R/H turbo feed pipe and bracket and there is an electrical connector quite far down the L/H side of the engine that will have to be loosened and a trim removal tool is needed to release the bracket that holds is. there is a similar connector on the R/H side of the engine that will help you determine what sort of release clip it uses.
I used little boxes for every stage of the disassembly, labelled with where they came from and the number of nuts or bolts, I made a ton of bits of video where things go, up /under, left/right whatever but it did mean I have nothing left over and it all worked first time, the positioning of the fuel lines and vacuum lines are certainly worth noting down, quite easy to get them wrong.
I did manage to damage the cooling system assembly on the back of the engine, it split on the seam, I assume me disturbing it caused it to fail so I had to do the job twice, second time was a lot quicker and easier...
The job is technically no too difficult, you don't need that many tools, it is time consuming and you have to take your time but the satisfaction of getting it all back together and working is priceless.
I assume you know about the coolant drain on the radiator L/H side, a plastic screw affair that you can put some garden hose on and the fuel priming connector on the fuel line near the air box will make life a tiny bit less messy.

Good luck and if you need any detailed info on a particular bit let me know, as I said in an earlier post the 2 guides I mentioned from Edfors (EGR replacement) and Hammer (Thermostate housing replacement) are very detailed and tell you everything you need to know to get that far, all you then have to do is remove the rear coolant block and you can remove the whole assembly.

btw. all the L/H and R/H mentions are taken sitting in the drivers seat instead of standing in front of the engine.

Post #726736 23rd Oct 2025 5:14pm
View user's profile Send private message View poster's gallery Reply with quote
Post Reply  Back to top
Page 1 of 2 12>
All times are GMT

Jump to  
Previous Topic | Next Topic >
Posting Rules
You cannot post new topics in this forum
You cannot reply to topics in this forum
You cannot edit your posts in this forum
You cannot delete your posts in this forum
You cannot vote in polls in this forum


Site Copyright © 2006-2025 Futuranet Ltd & Martin Lewis
fullfatrr.com RSS Feed - All Forums


Switch to Mobile site