Advertise on fullfatrr.com »

Home > Technical (L322) > TDV8 Alternatorh how to change/replacement pics
Post Reply  Down to end
Page 7 of 7 <1234567
Print this entire topic · 
ur20v


Member Since: 19 Feb 2019
Location: None
Posts: 634

A Trap 

Just my luck, rain is forecast, we have had sunny days in the mid 20’s from all of Jan and now March, but now I have to get wait for the parts to arrive and get under the car, it forecasts rain for the next 7 days 🤔

Luckily we have garage wto work in, it’s a luxury in Spain.

Post #547521 18th Mar 2020 12:35pm
View user's profile Send private message View poster's gallery Reply with quote
ur20v


Member Since: 19 Feb 2019
Location: None
Posts: 634

A Trap 

Alternator, belt coolant and header tank all arrived ok but found 2 of the idler pulleys are noisy and have play when tested with no belt, no noise evident before... car only has 80k miles on it so surprised they have failed so early. Going to replace all 3 idlers and the tension.... IR have stepped up to help get them to me ASAP as the car is now off the road.

I would suggest to anyone thinking of doing their alternator to either bank a few days down time if you end up requiring them or just bight the bullet and order them all before you start.

I have swapped out the alternator, it’s tight but you can work out what needs to come off etc easily enough, need about 5 hours if you aren’t waiting for parts 👍

Post #548240 25th Mar 2020 2:28pm
View user's profile Send private message View poster's gallery Reply with quote
ur20v


Member Since: 19 Feb 2019
Location: None
Posts: 634

A Trap 

Just to be helpful:

Torque Specifications. (First number - Nm second number lb-ft)

65 mm cooling fan belt idler pulley bolt 48 35
80 mm cooling fan belt idler pulley bolt 80 59
Cooling fan belt tensioner bolts 25 18
Accessory drive belt tensioner bolts 25 18

Post #548247 25th Mar 2020 2:58pm
View user's profile Send private message View poster's gallery Reply with quote
ur20v


Member Since: 19 Feb 2019
Location: None
Posts: 634

A Trap 

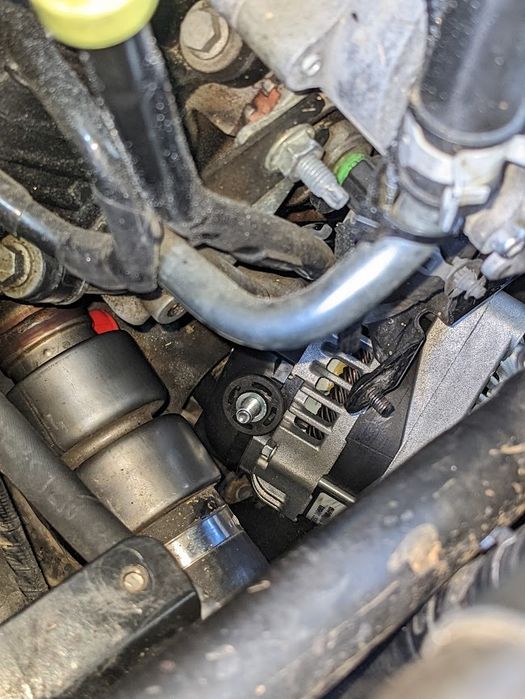
Just received and fitted new pulleys

Battery at rest 12.6v after reconnecting
Start up voltage at idle 13.5v
After 30 seconds idling 14v
After blipping to 3000rpm 15v
Now at tick over 14.5
Off ticker 15v

All measured on my iID tool, dash confirms the same numbers

Happy to have the car back up and running

Post #548995 31st Mar 2020 8:06pm
View user's profile Send private message View poster's gallery Reply with quote
ur20v


Member Since: 19 Feb 2019
Location: None
Posts: 634

A Trap 

First road test showed battery voltages as follows:

Before starting 12.5v
First start at idle 13v then claimed to 13.5v still at idle
Reved up to 2000rpm - voltage at 14v
Within the first mile the voltage climbed to 14.5v at around 1500rpm cruising.
Switched on most loads - heated steering wheel, heated front screen, heated rear screen, heated seats fan on full, radio on, AC on, lights on - voltage 14.5v constant.
20 miles later (most of the loads switched off) voltage dropped back to 13.7v

Also noted that at full throttle when the voltages was in its stead 14.5v it would drop back to 13.7v at full throttle then go straight back to 14.5v when off full throttle.

May help some with checking their charging system and the algorithms around charging.

Another interesting ‘symptom’ is my tyre pressure warning light stayed off, this has always come on regularly even when the tyre pressures are spot on also all the spurious fault codes have stayed clear, these would always come back after a run.

Looks like the alternator has been on it’s way out the hole time we have owned the car, with maximum charging volts observed at 13.7v only obtained over 2500rpm before and under load dropping to 12.5v, but with the AGM battery and the fact we tend to do regular and long journeys of over 40 miles means we avoided a flat battery for over a year.

Hope it helps check your systems

Post #549073 1st Apr 2020 1:11pm
View user's profile Send private message View poster's gallery Reply with quote
kgeddes


Member Since: 11 Jan 2015
Location: UK
Posts: 289

United Kingdom 2013 Range Rover Autobiography SDV8 Causeway Grey

Just found this very useful thread!

I’ve followed Craig’s advice and my alternator test results are as follows:

Alternator at idle (after 2 minutes) = 14.6V
Alternator under load (everything on) = 12.4V
Alternator with everything off = 14.6V

Can I concluded that my alternator needs replaced?

Thank you...

Post #583575 13th Feb 2021 3:45pm
View user's profile Send private message View poster's gallery Reply with quote
Bluegreygreen Rangie 2


Member Since: 27 Feb 2020
Location: Australia
Posts: 74

Australia 

Sure sounds like it, What was the battery voltage prior to starting? Your using a multimeter on the terminals?


Dave 2010 3.6TDV8 Autobiography
Bas remap, Egr deleted (blanked & via remap) , Cold air intake, Turbo back exhaust, Provent 200 catch can, Banks idash gauge, 275/55/R20

GAP Diagnostics

Past - 02 & 03 TD6 And an 1984 Classic

Post #583595 13th Feb 2021 6:52pm
View user's profile Send private message View poster's gallery Reply with quote
kgeddes


Member Since: 11 Jan 2015
Location: UK
Posts: 289

United Kingdom 2013 Range Rover Autobiography SDV8 Causeway Grey

Hi Dave, battery was 12.3V. I’m using a Sealey AK500 to check (plugs into cig lighter socket).....

Post #583603 13th Feb 2021 8:06pm
View user's profile Send private message View poster's gallery Reply with quote
Thunderbird2


Member Since: 06 May 2021
Location: Sydney NSW
Posts: 7

Australia 2007 Range Rover Vogue TDV8 Buckingham Blue

Hi all

Reviving this thread to thank T24RES and others for their guidance and to share what I learned changing the alternator on my 2007 3.6 TDV8.


I also found this video on YouTube which was also very helpful:

https://www.youtube.com/watch?v=W3PrsSKvFtM

Like others, I had experienced a gradual worsening of whining/belt noise linked to engine speed over about 2-3 months before the dreaded charging failure light came on. In its terminal stages, it was intrusive below <2500 RPM and drowned out thereafter.

What I learned for next time (which I hope will be a looooong way off!):


- Tools I used for the job were a pry bar and long-handled adjustable spanner (36mm) for fan removal, a set each of long-nosed pliers and long-nosed angled pliers to remove coolant hose clips, 13mm and 10mm spanners (for the alternator terminal and hard pipe mounting nuts respectively), and a 1/2 inch socket set with about a foot of extensions and a uni joint for everything else.

- I did the job with my car at normal height as I couldn't start the engine to put it at off-road. This did not impede me in any way.

- It's possible to change the alternator without moving the hard pipes out of the way. However, it's 10/10 for difficulty and I would not recommend it. Requires a lot of grunt and patience to manoeuvre the alternator in and out, and it makes it extremely difficult to seat the positive terminal and install/tighten its nut. After a few false starts, I bit the bullet and disconnected the hard pipes and pulled the coolant reservoir. I wouldn't say it gave me great access but it did reduce the need to contort my arms, and was sufficient to solve the terminal nut issue. On which note...

- Re-seating and securing the positive terminal was the most tedious part of the whole operation. It has to be done one-handed with no visibility and poor access. The good people at Ford are clearly engineers and not mechanics: an extra 15cm on the positive lead and it would be a dream, per the photo below. You can see the red lead at its maximum reach hiding in the centre left of the photo, meaning the alternator had to be pushed back into its cavity in order to seat and secure the terminal. Getting the lead on the terminal was OK, but reattaching the nut? Geez.... I learned this weekend that I am a more patient man than I could have imagined. Dropping the nut and then trying to find it under the car or hiding on top of the subframe was not fun. In the end, it was simply lots of practice and ensuring the terminal was as vertical as I could get it to help keep the thing on. I also bought a spare pack of suitable nuts at Repco as back-up.

Click image to enlarge


- Remounting the alternator's securing bolts was a breeze

- Refilling and bleeding the coolant was very straightforward. I followed the RAVE procedure to the letter, and T24RES' advice to take it slow and steady was spot on. I topped it up several times over the course of about 15 minutes before the coolant level settled in the cold fill zone. As it fills, naturally the rate at which the coolant in the tank drops slows so much as to be barely perceptible, but it does keep dropping. So be patient, and let as much air escape as you can- it's then relatively quick and clean when you do start the engine.

It was a delight to get back behind the wheel and enjoy my now whine-free fatty. I was also pleased to see that my fuel economy and engine response had improved slightly- I suspect that the dying alternator was generating significant resistance.

Only down side is that in the course of the proceedings, I noticed my thermostat housing is cracked- oh well, looks like an excuse to spend more time in the belly of the beast!

Thanks again to all who have posted before, and hope by paying it forward this helps someone else.

Cheers

Will 2007 FFRR Vogue 3.6 TDV8 (Buckingham Blue)
1979 Jaguar XJ12 5.3 LWB (Juniper Green)

Post #640455 22nd Aug 2022 1:00am
View user's profile Send private message View poster's gallery Post Reply
Post Reply  Back to top
Page 7 of 7 <1234567
All times are GMT + 1 Hour

Jump to  
Previous Topic | Next Topic >
Posting Rules
You cannot post new topics in this forum
You cannot reply to topics in this forum
You cannot edit your posts in this forum
You cannot delete your posts in this forum
You cannot vote in polls in this forum


Site Copyright © 2006-2024 Futuranet Ltd & Martin Lewis
fullfatrr.com RSS Feed - All Forums


Switch to Mobile site