Advertise on fullfatrr.com »

Home > Maintenance & Mods (L405) > Retrofit Deployable towbar - how to
Post Reply  Down to end
Page 1 of 4 1234>
Print this entire topic · 
nicksaab


Member Since: 28 May 2013
Location: Wimbledon and West Wales
Posts: 559

2016 Range Rover Vogue SE SDV8 Corris Grey
Retrofit Deployable towbar - how to

To retrofit a deployable towbar to an L405 here is what you need

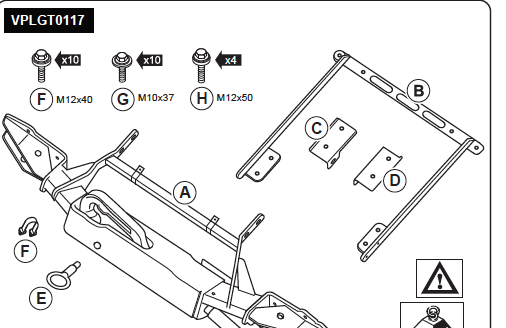
Parts List - this covers the MY13-16 although later models have just some minor tweaks to the parts list

Towbar Set - - VPLGT0117

Includes
Towbar bar (A)
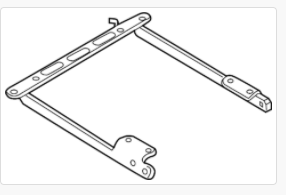
Towbar reinforcement frame (B)
Towbar reinforement L shaped brackets (C & D)
Bolts M10x37. (10) (G)
Bolts M12x40 (4) (F)
Bolts M12x50 (10) (H)


Now if you are buying off ebay make sure you get the frame (B) and the brackets (C&D)

B can be bought seperately (part number LR036694) but I haven't yet found C&D as seperate parts. They could be fabricated seperately but hold out for a second hand bar with all those bits. On the usual auction sites there plenty for sale without the reinforcement and the brackets but unless you are confident finding B,C & D I wouldn't bother. Also there are a few for sale which are listed as for the L405 but are actually L494 Sport versions. The L494 version of the actual towbar looks very similiar but has two small exhaust mounts on the front and the reinforcement frame is flared at the end - the 405 verstion is straight so it won't fit.

The frame - Part B seems to have been updated recently to remove the need for C&D but I don't know exact fit as I haven;'t seen one in the flesh so you may get lucky and not need C&D


If you want the bolts seperately then the part numbers are:-


LR034249 (M10x37) x 10
LR047359 (M12x40) x 10
LR046235 (M12x50) x 4

The rest of the parts:-

Towbar light electics (13pin) - often included on the second hand frames but if buying new you will need to buy this - VPLGT0073 - this has two connectors which connect directly to the connections behind the rear bumper which are fitted in the factory on all models

Towbar deployment module - CPLA 19H397-AF also known as VPLGT0215
Towbar deployment wiring loom - CPLA 140A01-AF also known as VPLGT0216 but includes the module


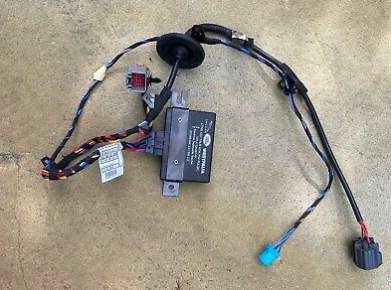
Plenty of modules on ebay but you'll need to hunt for the loom and may have to buy new. I got lucky and found a module with the loom included.
Module year MY17 and the MY18 onwards have a different module and loom

The loom has 3 connections - one to connect to the loom which the connector is behind the carpet in the spare wheel well below the tailgate. The 2nd large connector connects to the main connector on the towbar and the smaller connector connects to the buttons.

Towbar deployment buttons - CPLA 18X10 AB / VPLWT0123 - very expensive new but if you search the auction sites for the rear seat buttons you may find a complete button set - search for CPLA 14D340 AC and you might get lucky and find a set with the towbar buttons included.
MY17 onwards has a different set of buttons

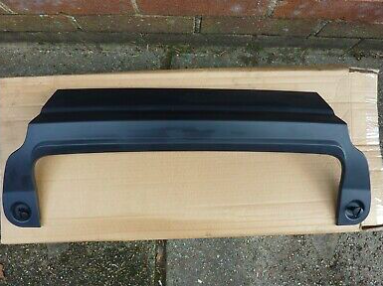
Towbar bumper trim LR056299 - you can just cut your existing one if you have a steady hand. MY18 onwards may be slightly different.


To install there are detailed guides on topix - search for instal guide VPLGT0117 but here is a quick guide.

1. Disconnect the battery and install the buttons, module and loom. You;ll need to remove the flap which covers the gap between the boot and the lower tailgate which is three bolts. The module mounts on two bolt studs on the right hand side of the wheel well behind the carpet. The loom for the bar goes through the blanked off hole below the tailgate above the electrical connector. Remove the blank grommet, push the loom through and reseal with the grommet on the loom.

2. Raise the rear of the car and secure with axle stands or equivalent

3. Remove the rear bumper. This is relatively straight forward and takes about 10 minutes. Remove the screws on the trim panels under the bumper. Then remove the small plastic mount which is visible behind the trim panel that the trim panel screws into (you won't need this afterwards as the towbar replaces this part). Then prise off the two chrome side trims on top of the bumper and remove the bolts and screws at the end, on the corner and underneath.
With the lower tailgate lowered you'll see three plastic trim clips which need prised off. Then pull the bumper free, starting from just behind the wheel- it will pop off but take care to disconnect the rear parking sensor connector. As you do this you will notice the two other connectors for the trailer light socket are already there. The bumper is very light but ideally a 2 man job to remove safely to prevent potential scratches. Topix has very detailed instructions on how to remove the bumper and there is also a Powerful video too.

4. Examine the 2 connectors for the towbar lighting socket that are clipped to the rear of the car next to the rear parking sensor connector you've just disconnected and remove the plastic inserts

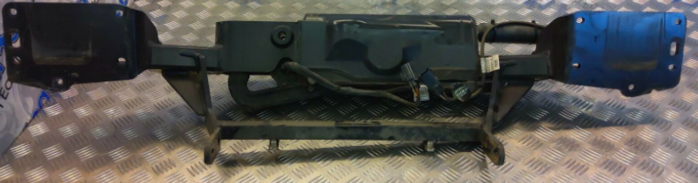
5. Undo the 10 bolts (5 each side) on the reinforced bumper bar and remove

6. Install the towbar unit in place of the reinforced bumper bar and bolt up with 10 M10x37. The landrover parts have flanged heads and washers installed on them.

7) Install parts B,C & D under the car - the bolt holes are already there and bolt into the towbar. 4 M12x50 at the rear of part B and 10 x M12x40 to connect parts B,C&D to the underbody and the towbar. Again the landrover bolts have flanged heads and washers

8 ) Connect the towbar deploy loom to the connector on the bar and then connect the 2 light socket connectors, and add the electric socket to the bar if its not already installed

9) Torque up all the bolts to the correct torque settings which are detailed in the install instructions which can be freely downloaded from google - just search VPLGT0117 instal guide

10) Reconnect the battery and test the system. You may find you need to follow the reset process which is detailed in your owners manual but I've put it here

Start the engine and run for longer than 2 seconds. Stop the engine and switch the ignition off.

Switch the ignition on, and then off.

Press and hold the on-off button for approximately 2 seconds, until the LED indicator lamp illuminates on the deploy-
stow button.

Press and hold the deploy-stow button for approximately 10 seconds, until the electrically deployable tow ball has
reached the fully deployed position. A double warning tone sounds to confirm.

Release the deploy-stow button. The electrically deployable tow ball is now reset.

11) Reinstall the rear bumper, rear parking sensor connector and the underneath panels and install your new bumper cut out.

12) If you have an IID tool you can go into the CCF and switch on the towbar electrics and module - this will programme the trailer indicator on the instrument panel to show the lights are working as well as turn on the tow hitch assistance view on the rear camera

You are done! You'll be left with the bumper reinforcement bar, the 10 bolts that held the bar, a small under bumper plastic frame and a solid bumper cover if you have replaced with the bumper cutout and a fancy electric deployable towbar!

I'll post up some more photos of the instal process on my own car in this post shortly.

Hope you find this useful Current Fleet:-
2018 Discovery 5 3.0 HSE
2021 Ford Ranger Wildtrack
2019 Ford Mustang Bullitt 5.0 V8
1993 Defender 90 200TDI Pickup

Gone - not forgotten
2016 L405 4.4 SDV8 Vogue SE
2012 L322 4.4 Westminster
2004 L322 4.4 V8 Autobiography LE
2000 P38 RR 4.0 HSE (ex Clarkson test car)

Post #569554 11th Oct 2020 9:00pm
View user's profile Send private message View poster's gallery Reply with quote
iainlovatt


Member Since: 13 Aug 2021
Location: wales
Posts: 3

United Kingdom 

brilliant write up. I am currently trying to add this to my vehicle. Do you have any additional pics as to what the loom within the car and boot looks like that all this is plugged into?

Post #603688 13th Aug 2021 9:48am
View user's profile Send private message View poster's gallery Reply with quote
stan
Site Moderator


Member Since: 13 Jul 2010
Location: a moderate moderated moderator moderating moderately in moderation
Posts: 34871

United Kingdom 

dont know how i missed this Nick..put into our wiki.. ... - .- -.


click link for ,

FORUM WIKI

HOW TO Ǝꓕ∀ꓕOꓤ PICS

workshop manual downloads are in our wiki

.

Post #603691 13th Aug 2021 10:11am
View user's profile Send private message View poster's gallery Reply with quote
nbunney


Member Since: 10 Aug 2008
Location: Lancashire
Posts: 2028

United Kingdom 

Ian have you sourced one ?

Post #603739 13th Aug 2021 11:15pm
View user's profile Send private message View poster's gallery Reply with quote
nicksaab


Member Since: 28 May 2013
Location: Wimbledon and West Wales
Posts: 559

2016 Range Rover Vogue SE SDV8 Corris Grey

Hi Ian
Sorry - my L405 has gone and its not been replaced yet so don't have one to take the photos of!

However there are 2 looms - one for the trailer lights and one for the deployable towbar. The loom for the trailer lights has two grey electrical connectors and they connect to the vehicle wiring loom through the connectors already in place behind the rear bumper. The connectors on the vehicle have some blanking plugs in them - took me ages to work out as I thought I had the wrong loom.

The deploy module is quite easy too. Once the module is in place - mounted on the two studs to the right of the spare wheel well behind a flap in the carpet. There are three connectors on it - a small blue one, a dark grey one and and light grey one. The light grey one goes through the hole in the bulk head with the grommet and connects directly to the loom on the actual towbar unit. The small blue one runs up behind the d pillar and into the buttons to lower the towbar on the inside of the tailgate apertature and the light grey one connects to the vehicle loom - from memory that sbould be found clipped to the inside of the wheel well just below where the grommet is. You can see that all in the picture in the first post of the module and loom. Current Fleet:-
2018 Discovery 5 3.0 HSE
2021 Ford Ranger Wildtrack
2019 Ford Mustang Bullitt 5.0 V8
1993 Defender 90 200TDI Pickup

Gone - not forgotten
2016 L405 4.4 SDV8 Vogue SE
2012 L322 4.4 Westminster
2004 L322 4.4 V8 Autobiography LE
2000 P38 RR 4.0 HSE (ex Clarkson test car)


Last edited by nicksaab on 15th Aug 2021 9:36am. Edited 1 time in total

Post #603786 14th Aug 2021 3:40pm
View user's profile Send private message View poster's gallery Reply with quote
nbunney


Member Since: 10 Aug 2008
Location: Lancashire
Posts: 2028

United Kingdom 

When my Indie removes my deployable tow bar, to replace it with the 2" receiver version, I will ask him to take some pictures.
I am just waiting on delivery of my replacement boot switch and KVM module and we will be good to go and get it changed out.

Post #603815 15th Aug 2021 7:26am
View user's profile Send private message View poster's gallery Reply with quote
iainlovatt


Member Since: 13 Aug 2021
Location: wales
Posts: 3

United Kingdom 

Thank you guys.

Just trying to purchase all the bits I need. So any input is great. Currenytly I have the loom, module, switch and Electric deployable tow bar.

@ nicksaab
Was there a difference in the Bolts that you used for the new tow bar and the bolts that were used for the reinforecement bar?

Post #604353 21st Aug 2021 12:38pm
View user's profile Send private message View poster's gallery Reply with quote
nicksaab


Member Since: 28 May 2013
Location: Wimbledon and West Wales
Posts: 559

2016 Range Rover Vogue SE SDV8 Corris Grey

Ian - no the bolts which came off the reinforcing bar looked identical to the ones to put the towbar back on. I didn't want to take any chances though so for the sake of £20 worth of new bolts I put new ones on when I put the towbar on. Current Fleet:-
2018 Discovery 5 3.0 HSE
2021 Ford Ranger Wildtrack
2019 Ford Mustang Bullitt 5.0 V8
1993 Defender 90 200TDI Pickup

Gone - not forgotten
2016 L405 4.4 SDV8 Vogue SE
2012 L322 4.4 Westminster
2004 L322 4.4 V8 Autobiography LE
2000 P38 RR 4.0 HSE (ex Clarkson test car)

Post #604380 21st Aug 2021 4:19pm
View user's profile Send private message View poster's gallery Reply with quote
iainlovatt


Member Since: 13 Aug 2021
Location: wales
Posts: 3

United Kingdom 

@nicksaab

Thanks for your input, I have now got mine installed and running. Booked in with the garage for the additional functionality on main screen, but working as a treat, so thank you... I do have a confession though, the towbar is installed on a L494, Rolling Eyes

Post #606019 9th Sep 2021 10:27am
View user's profile Send private message View poster's gallery Reply with quote
zenman63


Member Since: 14 Nov 2021
Location: Warwickshire
Posts: 125

England 2016 Range Rover Autobiography SDV8 Indus Silver

Hi guys
Just picked up the frame for mine.
Is this the revised part?

Post #621458 26th Jan 2022 2:37pm
View user's profile Send private message View poster's gallery Reply with quote
zenman63


Member Since: 14 Nov 2021
Location: Warwickshire
Posts: 125

England 2016 Range Rover Autobiography SDV8 Indus Silver

Pictures should be here.

Post #621459 26th Jan 2022 2:39pm
View user's profile Send private message View poster's gallery Reply with quote
ciprian


Member Since: 23 May 2021
Location: Essex
Posts: 3

United Kingdom 2017 Range Rover Autobiography SDV8 Santorini Black

Hello guys.
I just want to share with you some things I didn’t found listed anywhere while I fitted my deployable tow bar.I got a MY17 and indeed the module and the wiring loom are different.If your vehicle has deployable side steps you don’t need a new module as VPLGT0204 module does both functions.After you install the tow bar,wiring loom and switch don’t panic if the tow bar doesn’t work it needs to be programmed and after it will work.
Hope this will help someone as I had a proper nightmare to figure it out

Post #635308 23rd Jun 2022 8:24pm
View user's profile Send private message View poster's gallery Reply with quote
Ryanmt


Member Since: 14 May 2015
Location: Warrington
Posts: 65

United Kingdom 2017 Range Rover Autobiography SDV6 Santorini Black

Does anyone know what the part numbers are for the 2017 bits?

Looking for the loom part number if anybody knows them. Thanks!

Post #656700 15th Feb 2023 9:03am
View user's profile Send private message View poster's gallery Reply with quote
zenman63


Member Since: 14 Nov 2021
Location: Warwickshire
Posts: 125

England 2016 Range Rover Autobiography SDV8 Indus Silver

Just go to the dealership as it’s slightly different, the switch is different for a start.

Post #656773 15th Feb 2023 4:54pm
View user's profile Send private message View poster's gallery Reply with quote
Ryanmt


Member Since: 14 May 2015
Location: Warrington
Posts: 65

United Kingdom 2017 Range Rover Autobiography SDV6 Santorini Black

Fair enough, I was bidding (but sadly didn't win) a kit that was complete with the button and loom so thats why I was keen to answer the question.

I know the MY18 has a different switch + loom as the switch is split off from the seat folding buttons. The MY17 has the same switch arrangement as the 2013-2016MY though. As far as I can gather the MY17 requires a different module but so far the loom looks the same - I guess I will find out soon though hopefully!

Post #656842 16th Feb 2023 12:28pm
View user's profile Send private message View poster's gallery Reply with quote
Post Reply  Back to top
Page 1 of 4 1234>
All times are GMT

Jump to  
Previous Topic | Next Topic >
Posting Rules
You cannot post new topics in this forum
You cannot reply to topics in this forum
You cannot edit your posts in this forum
You cannot delete your posts in this forum
You cannot vote in polls in this forum


Site Copyright © 2006-2024 Futuranet Ltd & Martin Lewis
fullfatrr.com RSS Feed - All Forums


Switch to Mobile site